You are using an out of date browser. It may not display this or other websites correctly.
You should upgrade or use an alternative browser.
You should upgrade or use an alternative browser.


Those are the best looking sakura trees I've ever seen including real life covered in money & honey and I'm totally not biased at all in any way nope not me ha ha treeeees.
Also did you bulk those up with extra foliage? They look thicker, so I guess doing that works out pretty well after all. Wasn't sure if I should make extra "generic" foliage pieces for them or not.
Also did you bulk those up with extra foliage? They look thicker, so I guess doing that works out pretty well after all. Wasn't sure if I should make extra "generic" foliage pieces for them or not.
Also did you bulk those up with extra foliage? They look thicker, so I guess doing that works out pretty well after all. Wasn't sure if I should make extra "generic" foliage pieces for them or not.
I did yes, some of them have 2 or even 3 foliage pieces. I was using them as LoS blockers in some situations so I wanted them to be bulky and lush!
Skittelz
L6: Sharp Member
- Mar 17, 2016
- 399
- 281
It's not that bad. It's just 3. Some people get 7. It's not that bad.Omg, why are you giving me so many negatives?
Freyja updated Shigai with a new update entry:
Alpha 3
Read the rest of this update entry...
Alpha 3
- New final point and leadup
- Reworked a lot of the map
- 5 years revival
Read the rest of this update entry...

some nitpicks, mostly not about the layout

Using flat color textures can lead to some depth perception issues. I recommend at least using grids for the floor, if not the walls as well.

I think A and B could stand to be a little more visually distinct. Maybe A could be a park without any streets running through it? I'd also consider making the wall in front of the point transparent somehow (a wood trellis?) so that the point hologram is more easily visible from all angles. Lastly, the size of the capzone is relatively intuitive but could still use highlighting.

You can get up here, not sure if that's intended.

I assume these would be passenger rail instead of industrial use, in which case I would also assume the trains should be more than one car long, which would have an impact on gameplay.

You can get stuck in this hole.

Symmetry here is slightly off. I would also recommend considering a spawn with a "main" exit rather than two equally important exits, as this makes teleporter placement more reliable.

I like the design of the point itself, but I think the areas leading up to it need some work, as currently it is a very long commit for blue to get to the point. If I had to suggest a change, I would do something like this:

Rotate the entire point 45 degrees and move it so that the stair on the left is in the position of the stair on the right. I think this would make for a much more fun chokepoint to push, and would also eliminate some of that 45 degree geometry that I know you hate. I also think the distance from B to C might be too long.
Using flat color textures can lead to some depth perception issues. I recommend at least using grids for the floor, if not the walls as well.
I think A and B could stand to be a little more visually distinct. Maybe A could be a park without any streets running through it? I'd also consider making the wall in front of the point transparent somehow (a wood trellis?) so that the point hologram is more easily visible from all angles. Lastly, the size of the capzone is relatively intuitive but could still use highlighting.
You can get up here, not sure if that's intended.
I assume these would be passenger rail instead of industrial use, in which case I would also assume the trains should be more than one car long, which would have an impact on gameplay.
You can get stuck in this hole.
Symmetry here is slightly off. I would also recommend considering a spawn with a "main" exit rather than two equally important exits, as this makes teleporter placement more reliable.
I like the design of the point itself, but I think the areas leading up to it need some work, as currently it is a very long commit for blue to get to the point. If I had to suggest a change, I would do something like this:
Rotate the entire point 45 degrees and move it so that the stair on the left is in the position of the stair on the right. I think this would make for a much more fun chokepoint to push, and would also eliminate some of that 45 degree geometry that I know you hate. I also think the distance from B to C might be too long.
Freyja updated Shigai with a new update entry:
Alpha 4
Read the rest of this update entry...
Alpha 4
- Adjusted final point position (no more 45 degree angles!
- Adjusted blue attack routes to final point
- Added a new balcony for blue to attack final point
- Adjusted health pickup locations
- Trains are now straight (they had to be for the multi-cars...)
- Adjusted B-C right connector to be more natural to flow into as blue
- Reduced some sightlines
- Made first point more gardeny rather than a street
- Made A point barrier transparent
Read the rest of this update entry...
Freyja updated Shigai with a new update entry:
Alpha 5
Read the rest of this update entry...
Alpha 5
- Added a red forward spawn to defend B
- Blocked a side route for blue before A is capped
- Removed a superfluous route between B and C
- Tweaked pickup locations
Read the rest of this update entry...
Freyja updated Shigai with a new update entry:
Alpha 6
Read the rest of this update entry...
Alpha 6
- Small update
- Made the bridge over B solid to improve defensibility
- Added some more railings
- Delay between trains is now a bit longer
- Moved some pickups around
- Moved some geometry around to increase breathing room
- Closed off the window balcony for blue at final (as an experiment)
Read the rest of this update entry...
- Sep 10, 2016
- 630
- 480
Today, I felt like analysing this map.
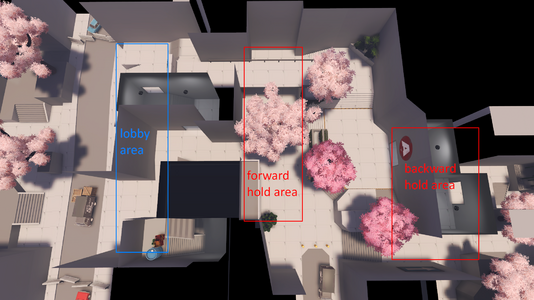
A6 walk times:
Here are where I would place the lobby, forward hold and backward hold on each point:


Using these benchmarks, we can analyse the events of a demo:
a6 demo1 (US) analysis:
1st round:
2nd round:
3rd round:
4th round
The events of this demo reveal a number of issues, some of which arise through walk time and some through rotate time:
Each of the three points has a really wide lobby area with routes to the next point's forward hold area which are really far apart for RED, but less far apart for BLU.
It's exactly the way a lobby area should be, discouraging RED from pushing into it, and it gives me hope that all my ramblings about rotate times and forward holds won't be alien to you.
Right, now for the solutions:
So, honestly, C looks like a lot of fun, and if A and B can be polished up to that same level of fun (which for A is not that far away!), and then this map can receive a great artpass which feels like Tokyo without feeling too alien to TF2, then this will be one of my all-time favourite TF2 maps, no question.
A6 walk times:
| BLU to A forward hold from 1st spawn: | 12 s |
| BLU to A backward hold from 1st spawn: | 17 s |
| RED to A backward hold from 1st spawn: | 6 s |
| RED to A forward hold from 1st spawn: | 10 s |
| BLU to B forward hold from A backward hold: | 4 s (this should be equal to or greater than RED's walk time to the B forward hold) |
| BLU to B forward hold from 1st spawn: | 20 s |
| BLU to B backward hold from 1st spawn: | 25 s |
| RED to B backward hold from 2nd spawn: | 6 s |
| RED to B forward hold from 2nd spawn: | 12 s (this is a lot longer than 4 seconds!) |
| BLU to C forward hold from B backward hold: | 10 s |
| BLU to C forward hold from 2nd spawn: | 17 s |
| BLU to C backward hold from 2nd spawn: | 21 s |
| RED to C backward hold from 3rd spawn: | 2 s |
| RED to C forward hold from 3rd spawn: | 7 s |
Here are where I would place the lobby, forward hold and backward hold on each point:
Using these benchmarks, we can analyse the events of a demo:
a6 demo1 (US) analysis:
1st round:
- A: Captured by BLU; it seems like RED was given a fair enough chance at a forward and backward hold, although the backward hold wasn't very strong to the point of near non-existence
- B: Captured by BLU; RED and BLU met at the backward hold; however the point did not roll because RED won that fight, pushed forward and assumed a forward hold; BLU's upper route onto the train tracks seems very annoying for RED to deal with since it goes directly from BLU's lobby to the backward hold
- C: Captured by BLU; sort of rolled even though RED was given a fair chance at a forward hold, which is most likely cause the number of RED players who reached the forward hold was very small - an instant respawn after B is capped could help alleviate this
2nd round:
- A: Captured by BLU; fair chance at a forward and backward hold, no massive complaints but the backward hold fell quickly at the end and didn't really feel exciting; more on this later
- B: Captured by BLU; rolled for much the same reason as C in the first round
- C: Defended by RED; RED enjoyed a brief hold over BLU's lobby, but the well-chosen width of the lobby eventually dismantled that, but RED was still left with a forward hold afterwards; generally it looked pretty tense and fun
3rd round:
- A: Defended by RED; fair chance for a forward and backward hold, no outstanding complaints
- B: Never attacked
- C: Never attacked
4th round
- A: Captured by BLU; fair chance for a forward and backward hold, no outstanding complaints
- B: Captured by BLU; same as the 1st round
- C: Captured by BLU; same as the 1st round although RED put up a slightly better fight
The events of this demo reveal a number of issues, some of which arise through walk time and some through rotate time:
- RED's rotate time for the A backward hold is very disadvantageous for them, which can sometimes lead to the point being stomped disappointingly by BLU
- A and B are too close together, which can sometimes invalidate the B forward hold and lead to the point unfairly rolling as a result (RED and BLU end up first meeting at the backward hold, and if RED loses that initial fight it's an unfair roll)
- There's a route on B that goes directly from the lobby to the backward hold, which can invalidate the forward hold (this admittedly wasn't a persistent issue during the demo)
- BLU's walk times to B and C are a little intense compared to RED's, which can make the points feel too difficult in cases where the point doesn't roll (I think this is mostly a non-issue for C)
Each of the three points has a really wide lobby area with routes to the next point's forward hold area which are really far apart for RED, but less far apart for BLU.
It's exactly the way a lobby area should be, discouraging RED from pushing into it, and it gives me hope that all my ramblings about rotate times and forward holds won't be alien to you.
Right, now for the solutions:
- Use game_forcerespawn to instantly respawn all dead RED players when A and B are captured, to reduce the chance of B and C rolling
- Add a new arena between A and B equivalent to roughly 8 seconds of walk time, or 2400 hammer units
- Give BLU a forward spawn to attack B so that this new arena doesn't balloon their walk time to ridiculous levels
- Rework this particular route to be less covered from the forward-holding RED players:
- Redesign the A backward hold with the goal of faster rotate times for RED and longer ones for BLU (this example layout still has pretty unfavourable rotate times, so a more overarching refactor of the hold would be better):
- Make it quicker for RED to access health in the A backward hold
- All of RED's routes to B lead them into this one huge underpass sightline, which is harmful to class balance and the strength of the backward hold:
So, honestly, C looks like a lot of fun, and if A and B can be polished up to that same level of fun (which for A is not that far away!), and then this map can receive a great artpass which feels like Tokyo without feeling too alien to TF2, then this will be one of my all-time favourite TF2 maps, no question.
Attachments
Last edited:
- Nov 25, 2013
- 156
- 361
Before the black screen took me, I wanted to write a general feedback for this version:
In the past few years I've played like 2 hours of TF2. This map was really cool and the height variation was refreshing, it was like a challenge climbing up a mountain and then feeling your momentum carry you down the other side. I think you could use a bit of highlighting to make 'the main path' a bit more obvious, but I really love the ability to curve around either side of that big block (that I imagine to be a planter) to get to A. Oh also I think the train tracks could use some ramp-clipping. Really liking the map overall.
In the past few years I've played like 2 hours of TF2. This map was really cool and the height variation was refreshing, it was like a challenge climbing up a mountain and then feeling your momentum carry you down the other side. I think you could use a bit of highlighting to make 'the main path' a bit more obvious, but I really love the ability to curve around either side of that big block (that I imagine to be a planter) to get to A. Oh also I think the train tracks could use some ramp-clipping. Really liking the map overall.
Freyja updated Shigai with a new update entry:
Alpha 7
Read the rest of this update entry...
Alpha 7
Alpha 7
- Reworked B-C connector
- Reworked blue spawn
- Added a more defensive sentry area at A
Read the rest of this update entry...
Freyja updated Shigai with a new update entry:
Alpha 8
Read the rest of this update entry...
Alpha 8
Alpha 8
- Reworked A-B connector
- Tweaked pickups
Read the rest of this update entry...
Freyja updated Shigai with a new update entry:
Alpha 9
Read the rest of this update entry...
Alpha 9
Alpha 9
- Hopefully improved defense of 2nd point for red
- Removed the route through red forward spawn for BLU to choke them more on B
- After capturing A, dead red players now respawn
- Repositioned an ammo pickup at A so engineers aren't discouraged from building on it
- Lowered time BLU gains on capping A and B by 60s each
Read the rest of this update entry...
Freyja updated Shigai with a new update entry:
Alpha 12
Read the rest of this update entry...
Alpha 12
Alpha 12 - site revival edition
- Widened tracks
- Increased first CP cap time by 1 seconds
- Added new ammo pickup at final
- Blocked some sightlines
Read the rest of this update entry...
Freyja updated Shigai with a new update entry:
Alpha 13
Read the rest of this update entry...
Alpha 13
- Reworked A point
Read the rest of this update entry...