- Sep 10, 2016
- 524
- 395
So, you want to make a Payload map.
And if you're anything like me when I was making my first maps, you also want to follow the classic "RED and BLU get one set of spawns to attack/defend A and B, then when B is captured they get new spawns to attack/defend C and D" formula.
I find this formula particularly interesting, because each point has subtly different properties and pitfalls for mappers, which this guide will bring to light.
(saying this is kind of clickbait, though, since I'm about to recommend you give BLU a forward spawn to attack B - whoops, spoiler!)
Well, that was fun. Time to wait another 8 months before writing the next guide!
And if you're anything like me when I was making my first maps, you also want to follow the classic "RED and BLU get one set of spawns to attack/defend A and B, then when B is captured they get new spawns to attack/defend C and D" formula.
I find this formula particularly interesting, because each point has subtly different properties and pitfalls for mappers, which this guide will bring to light.
(saying this is kind of clickbait, though, since I'm about to recommend you give BLU a forward spawn to attack B - whoops, spoiler!)
===Forward and Backward Holds===
Each control point should have a "forward hold" and a "backward hold" - this is what they look like on Dustbowl 2-B.

If RED loses the forward hold, they'll be able to regroup at the backward hold and still have a chance to keep the point.
But, if they lose a fight at the backward hold, they'll lose the point.
We want to ensure that after BLU captures a control point and tries to move forward to the next one, they'll meet the freshly-respawned RED team at the forward hold. This'll mean that even if RED loses this initial fight (which they often do), they still have the backward hold to fall back on.
If this isn't properly observed (e.g BLU and RED first meet at the backward hold instead of the forward one), there can be trouble, because RED losing the initial fight means they immediately lose the point.
It also means that RED players who didn't respawn fast enough to participate in this fight didn't even get a chance to defend the point, which is not fun.
===Rotate and Retreat Times===
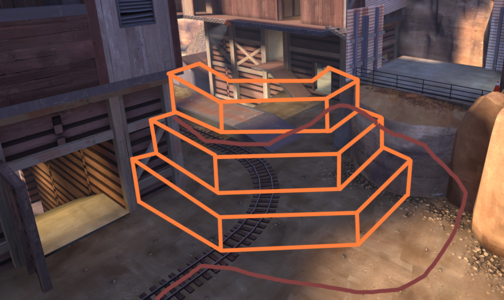
Here's a diagram:
The numbers represent the entrances to routes, and the orange lines between them represent the route. So, if you see a RED 2, a BLU 2 and an orange line between them, that represents "Route 2" and where each team enters it.
A blue line between BLU 1 and BLU 2 represents the path BLU uses to walk between the entrances to Route 1 and Route 2, or "rotate" between the routes. Written next to it in purple is the amount of time this path takes.
I also haven't bothered to illustrate the door route, because it complicates things needlessly and doesn't actually bring much change to the attack on 2-B.

Now, with all that out of the way, we can actually analyse the diagram:
You'll notice that when BLU's attacking the backward hold, RED has a shorter rotate time (2 s) than BLU (4 s) between the two routes. The longer RED's rotate time is, the easier it becomes for BLU to swarm out of all of the routes at once and overwhelm them. This is one of the two fundamental factors that affect how difficult a hold is to attack. (The other one is how long it takes RED to retreat to a health pack from their hold positions)
You usually want to make RED spend at least a little time rotating between the entrances to the routes.
This point (Dustbowl 2-B) is a good example of this, because the match often stalls for a long time at the forward hold. I've said that RED has 2 second and 3 second rotate times between the routes at the forward hold, but in actuality they can watch all the routes by standing at [2] and not even moving, so it's more like they have 0 second rotate times. Couple that with BLU having pretty long rotate times, and you have a recipe for a successful defense.
Let's look deeper into BLU's rotate times. You may notice that BLU's rotate time when attacking the backward hold is longer than RED's, and if you've played this point you might also remember that they have almost no access to health. This is important, because it makes it easy for RED to push BLU back, so RED can move into the forward hold area and re-assume their forward hold.
You may also notice that the area BLU uses to attack the forward hold has been given the name "BLU lobby area".
Typically, you want to give BLU short rotate times and easy access to health within the lobby area, because we don't want to let RED push into, and hold, the lobby area.
Why? Well, if RED could hold the lobby area, BLU would have to attack three areas in a row in order to capture the point. And that's just too hard.
Finally, a word of warning:
Make sure to avoid creating routes from BLU's lobby straight to RED's backward hold!!! If you do that, BLU will just use that route to skip RED's forward hold and force RED to retreat back to their backward hold. It totally destroys the forward hold/backward hold dynamic and leaves RED vulnerable to losing the point to an uber push at any time, through no fault of their own.
And, with all that out of the way, we can finally move on to analysing how the A, B, C and D points of the average single-stage payload map work.
Each control point should have a "forward hold" and a "backward hold" - this is what they look like on Dustbowl 2-B.
If RED loses the forward hold, they'll be able to regroup at the backward hold and still have a chance to keep the point.
But, if they lose a fight at the backward hold, they'll lose the point.
We want to ensure that after BLU captures a control point and tries to move forward to the next one, they'll meet the freshly-respawned RED team at the forward hold. This'll mean that even if RED loses this initial fight (which they often do), they still have the backward hold to fall back on.
If this isn't properly observed (e.g BLU and RED first meet at the backward hold instead of the forward one), there can be trouble, because RED losing the initial fight means they immediately lose the point.
It also means that RED players who didn't respawn fast enough to participate in this fight didn't even get a chance to defend the point, which is not fun.
===Rotate and Retreat Times===
Here's a diagram:
The numbers represent the entrances to routes, and the orange lines between them represent the route. So, if you see a RED 2, a BLU 2 and an orange line between them, that represents "Route 2" and where each team enters it.
A blue line between BLU 1 and BLU 2 represents the path BLU uses to walk between the entrances to Route 1 and Route 2, or "rotate" between the routes. Written next to it in purple is the amount of time this path takes.
I also haven't bothered to illustrate the door route, because it complicates things needlessly and doesn't actually bring much change to the attack on 2-B.
Now, with all that out of the way, we can actually analyse the diagram:
You'll notice that when BLU's attacking the backward hold, RED has a shorter rotate time (2 s) than BLU (4 s) between the two routes. The longer RED's rotate time is, the easier it becomes for BLU to swarm out of all of the routes at once and overwhelm them. This is one of the two fundamental factors that affect how difficult a hold is to attack. (The other one is how long it takes RED to retreat to a health pack from their hold positions)
You usually want to make RED spend at least a little time rotating between the entrances to the routes.
This point (Dustbowl 2-B) is a good example of this, because the match often stalls for a long time at the forward hold. I've said that RED has 2 second and 3 second rotate times between the routes at the forward hold, but in actuality they can watch all the routes by standing at [2] and not even moving, so it's more like they have 0 second rotate times. Couple that with BLU having pretty long rotate times, and you have a recipe for a successful defense.
Let's look deeper into BLU's rotate times. You may notice that BLU's rotate time when attacking the backward hold is longer than RED's, and if you've played this point you might also remember that they have almost no access to health. This is important, because it makes it easy for RED to push BLU back, so RED can move into the forward hold area and re-assume their forward hold.
You may also notice that the area BLU uses to attack the forward hold has been given the name "BLU lobby area".
Typically, you want to give BLU short rotate times and easy access to health within the lobby area, because we don't want to let RED push into, and hold, the lobby area.
Why? Well, if RED could hold the lobby area, BLU would have to attack three areas in a row in order to capture the point. And that's just too hard.
Finally, a word of warning:
Make sure to avoid creating routes from BLU's lobby straight to RED's backward hold!!! If you do that, BLU will just use that route to skip RED's forward hold and force RED to retreat back to their backward hold. It totally destroys the forward hold/backward hold dynamic and leaves RED vulnerable to losing the point to an uber push at any time, through no fault of their own.
And, with all that out of the way, we can finally move on to analysing how the A, B, C and D points of the average single-stage payload map work.
A points are the easiest to make. It's guaranteed that RED will have a forward hold, because they literally get a "setup time" period to let them set up that hold.
We also want to make the point easy to capture, but that's not hard to do, since RED will spend a very long amount of time walking to the point from their spawn, because they spawn at B.
This means it'll be hard for them to get a backward hold after they lose their forward one (but still possible if their teammates are amazing enough to stall long enough for them to respawn and walk back to A!), unless they have an engineer who was kind enough to build a teleporter.
Which in turn means that capturing the point is almost free for BLU once they destroy that teleporter.
Beyond that, all you really need to do is make RED spend a long-ish time rotating between spots that watch BLU's entrances into the forward and backward hold. There are an infinite number of ways to do this, so get creative.
This is where a lot of Payload maps fall apart.
As we discussed earlier, RED players need to be able to reach the B forward hold at the same time BLU players do, after A is captured.
Otherwise, RED only gets their backward hold, and if they lose that, B might as well have not existed. Which is bad for you, because you spent hours building it in Hammer.
There are actually very few payload maps where RED can somewhat consistently get a forward hold over B.
But Upward is one of those few, so we'll look at it.

If BLU uses the tunnel, or the other cliff route, they can get there in 5 seconds instead of 7.
This is our chance to observe a couple of things:
So, to ensure that RED can get their B forward hold as often as possible, I highly recommend you make each team's walk time to the forward hold area perfectly equal in your own maps, and use a force respawn after A is capped.
Here are some stats I captured (by measuring HU distances with brushes and then dividing by 300 to find the number of seconds it would take a 100% speed class to walk) for pl_boatload_a1:
I've colour-coded the relevant stats, which is walk time to the next point's forward hold after the previous one is capped. B is green, C is orange and D is red. You'll notice that they're equal or RED-favoured in every case. (You don't want to make them too RED-favoured, because that means RED might start holding BLU's lobby which they're not supposed to, which could be very bad for us.)

Well, there haven't been many playtests of Boatload yet, but so far it seems to be consistently possible for RED to get a forward hold on all three of these points after the previous one is captured. Oh, and I also use force respawns.
And, as Boatload continues to be playtested, you'll have a chance to observe this guide's philosophies in action. Lucky you!
Another thing Upward B does is move BLU's spawnpoints forward slightly after they cap A:

This small, subtle change is actually very important - When attacking A, BLU uses their spawn as their lobby so RED can have a forward hold, but if that was maintained for the attack on B, it would become all too possible for RED to just push forward and start forward-holding A again, even after they lost it.
Moving the spawns forward ensures that BLU uses the A backward hold area as their lobby to attack the B forward hold, so they don't have to push through three areas in a row to attack B.
So, it's almost always a good idea to give BLU a forward spawn, even if it's only a short distance forward, to attack B.
Oh, also, when Upward's A is capped, the respawn times also shift to favour BLU more, which helps them maintain control over their new lobby. You don't have to imitate this, but it could be good to keep in mind.
As we discussed earlier, RED players need to be able to reach the B forward hold at the same time BLU players do, after A is captured.
Otherwise, RED only gets their backward hold, and if they lose that, B might as well have not existed. Which is bad for you, because you spent hours building it in Hammer.
There are actually very few payload maps where RED can somewhat consistently get a forward hold over B.
But Upward is one of those few, so we'll look at it.
If BLU uses the tunnel, or the other cliff route, they can get there in 5 seconds instead of 7.
This is our chance to observe a couple of things:
- This point doesn't use a force-respawn, and RED's respawn time is 10 seconds compared to BLU's 2 - so, we can expect whichever RED players survived the attack on A to stall BLU (possibly for a long time) until their teammates can respawn and arrive
- BLU's walk time to the forward hold is actually a little faster than RED's, but their need to commit a few players to pushing the cart usually keeps the balance intact.
So, to ensure that RED can get their B forward hold as often as possible, I highly recommend you make each team's walk time to the forward hold area perfectly equal in your own maps, and use a force respawn after A is capped.
Here are some stats I captured (by measuring HU distances with brushes and then dividing by 300 to find the number of seconds it would take a 100% speed class to walk) for pl_boatload_a1:
I've colour-coded the relevant stats, which is walk time to the next point's forward hold after the previous one is capped. B is green, C is orange and D is red. You'll notice that they're equal or RED-favoured in every case. (You don't want to make them too RED-favoured, because that means RED might start holding BLU's lobby which they're not supposed to, which could be very bad for us.)
Well, there haven't been many playtests of Boatload yet, but so far it seems to be consistently possible for RED to get a forward hold on all three of these points after the previous one is captured. Oh, and I also use force respawns.
And, as Boatload continues to be playtested, you'll have a chance to observe this guide's philosophies in action. Lucky you!
Another thing Upward B does is move BLU's spawnpoints forward slightly after they cap A:
This small, subtle change is actually very important - When attacking A, BLU uses their spawn as their lobby so RED can have a forward hold, but if that was maintained for the attack on B, it would become all too possible for RED to just push forward and start forward-holding A again, even after they lost it.
Moving the spawns forward ensures that BLU uses the A backward hold area as their lobby to attack the B forward hold, so they don't have to push through three areas in a row to attack B.
So, it's almost always a good idea to give BLU a forward spawn, even if it's only a short distance forward, to attack B.
Oh, also, when Upward's A is capped, the respawn times also shift to favour BLU more, which helps them maintain control over their new lobby. You don't have to imitate this, but it could be good to keep in mind.
This is the hardest point for Payload maps to get right.
The only map in the game which has a C point where RED can consistently get a forward hold after B is capped is Frontier.
Or maybe Pier is one of them too. But I don't know much about Pier, so I'll talk about Frontier C instead, because its design has a lot going on to make it work.
Let's get stuck into it.

For starters, BLU's walk time to the C forward hold from B is almost equal to RED's walk time to it from their new spawn.
Additionally, capping B sets the respawn wave time of both teams to 4 seconds, so RED really doesn't have to do much stalling at B for the C forward hold to be practical, giving the point the upper hand compared to Upward B.
And it works. I don't think I've ever seen this point roll without a fair chance for RED to assume a forward hold.
But there's more going on here.
There's a long, long distance between B and C, so that BLU spends 8 seconds walking to C. But that would mean if BLU kept the same spawn they used to attack B, they would have a ridiculous walk time to C, and basically no chance of attacking it without a teleporter. This happens on pl_cashworks, unfortunately.
So we need to give BLU a forward spawn to attack C; it's basically mandatory unless you have a short distance between B and C, which you could only make work if you spawned RED basically right on top of C.
Also, the unusually short RED respawn time helps RED assume a backward hold after they lose their forward hold, even though the forward and backward hold areas are right next to each other.
Why are they right next to each other? Because RED also needs to have a fair chance to hold D after C is capped. Sadly, this is where Frontier falls apart.
The distance between C and D just isn't large enough. Even though BLU has to push past RED's spawn to cap D (and for good reason - there needed to be as much space between C and D as it was practical to fit in!), RED still has to spend time respawning after C is capped, and in that time BLU can easily push the cart to RED's backward hold.
The problem here is that we can't just move D back, because then BLU would have to push ridiculously far past RED's spawn. And we can't move RED's spawn back, because if we do, RED spends too long walking to C and they can't reliably get a forward hold over it.
Now, you might think "Oh, that's easy! Just extend the distance between C and D, keep RED's spawn close to C, then when C is capped, move RED's spawn back to D!"
If you actually thought that, major props to you. But even that has a few issues.
If we move RED to a new, further-back spawn, we need to move BLU's new spawn they're given when C is capped further forward. If we move BLU's forward spawn too far forward, then any RED players who are still alive when C is capped have a chance to wipe out the remaining BLU players and start camping their new spawn.
And, if we have to move it even further forward than that, then BLU will be spawning behind the living RED players, and the cart will be trapped behind BLU's spawn. And chances are neither team actually knows this is happening. This, embarassingly, happened in pl_boatload_a1b.
This isn't an unsolvable problem, of course. You could put the activation of BLU's forward spawn on a time delay, or only activate it once the cart passes a certain point on the track. But it is a good example of how difficult it is to make multiple points work in tandem with each other, and the respawn room wrangling you have to do to get it working.
The only map in the game which has a C point where RED can consistently get a forward hold after B is capped is Frontier.
Or maybe Pier is one of them too. But I don't know much about Pier, so I'll talk about Frontier C instead, because its design has a lot going on to make it work.
Let's get stuck into it.
For starters, BLU's walk time to the C forward hold from B is almost equal to RED's walk time to it from their new spawn.
Additionally, capping B sets the respawn wave time of both teams to 4 seconds, so RED really doesn't have to do much stalling at B for the C forward hold to be practical, giving the point the upper hand compared to Upward B.
And it works. I don't think I've ever seen this point roll without a fair chance for RED to assume a forward hold.
But there's more going on here.
There's a long, long distance between B and C, so that BLU spends 8 seconds walking to C. But that would mean if BLU kept the same spawn they used to attack B, they would have a ridiculous walk time to C, and basically no chance of attacking it without a teleporter. This happens on pl_cashworks, unfortunately.
So we need to give BLU a forward spawn to attack C; it's basically mandatory unless you have a short distance between B and C, which you could only make work if you spawned RED basically right on top of C.
Also, the unusually short RED respawn time helps RED assume a backward hold after they lose their forward hold, even though the forward and backward hold areas are right next to each other.
Why are they right next to each other? Because RED also needs to have a fair chance to hold D after C is capped. Sadly, this is where Frontier falls apart.
The distance between C and D just isn't large enough. Even though BLU has to push past RED's spawn to cap D (and for good reason - there needed to be as much space between C and D as it was practical to fit in!), RED still has to spend time respawning after C is capped, and in that time BLU can easily push the cart to RED's backward hold.
The problem here is that we can't just move D back, because then BLU would have to push ridiculously far past RED's spawn. And we can't move RED's spawn back, because if we do, RED spends too long walking to C and they can't reliably get a forward hold over it.
Now, you might think "Oh, that's easy! Just extend the distance between C and D, keep RED's spawn close to C, then when C is capped, move RED's spawn back to D!"
If you actually thought that, major props to you. But even that has a few issues.
If we move RED to a new, further-back spawn, we need to move BLU's new spawn they're given when C is capped further forward. If we move BLU's forward spawn too far forward, then any RED players who are still alive when C is capped have a chance to wipe out the remaining BLU players and start camping their new spawn.
And, if we have to move it even further forward than that, then BLU will be spawning behind the living RED players, and the cart will be trapped behind BLU's spawn. And chances are neither team actually knows this is happening. This, embarassingly, happened in pl_boatload_a1b.
This isn't an unsolvable problem, of course. You could put the activation of BLU's forward spawn on a time delay, or only activate it once the cart passes a certain point on the track. But it is a good example of how difficult it is to make multiple points work in tandem with each other, and the respawn room wrangling you have to do to get it working.
Making D not roll is relatively simple. Most SSPL maps spawn RED a very short distance away from D, and have a decently long distance between C and D - this being the reason why C rolls because RED can't reach its forward hold in time.
This is why the shortcut on Frontier C is so clever:

This way, RED can reach C quickly, but there was still a lot of potential for D to not roll - all it would have taken would have been for the shortcut to have been placed between C's backward hold and D's forward hold, so BLU would have to jump multiple times to reach D after C is capped, slowing them down.
You could even just get rid of BLU's opportunity to jump up the shortcut and turn it into a hole in the wall RED can drop down from, but BLU can't go up without explosive jumping. That way, both BLU and their payload would have to go around the wall to reach D, so you could slow them down while letting RED get to C's forward hold in a timely manner.
So now that you know how to make D not roll, we can get into the exciting stuff.
D points are legendary. They're the hardest point of the map, RED's last-ditch defense. They feel frantic for both teams, and because they're so hard, they usually go into a super-tense overtime.
There are a few criteria that D points need to follow to make this happen:

And it works flawlessly in-game.
RED rarely pushes out of the building, and they can sometimes hold the low ground within the building, but even if they do, they're still vulnerable to the same BLU pushes they would have been if they were holding further back on the high ground.
The sentry spots are so overpowered that they can often even survive a BLU uber through the cart path, so BLU is encouraged to use their flanks to try to outrange, sap or corner-peek the sentries to death.
BLU's rotate times are very, very long, so RED can often hold until overtime, whereupon all living BLU players push onto the cart, and often manage to survive long enough for their teammates to arrive and throw themselves at the cart, and this continues until a winner is declared.
As long as you can make your D point feel similar to this and not roll, you'll have a fun D point. I think.
This is why the shortcut on Frontier C is so clever:
This way, RED can reach C quickly, but there was still a lot of potential for D to not roll - all it would have taken would have been for the shortcut to have been placed between C's backward hold and D's forward hold, so BLU would have to jump multiple times to reach D after C is capped, slowing them down.
You could even just get rid of BLU's opportunity to jump up the shortcut and turn it into a hole in the wall RED can drop down from, but BLU can't go up without explosive jumping. That way, both BLU and their payload would have to go around the wall to reach D, so you could slow them down while letting RED get to C's forward hold in a timely manner.
So now that you know how to make D not roll, we can get into the exciting stuff.
D points are legendary. They're the hardest point of the map, RED's last-ditch defense. They feel frantic for both teams, and because they're so hard, they usually go into a super-tense overtime.
There are a few criteria that D points need to follow to make this happen:
- The cart path between the forward hold and backward hold needs to be short
- You also need to give RED really strong defensive positions that turn the cart path into a really nasty choke
- From there, you need to give BLU's flanks good ways of busting these super-strong defensive positions
- It needs to be difficult for RED to assume a forward hold after beating BLU back from their backward hold
- This ensures that overtimes are actually tense and don't consist of "Oh, BLU took the forward hold, time for them to slowly push the cart to RED's backward hold then get destroyed and lose the round"
- This ensures that BLU can't just win by mindlessly throwing heavies at the cart like they've probably been doing up until this point
- This gives BLU a chance to actually win the round before overtime by busting RED's defensive positions then pushing the cart now that the cart path isn't such a huge choke
- Remember when I talked about anticlimatic overtimes in 1. ? Well, this prevents those anticlimactic overtimes from happening. Although it's important for RED to get to the D forward hold right after C is capped, this forward hold should ideally die quickly so BLU can get into the meat of the D point, which is trying to push the impossible main choke while optimistically poking RED with the flanks.
And it works flawlessly in-game.
RED rarely pushes out of the building, and they can sometimes hold the low ground within the building, but even if they do, they're still vulnerable to the same BLU pushes they would have been if they were holding further back on the high ground.
The sentry spots are so overpowered that they can often even survive a BLU uber through the cart path, so BLU is encouraged to use their flanks to try to outrange, sap or corner-peek the sentries to death.
BLU's rotate times are very, very long, so RED can often hold until overtime, whereupon all living BLU players push onto the cart, and often manage to survive long enough for their teammates to arrive and throw themselves at the cart, and this continues until a winner is declared.
As long as you can make your D point feel similar to this and not roll, you'll have a fun D point. I think.
So, now that we've looked so, so deeply into Payload, what's the easiest way to make a fun Payload map?
Well, if you ask me, it's actually multi-stage!
But that's strange... all the multi-stage payload maps in TF2 suck!
Well, the thing is that they don't have to. They don't actually suck because they're multi-stage, they suck because:
You just put the A point an actual reasonable distance away from BLU spawn, then put the B point a reasonable distance away from A, then give BLU a forward spawn to attack B.
Some people have a misconception that you can't have forward spawns due to engine limitations, but cp_bruhstbowl is multi-stage and has functioning forward spawns, so...

You can also very easily vary the difficulty between your stages.
Yes, you can do it with rotate/retreat times, but you can also do a sneaky little trick:
Remember how I said A points are easy to capture because RED's walk time to them from spawn is long, so they basically lose the point as soon as they lose their teleporter? Well, on the second stage, you can give RED a forward spawn to defend A, so this isn't true anymore.
Doing that makes 2-A feel like the C point of a single-stage map, but it has setup time. So, you don't have to do anything special between B and C to make C not roll. You can also just not bother making a third stage - this will confuse people, but you really don't need more than two. With two stages, you get four points - the same amount you'd get in a single-stage map. There's a good reason single-stage Payload maps with 6 points haven't taken off.
So, 2-stage is actually, if you ask me, the easiest way to make a good Payload map.
Well, if you ask me, it's actually multi-stage!
But that's strange... all the multi-stage payload maps in TF2 suck!
Well, the thing is that they don't have to. They don't actually suck because they're multi-stage, they suck because:
- They imitate Dustbowl, but they don't give RED insanely strong defensive positions to compensate for putting the A point really close to BLU spawn like Dustbowl does, so the A point of each stage just ends up rolling
- They don't properly consider rotate times, making it so that some points force BLU to spend a ridiculously long time rotating between routes while RED spends barely any (looking at you, Goldrush 1-B and Enclosure 2-B!)
You just put the A point an actual reasonable distance away from BLU spawn, then put the B point a reasonable distance away from A, then give BLU a forward spawn to attack B.
Some people have a misconception that you can't have forward spawns due to engine limitations, but cp_bruhstbowl is multi-stage and has functioning forward spawns, so...
You can also very easily vary the difficulty between your stages.
Yes, you can do it with rotate/retreat times, but you can also do a sneaky little trick:
Remember how I said A points are easy to capture because RED's walk time to them from spawn is long, so they basically lose the point as soon as they lose their teleporter? Well, on the second stage, you can give RED a forward spawn to defend A, so this isn't true anymore.
Doing that makes 2-A feel like the C point of a single-stage map, but it has setup time. So, you don't have to do anything special between B and C to make C not roll. You can also just not bother making a third stage - this will confuse people, but you really don't need more than two. With two stages, you get four points - the same amount you'd get in a single-stage map. There's a good reason single-stage Payload maps with 6 points haven't taken off.
So, 2-stage is actually, if you ask me, the easiest way to make a good Payload map.
Well, that was fun. Time to wait another 8 months before writing the next guide!
Attachments
Last edited:
")