- Aug 29, 2023
- 8
- 1
Hello, good people!
I am somewhat new to the whole mapping scene, so I apologize in advance if this is something that could be easily figured out, but after doing some research and testing myself, I thought perhaps people with more experience would know.
I've been messing around with the Japan Content Pack to create some things, and a bunch of strange lighting related things have come up in regards to the roof props. I'm not too upset if there isn't an easy fix right away, but I'm quite interested in getting a basic understanding of what is even happening. I've even brought screenshots. Bear with me though, I might get the terminology wrong.
Exhibit A.
When I build using the roof props, sometimes they seem to become a little discolored.

It's likely a little hard to see, but the corner piece has the original blueish gray tint, while the props in the middle are slightly darker and tinted greenish. Why is that?
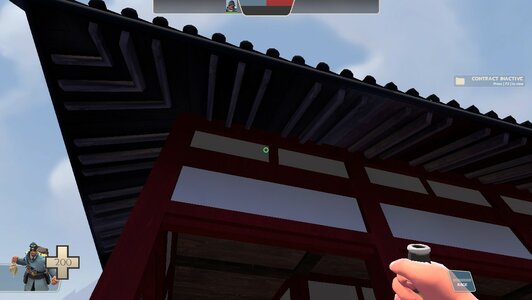
Exhibit B.
The undersides of the roof pieces seem to have some kind of lighting issue.

At least to me, this doesn't look like just natural shadow, but rather an issue with the lighting of the prop. I'm also confused as to why this isn't a "regular" problem. I understand that the corner pieces were built with an angle, while the middle pieces have to be rotated first, which might affect lighting, but sometimes there's this bug and sometimes there isn't.
I've taken a screenshot from Sulfur, where the props seem much more normally shaded. I assumed maybe this is a clipping problem, but then why are there no lighting bugs here?

Exhibit C.
Something that came up, which confuses me, is this.

I used a brush to close the gap between the two roof ornaments, something which I've seen done on Sulfur and Suijin, yet while it looks fine on those maps, here it causes... this.
Once again, I assume it is clipping, but I don't understand why it only happens here and not with Sulfur/Suijin. Also, why are some of the props only discolored and others entirely blacked out?
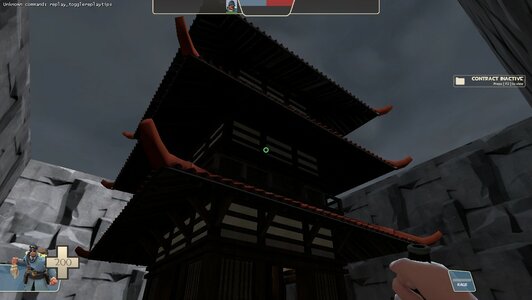
Exhibit D.
Finally, some more shadow related shenanigans.

I think my assumption is not too farfetched that this is the brush in the center of the roof casting a shadow, but why is it oriented perfectly straight? The environmental light is at an angle, which should be visible in the first screenshot.
Another example from a different building:

Bottom Text.
I have no idea if I'm being too sensitive with these issues. I do understand that Hammer is an older program, and maybe I'm just using it in a way that it wasn't intended for. I'm just confused that, even though I tried to emulate the way Sulfur and Suijin were built, I still get these strange problems with the roof props.
Hope that someone can help me! If more screenshots or information are required, I'll gladly update the post.
I am somewhat new to the whole mapping scene, so I apologize in advance if this is something that could be easily figured out, but after doing some research and testing myself, I thought perhaps people with more experience would know.
I've been messing around with the Japan Content Pack to create some things, and a bunch of strange lighting related things have come up in regards to the roof props. I'm not too upset if there isn't an easy fix right away, but I'm quite interested in getting a basic understanding of what is even happening. I've even brought screenshots. Bear with me though, I might get the terminology wrong.
Exhibit A.
When I build using the roof props, sometimes they seem to become a little discolored.
It's likely a little hard to see, but the corner piece has the original blueish gray tint, while the props in the middle are slightly darker and tinted greenish. Why is that?
Exhibit B.
The undersides of the roof pieces seem to have some kind of lighting issue.
At least to me, this doesn't look like just natural shadow, but rather an issue with the lighting of the prop. I'm also confused as to why this isn't a "regular" problem. I understand that the corner pieces were built with an angle, while the middle pieces have to be rotated first, which might affect lighting, but sometimes there's this bug and sometimes there isn't.
I've taken a screenshot from Sulfur, where the props seem much more normally shaded. I assumed maybe this is a clipping problem, but then why are there no lighting bugs here?
Exhibit C.
Something that came up, which confuses me, is this.
I used a brush to close the gap between the two roof ornaments, something which I've seen done on Sulfur and Suijin, yet while it looks fine on those maps, here it causes... this.
Once again, I assume it is clipping, but I don't understand why it only happens here and not with Sulfur/Suijin. Also, why are some of the props only discolored and others entirely blacked out?
Exhibit D.
Finally, some more shadow related shenanigans.
I think my assumption is not too farfetched that this is the brush in the center of the roof casting a shadow, but why is it oriented perfectly straight? The environmental light is at an angle, which should be visible in the first screenshot.
Another example from a different building:
Bottom Text.
I have no idea if I'm being too sensitive with these issues. I do understand that Hammer is an older program, and maybe I'm just using it in a way that it wasn't intended for. I'm just confused that, even though I tried to emulate the way Sulfur and Suijin were built, I still get these strange problems with the roof props.
Hope that someone can help me! If more screenshots or information are required, I'll gladly update the post.