- Nov 12, 2007
- 1,128
- 746
The goal of this tutorial is to provide a basic understanding of lightmaps, how they work, and how one can minimize their load on texture memory.
You can find the map and associated assets here: Tutorial Map and Model
Lightmaps are an often forgotten part of map optimization. It's true that they are less important than other methods of optimizing performance, but a mapper who pays attention to his/her lightmaps can make a significant difference in their size, which not only has a positive impact on performance but decreases the size of the bsp.
What is a lightmap?
A lightmap is a grayscale image created for a brush face that creates the light shading on that face. Without lightmaps, everything would be fullbright. When the lightmap is overlayed on top of the brush face, it shows us how well (or poorly) lit that face is, if it has shadows cast across it, etc.
Because they are images, they take up a considerable amount of space, both as data in the bsp and in memory as you're playing the map. The first thing we want to do is find out just how much space. To do that we need to compile the map.
We don't need any fancy compile options, just use the "Normal" compile options for bsp, vis, and rad. When it completes, look in the summary table for "LDR lightdata", as shown in this image:
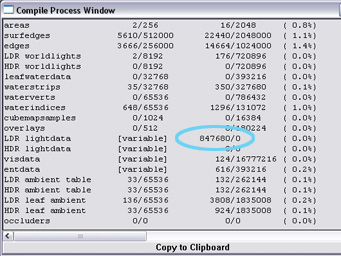
It's a tutorial map, so it's going to be a pretty small amount. As we look at actual differences, keep in mind that in a real map these differences will be multiplied greatly.
Lightmap Scale
The first thing we want to consider is lightmap scale, which is a face property that can be found here:
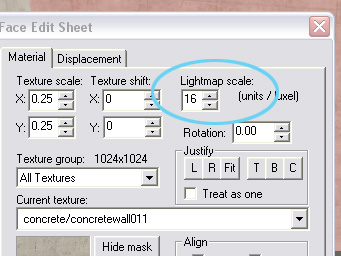
The number represents how much of a face gets condensed into a single pixel of the lightmap image. Higher scaling will result in a smaller image with less definition. Lower scaling will result in a larger image with more definition.
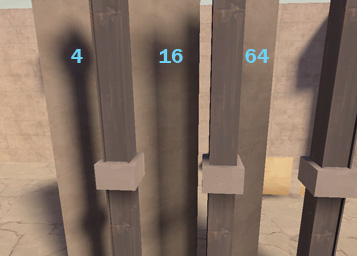
The thing to pay attention to when determining scale is how much definition is actually required for that face. If we look at the two walls that are in the shade, they both look almost identical.
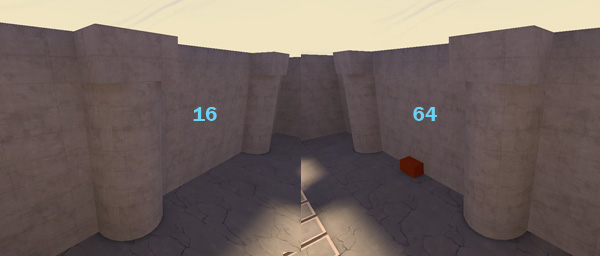
Since the lower scale of 16 does not bring much of an advantage, both walls should be using 64. Visual detail will not be lost, but lightdata will greatly decrease. Consider the following image:
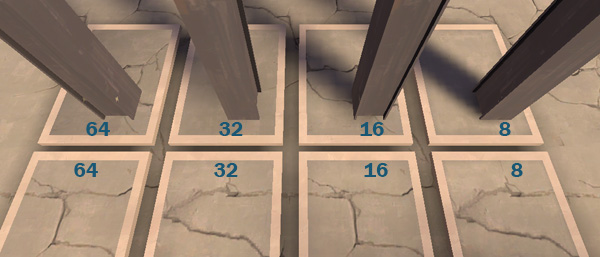
We can see that when a shadow falls across a surface, a lower lightmap is better. The top rectangles should probably all be using 16 at least, if not 8. However, the bottom rectangles are all very flat with little to no shading across them. They should all be using 64.
Eliminating Excess
Another way to decrease lightdata is to remove lightmaps from significantly large hidden areas. You can see the columns standing along each wall. These columns are func_detail, which means the face of the wall they are in front of is not cut by them. The area of the wall that is hidden is getting unneeded lightmap data generated for it. If we cut the wall and make the hidden portion of it nodraw, we can remove a considerable amount of lightdata. Look at the visgroups tool on the right side of Hammer:
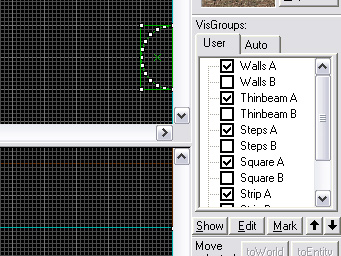
Uncheck "Wall A" to hide that group and check "Wall B" to make that group visible. Wall B in this case has the areas behind the columns cut and made nodraw. If we compile again and look at the lightdata, we will see that we have just removed 101080 from the map.
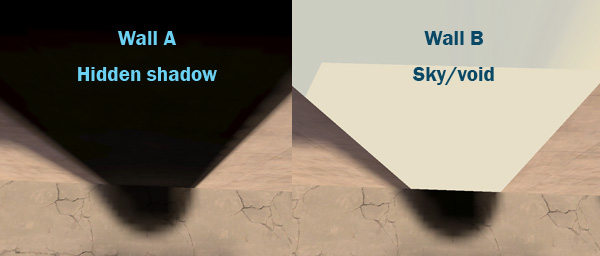
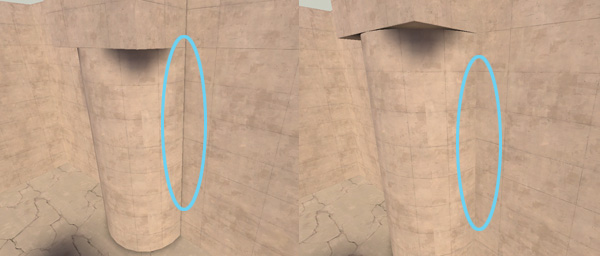
We also gain another advantage from doing this. This method also removes the shadow leak and makes the place where the column meets the wall more seamless.
Hidden Detail Faces
It is important to note that while the compiler will compute lightmap data for world geometry that is behind detail brushes, it is actually smart enough to NOT do this for other detail brushes. An easy example is steps, which you can see a set of in the middle of the map. There are two methods of creating steps: A series of rectangular brushes, each higher than the previous (visgroup Steps A), or a nodraw triangular brush covered by triangular step brushes (visgroup Steps B).
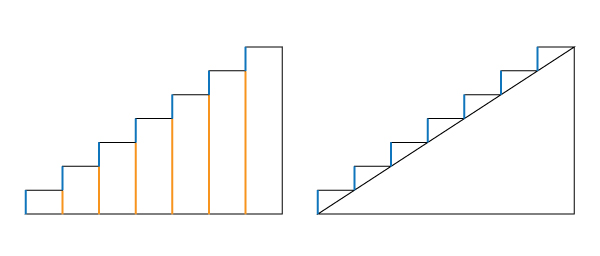
In A, each step has a lot of surface area covered by the brush in front of it (the orange lines). In B, no parts of the textured surfaces (blue lines) are hidden behind anything. Yet if we compile each one separately and compare lightdata, we will find that they are identical in size. This indicates that the covered areas are not having lightdata calculated for them.
Lightmaps are Rectangles and Pixels
Yes, we said this earlier, but we should consider the implications of this and how it relates to the shape of your face. A face can be nearly any valid polygon. A lightmap, however, will always be rectangular. Find the flat hovering square brush in the example map. This is visgroup Square A. If we switch to visgroup Square B, we'll see a triangular brush with exactly half the surface area of A. Yet if we compile them and look at the lightdata, it is again exactly the same.
Lightmaps also can't be a fraction of a pixel in dimensions. If your lightmap scale is 16 and the brush is 17 units wide, it's going to be the same size as if you brush were 32 units wide. It's important to note this in view of the section on eliminating excess. If the area you are trying to cut out is small or irregularly shaped, you may actually be increasing your lightdata rather than decreasing it.
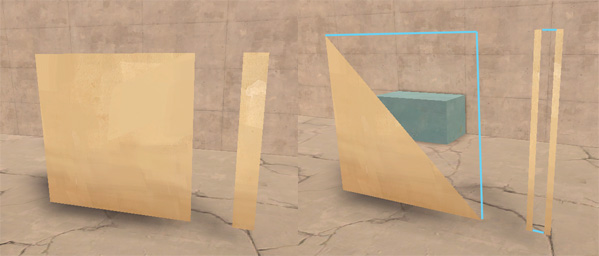
The blue lines represent the actual lightmap shape. In the case of Strip A and Strip B, it's important to note that in Strip B it does not apply the same lightmap to both strips. It creates two separate lightmaps, one for each face.
Using Props
Props are vertex lit, and so their contribution to bsp size and memory usage is the size of the model and skin. If you have brushwork that is repeated many times throughout the level, you may consider turning it into a prop. Not only is it easier to render the same mesh multiple times, but it eliminates all of the lightmap data required for those brushes.
Even if you are not a modeler, creating basic shapes is not difficult, and already existing Valve textures can be used for the model's skin (as it would be if it were still brushwork). In this example we use the I-beams scattered around the map.
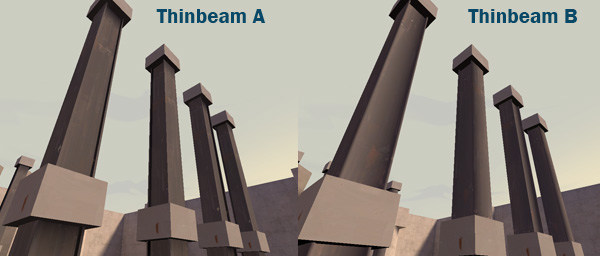
If we compile and compare, the use of the I-beam models cuts out 32192 bytes of lightdata. The model itself contributes 7709 bytes of data, but we're still at a profit of 24483 bytes removed.
You can find the map and associated assets here: Tutorial Map and Model
Lightmaps are an often forgotten part of map optimization. It's true that they are less important than other methods of optimizing performance, but a mapper who pays attention to his/her lightmaps can make a significant difference in their size, which not only has a positive impact on performance but decreases the size of the bsp.
What is a lightmap?
A lightmap is a grayscale image created for a brush face that creates the light shading on that face. Without lightmaps, everything would be fullbright. When the lightmap is overlayed on top of the brush face, it shows us how well (or poorly) lit that face is, if it has shadows cast across it, etc.
Because they are images, they take up a considerable amount of space, both as data in the bsp and in memory as you're playing the map. The first thing we want to do is find out just how much space. To do that we need to compile the map.
We don't need any fancy compile options, just use the "Normal" compile options for bsp, vis, and rad. When it completes, look in the summary table for "LDR lightdata", as shown in this image:

It's a tutorial map, so it's going to be a pretty small amount. As we look at actual differences, keep in mind that in a real map these differences will be multiplied greatly.
Lightmap Scale
The first thing we want to consider is lightmap scale, which is a face property that can be found here:

The number represents how much of a face gets condensed into a single pixel of the lightmap image. Higher scaling will result in a smaller image with less definition. Lower scaling will result in a larger image with more definition.

The thing to pay attention to when determining scale is how much definition is actually required for that face. If we look at the two walls that are in the shade, they both look almost identical.

Since the lower scale of 16 does not bring much of an advantage, both walls should be using 64. Visual detail will not be lost, but lightdata will greatly decrease. Consider the following image:

We can see that when a shadow falls across a surface, a lower lightmap is better. The top rectangles should probably all be using 16 at least, if not 8. However, the bottom rectangles are all very flat with little to no shading across them. They should all be using 64.
Eliminating Excess
Another way to decrease lightdata is to remove lightmaps from significantly large hidden areas. You can see the columns standing along each wall. These columns are func_detail, which means the face of the wall they are in front of is not cut by them. The area of the wall that is hidden is getting unneeded lightmap data generated for it. If we cut the wall and make the hidden portion of it nodraw, we can remove a considerable amount of lightdata. Look at the visgroups tool on the right side of Hammer:

Uncheck "Wall A" to hide that group and check "Wall B" to make that group visible. Wall B in this case has the areas behind the columns cut and made nodraw. If we compile again and look at the lightdata, we will see that we have just removed 101080 from the map.

We also gain another advantage from doing this. This method also removes the shadow leak and makes the place where the column meets the wall more seamless.

Hidden Detail Faces
It is important to note that while the compiler will compute lightmap data for world geometry that is behind detail brushes, it is actually smart enough to NOT do this for other detail brushes. An easy example is steps, which you can see a set of in the middle of the map. There are two methods of creating steps: A series of rectangular brushes, each higher than the previous (visgroup Steps A), or a nodraw triangular brush covered by triangular step brushes (visgroup Steps B).

In A, each step has a lot of surface area covered by the brush in front of it (the orange lines). In B, no parts of the textured surfaces (blue lines) are hidden behind anything. Yet if we compile each one separately and compare lightdata, we will find that they are identical in size. This indicates that the covered areas are not having lightdata calculated for them.
Lightmaps are Rectangles and Pixels
Yes, we said this earlier, but we should consider the implications of this and how it relates to the shape of your face. A face can be nearly any valid polygon. A lightmap, however, will always be rectangular. Find the flat hovering square brush in the example map. This is visgroup Square A. If we switch to visgroup Square B, we'll see a triangular brush with exactly half the surface area of A. Yet if we compile them and look at the lightdata, it is again exactly the same.
Lightmaps also can't be a fraction of a pixel in dimensions. If your lightmap scale is 16 and the brush is 17 units wide, it's going to be the same size as if you brush were 32 units wide. It's important to note this in view of the section on eliminating excess. If the area you are trying to cut out is small or irregularly shaped, you may actually be increasing your lightdata rather than decreasing it.

The blue lines represent the actual lightmap shape. In the case of Strip A and Strip B, it's important to note that in Strip B it does not apply the same lightmap to both strips. It creates two separate lightmaps, one for each face.
Using Props
Props are vertex lit, and so their contribution to bsp size and memory usage is the size of the model and skin. If you have brushwork that is repeated many times throughout the level, you may consider turning it into a prop. Not only is it easier to render the same mesh multiple times, but it eliminates all of the lightmap data required for those brushes.
Even if you are not a modeler, creating basic shapes is not difficult, and already existing Valve textures can be used for the model's skin (as it would be if it were still brushwork). In this example we use the I-beams scattered around the map.

If we compile and compare, the use of the I-beam models cuts out 32192 bytes of lightdata. The model itself contributes 7709 bytes of data, but we're still at a profit of 24483 bytes removed.

