- Sep 10, 2016
- 531
- 398
Attack/Defense - and, by extension, Payload - have always been my favourite gamemodes in TF2. They probably always will be. I couldn't really explain why, it's kinda like they just nail TF2's gameplay so well. You select one of a few routes to go down in order to attack the enemy team, and you meet whichever enemies happened to choose the same routes as you. Because of your ability to choose where you're gonna go - and the mixups that arise from predicting where the enemy who killed you last life is gonna go in order to avoid him - every fight is different, and whether you win it is determined by your ability. This is the major reason why maps need to have alternate routes, because otherwise every player on both teams meets in the same corridor every fight, and gameplay devolves to a boring series of """"fights"""" where the team that can output the most damage wins. Trust me - I have played more than a few maps that're like this on the playtesting servers.
So now you know that you need to make more than one route to the point. Well, great, but grazr's guide could have told you that (and done a very good job of it, too).
I'm here to tell you the other things you need to consider when making an A/D map.
A big consideration is the presence of a 'forward hold'. You almost never want RED to defend a control point by standing right on it, because this means they lose that control point if they lose a single fight to BLU, which not only makes it too easy for BLU, it makes RED feel cheated that they didn't get any second chances to defend their point. We can avoid this by building a space in front of the point, wherein RED is expected to initially meet BLU; let's look at the second point of Dustbowl's second stage as an example.
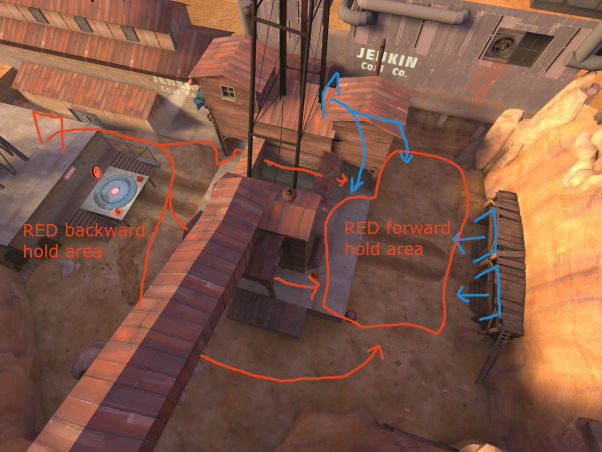
Suppose that BLU just capped the first point. They'll start moving forward to the second point, but they won't make it there; instead, they'll meet the recently respawned RED team at the forward hold area, and fight. This is great, because it means that even if RED loses this fight, they won't lose the control point, because they bought time for their Engineers to set up on the point, and they can retreat to the backward hold area which will have health and ammo, allowing them to resupply and meet up with their respawning teammates to form a defense.
Side note: there is actually one scenario where you can get away with not giving RED a forward hold - if the point takes a really, really long time to capture, BLU will need to win two fights in a row to capture it no matter what. This can make for a difficult and frantic point, but it also kinda makes for an uninteresting one, since BLU will always encounter RED in the same place. So I wouldn't recommend it.
Now, how can you make an effective forward-hold area?
There are a few important factors that go into the creation of such an area:
-BLU's routes from the previous area should only deposit them into the forward hold area and not the backward hold area.
-RED's respawn time and walk time should be short enough that they can get to the forward hold area at the same time BLU does after the previous point is capped.
-BLU's respawn time and walk time should be short enough that it's infeasible for RED to go further forward than the designated forward-hold area. (more on this later!)
-The walk time between the forward hold and backward hold should be long enough that BLU can't cap the point for free after winning a fight at the forward hold.
-The point's captime may vary, but if it's too short BLU sometimes gets to capture the point for free after breaking RED's forward hold.
-If the previous point had a long captime, BLU is forced to stay on it to capture it, which might buy RED some extra time to move forward.
Here are the relevant times for the second point of Dustbowl's second stage (let's just call it 2-B):
-BLU respawn wave time: 2 s
-RED respawn wave time: 10 s
-Walk time from BLU spawn to forward hold area: 17 s
-Walk time from RED spawn to forward hold area: 8 s
-Walk time from 2-A backward hold area to 2-B forward hold area: 5 s
-Walk time from 2-B forward hold area to 2-B backward hold area: 5 s
-Captime of 2-B: 3 s
-Captime of 2-A: 3 s (note that this point is very out of the way, so BLU has to commit some extra time just walking onto it)
(In case you're wondering, I measure my walk times as Engineer, who moves at 300 hammer units per second, which is a pretty average speed. I also try to take the fastest route possible, because it's usually the route players are gonna use and even if it isn't, you should be designing around the worst-case scenario of BLU arriving as quickly as possible.)
So you know the basics of how to make a fun control point. But how do you vary the difficulty? After all, we know the last control point needs to be more difficult than the first. The simple answer is: rotation times. Rotation time is the amount of time it takes a team who is watching one route to the point to move to another route. The longer this is, the harder it becomes for a team to control an area. Why? Well, gameplay in A/D, as I mentioned before, consists of BLU players individually choosing which route to push, while RED players individually choose which route to watch. If BLU can retreat and rotate to another route in no time at all, of course it's gonna be easier for them to push forward. And if RED can go from watching one route to another very quickly, it's gonna be harder for BLU to overwhelm them by winning the fight at multiple routes at the same time. Conversely, if it takes an eternity for RED to rotate between routes, it becomes trivially easy for BLU to push into the area RED is trying to hold.
So, based on those ideas, we can define a few guidelines for rotation times:
-RED's rotation time should be shorter than BLU's.
-You can vary difficulty by adjusting the rotation time for either team; making it longer for one team in an area will make that area easier for the other team.
Let's look at some examples, complete with walk times.
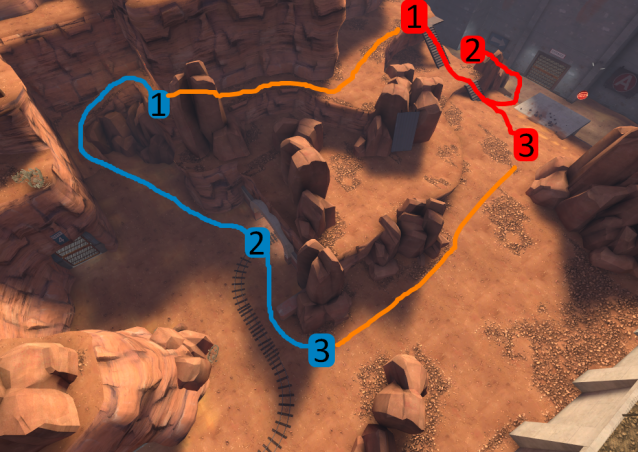
Specifically, let's look at Badwater A (a pretty average point in terms of difficulty for BLU to capture) and Dustbowl 3-B (a very difficult point for BLU, where rotate times are shifted too far in RED's favour)
Badwater A:
Here I've marked out each of the routes in orange (except route 2, which is underground). I've also given each route a team-coloured number where the respective team enters it, and marked the rotational routes between the entrances in that team's colour.
Now for the timings:
BLU 1 - BLU 2: 5 s
BLU 2 - BLU 3: 3 s
RED 1 - RED 2: 3 s
RED 2 - RED 3: 4 s
Note that 1-3 is the most important rotation time on this point, since RED can hold the point from the 1-3 connector and BLU usually prefers to use routes 1 and 3 over route 2. This holds true for a lot of Payload maps, since the cart path by design is pretty disadvantageous for BLU - if it wasn't, BLU wouldn't bother using the alternate routes, and we've already established how alternate routes are vital for fun gameplay.
BLU 1 - BLU 3: 8 s
RED 1 - RED 3: 3 s
Now for Dustbowl 3-B. Here are the entrances:
 Immediately, we can notice something worrying: RED doesn't need to rotate at all to watch all three of BLU's entrances.
Nevertheless, here are BLU's rotate times:
1 - 2: 3 s
1 - 3: 10 s
This is what makes this point so much harder than Badwater A for BLU. The ratio of BLU rotate time to RED rotate time was 8:3 on Badwater A (and BLU's rotate time could be argued to be less), but it's 10:0 on Dustbowl 3-B. This means that BLU has an extremely hard time getting into RED's backward hold area; additionally, if RED is forward holding, BLU can't even reach their entrance to route 3, and so they only have one route and gameplay becomes a miserable spamfest.
But Dustbowl 3-B could easily be made into a much better point, simply by giving BLU more routes into the forward hold area and making route 2 or 3 exit under the bridge or into the building that RED has stairs up to; this would force RED to rotate.
So here's my rule of thumb; whenever you build a control point where RED is gonna stand in one place to defend it, stop and think about how you can force them to rotate. Just don't make them spend too long rotating.
So we have a forward hold and backward hold. We have alternate routes, and both teams need to rotate to watch them. But where is BLU gonna enter the forward hold area from? We don't want RED pushing any further than the forward hold area; that would force BLU to win three fights in a row to capture the point, which is just too arduous of a trial. So, we need to establish a safe "lobby" area, where BLU can access health, ammo and all of their routes into the forward hold area.
On the first point of a map/stage, BLU's spawn will naturally act as their lobby. However, on longer maps, you might also see some 'dead space' in front of BLU spawn - this is to ensure that the first point is far from BLU spawn, so it can be close enough to RED spawn for RED to be able to form a backward hold after losing their forward hold.
A similar dead space needs to be placed between the backward hold area of one point and the forward hold area of the next. This ensures that RED can set up a forward hold on the next point, but it will also act as BLU's lobby to attack that same forward hold. So, it'll need health, ammo and fairly easy access to all of BLU's routes into the forward hold area.
In fact, the rotate time between these entrances needs to be very, very short, and the routes need to be very separated from each other - this is to ensure that RED faces a disadvantage while pushing the lobby area, so they can't reasonably push into it. The separation of the routes ensures that BLU still has a longer rotation time when pushing into the forward hold area, since they need to backtrack for a while to access health and the other entrances.
Here's the approach to the forward hold area of Dustbowl 2-B as an example:
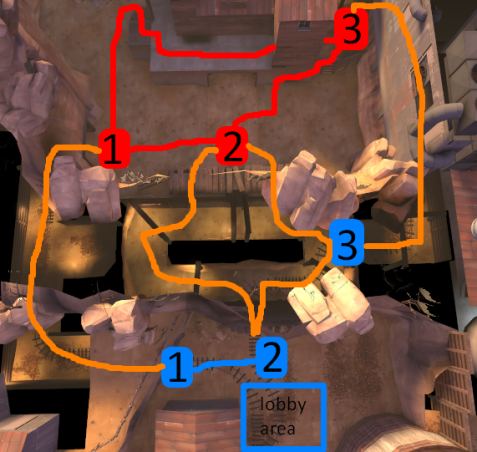
The only options RED has to access BLU's lobby area are routes 1 and 2. While in the lobby area, BLU has easy access to health and ammo thanks to the nearby building, and can watch the entrances to routes 1 and 2 so easily that it's near-impossible for RED to take over the lobby area.
However - despite facing this disadvantage - RED still has a strong forward hold, because they can fall back to their own entrances to routes 1 and 2, and from there they have short rotate times while BLU have very long rotate times. Therefore, the "forward-hold, backward-hold" gameplay loop of control point 2-B is preserved.
I'll leave off with a few, less substantial notes:
-You usually want to give BLU a forward spawn at some point - even if your map/stage only has two control points, BLU's walk time to the second point can easily get ridiculous, to the point where RED can kill BLU and then push into the lobby BLU was meant to use to attack the second point. Dustbowl doesn't have this problem, but its stages are really short and RED often loses the first point of each stage after a single lost fight as a result, which is no fun. Better to just make your map longer than Dustbowl, and give BLU a forward spawn right before their lobby into the second point.
-Another thing Dustbowl does wrong is the size of connectors between control points - the routes to 2-B's forward hold are all super cramped tunnels, so explosive classes frequently dominate this area - it can get so bad that RED has 6 demomen, and as a BLU sniper it doesn't matter what route you take, you're gonna run into at least one, and die. It's a similar story leading up to 1-B and 3-B, too. Luckily, I wrote a whole guide about avoiding this. The gist is basically to have at least one route that forces long-range combat and one that forces close-range combat.
-Health is generally best placed in the BLU lobby and in each point's backward hold area. It can also do well when placed in the forward hold area; this'll make RED's forward hold stronger, but it'll make it easier for BLU to push RED's backward hold, so it's a gentle balancing act.
-Payload requires slightly less dead space between its control points than A/D does, because the cart moves much slower than players do. This means BLU can often attack two control points in a row without needing a forward spawn. However, this lessened amount of dead space often means that BLU gets to occupy RED's forward hold area for free after capping the previous point, creating a serious risk of BLU overpowering RED's backward hold and winning the point after just one fight. There are a few methods of avoiding this (generally, they make it so that the path the cart travels is much longer than the paths the player travels, or slow down the cart which is the same thing) and I may someday write a Payload guide detailing these, amongst other things.
-For multi-stage maps, two stages is better than three. Control points, if designed well, take a pretty long time to attack, and having to attack six in a row (if your team is good enough to do it) before getting to play on defense is seriously fatiguing. Making some of your control points pushovers to get around this is just disappointing for the players, and unnecessary effort for you as a mapper. Better to just make two well-designed stages instead. Also, it's really easy to make two-stage maps logic wise. You just take the three-stage prefab, delete the third team_control_point_round and both of the team_control_point and trigger_capture_area entities associated with it.
So now you know that you need to make more than one route to the point. Well, great, but grazr's guide could have told you that (and done a very good job of it, too).
I'm here to tell you the other things you need to consider when making an A/D map.
A big consideration is the presence of a 'forward hold'. You almost never want RED to defend a control point by standing right on it, because this means they lose that control point if they lose a single fight to BLU, which not only makes it too easy for BLU, it makes RED feel cheated that they didn't get any second chances to defend their point. We can avoid this by building a space in front of the point, wherein RED is expected to initially meet BLU; let's look at the second point of Dustbowl's second stage as an example.
Suppose that BLU just capped the first point. They'll start moving forward to the second point, but they won't make it there; instead, they'll meet the recently respawned RED team at the forward hold area, and fight. This is great, because it means that even if RED loses this fight, they won't lose the control point, because they bought time for their Engineers to set up on the point, and they can retreat to the backward hold area which will have health and ammo, allowing them to resupply and meet up with their respawning teammates to form a defense.
Side note: there is actually one scenario where you can get away with not giving RED a forward hold - if the point takes a really, really long time to capture, BLU will need to win two fights in a row to capture it no matter what. This can make for a difficult and frantic point, but it also kinda makes for an uninteresting one, since BLU will always encounter RED in the same place. So I wouldn't recommend it.
Now, how can you make an effective forward-hold area?
There are a few important factors that go into the creation of such an area:
-BLU's routes from the previous area should only deposit them into the forward hold area and not the backward hold area.
-RED's respawn time and walk time should be short enough that they can get to the forward hold area at the same time BLU does after the previous point is capped.
-BLU's respawn time and walk time should be short enough that it's infeasible for RED to go further forward than the designated forward-hold area. (more on this later!)
-The walk time between the forward hold and backward hold should be long enough that BLU can't cap the point for free after winning a fight at the forward hold.
-The point's captime may vary, but if it's too short BLU sometimes gets to capture the point for free after breaking RED's forward hold.
-If the previous point had a long captime, BLU is forced to stay on it to capture it, which might buy RED some extra time to move forward.
Here are the relevant times for the second point of Dustbowl's second stage (let's just call it 2-B):
-BLU respawn wave time: 2 s
-RED respawn wave time: 10 s
-Walk time from BLU spawn to forward hold area: 17 s
-Walk time from RED spawn to forward hold area: 8 s
-Walk time from 2-A backward hold area to 2-B forward hold area: 5 s
-Walk time from 2-B forward hold area to 2-B backward hold area: 5 s
-Captime of 2-B: 3 s
-Captime of 2-A: 3 s (note that this point is very out of the way, so BLU has to commit some extra time just walking onto it)
(In case you're wondering, I measure my walk times as Engineer, who moves at 300 hammer units per second, which is a pretty average speed. I also try to take the fastest route possible, because it's usually the route players are gonna use and even if it isn't, you should be designing around the worst-case scenario of BLU arriving as quickly as possible.)
So you know the basics of how to make a fun control point. But how do you vary the difficulty? After all, we know the last control point needs to be more difficult than the first. The simple answer is: rotation times. Rotation time is the amount of time it takes a team who is watching one route to the point to move to another route. The longer this is, the harder it becomes for a team to control an area. Why? Well, gameplay in A/D, as I mentioned before, consists of BLU players individually choosing which route to push, while RED players individually choose which route to watch. If BLU can retreat and rotate to another route in no time at all, of course it's gonna be easier for them to push forward. And if RED can go from watching one route to another very quickly, it's gonna be harder for BLU to overwhelm them by winning the fight at multiple routes at the same time. Conversely, if it takes an eternity for RED to rotate between routes, it becomes trivially easy for BLU to push into the area RED is trying to hold.
So, based on those ideas, we can define a few guidelines for rotation times:
-RED's rotation time should be shorter than BLU's.
-You can vary difficulty by adjusting the rotation time for either team; making it longer for one team in an area will make that area easier for the other team.
Let's look at some examples, complete with walk times.
Specifically, let's look at Badwater A (a pretty average point in terms of difficulty for BLU to capture) and Dustbowl 3-B (a very difficult point for BLU, where rotate times are shifted too far in RED's favour)
Badwater A:
Here I've marked out each of the routes in orange (except route 2, which is underground). I've also given each route a team-coloured number where the respective team enters it, and marked the rotational routes between the entrances in that team's colour.
Now for the timings:
BLU 1 - BLU 2: 5 s
BLU 2 - BLU 3: 3 s
RED 1 - RED 2: 3 s
RED 2 - RED 3: 4 s
Note that 1-3 is the most important rotation time on this point, since RED can hold the point from the 1-3 connector and BLU usually prefers to use routes 1 and 3 over route 2. This holds true for a lot of Payload maps, since the cart path by design is pretty disadvantageous for BLU - if it wasn't, BLU wouldn't bother using the alternate routes, and we've already established how alternate routes are vital for fun gameplay.
BLU 1 - BLU 3: 8 s
RED 1 - RED 3: 3 s
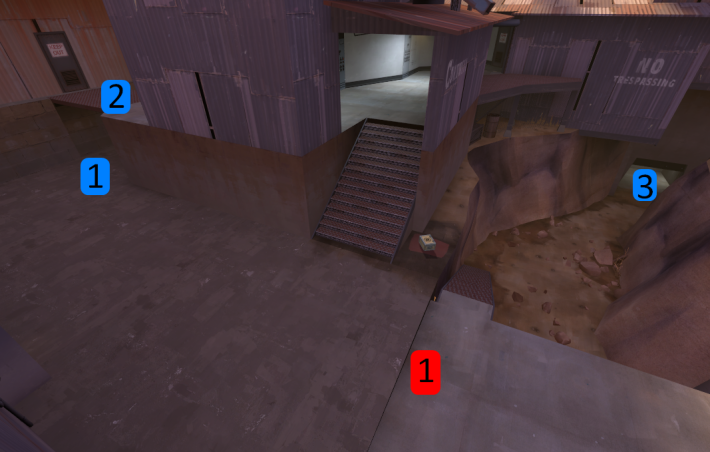
Now for Dustbowl 3-B. Here are the entrances:
Nevertheless, here are BLU's rotate times:
1 - 2: 3 s
1 - 3: 10 s
This is what makes this point so much harder than Badwater A for BLU. The ratio of BLU rotate time to RED rotate time was 8:3 on Badwater A (and BLU's rotate time could be argued to be less), but it's 10:0 on Dustbowl 3-B. This means that BLU has an extremely hard time getting into RED's backward hold area; additionally, if RED is forward holding, BLU can't even reach their entrance to route 3, and so they only have one route and gameplay becomes a miserable spamfest.
But Dustbowl 3-B could easily be made into a much better point, simply by giving BLU more routes into the forward hold area and making route 2 or 3 exit under the bridge or into the building that RED has stairs up to; this would force RED to rotate.
So here's my rule of thumb; whenever you build a control point where RED is gonna stand in one place to defend it, stop and think about how you can force them to rotate. Just don't make them spend too long rotating.
So we have a forward hold and backward hold. We have alternate routes, and both teams need to rotate to watch them. But where is BLU gonna enter the forward hold area from? We don't want RED pushing any further than the forward hold area; that would force BLU to win three fights in a row to capture the point, which is just too arduous of a trial. So, we need to establish a safe "lobby" area, where BLU can access health, ammo and all of their routes into the forward hold area.
On the first point of a map/stage, BLU's spawn will naturally act as their lobby. However, on longer maps, you might also see some 'dead space' in front of BLU spawn - this is to ensure that the first point is far from BLU spawn, so it can be close enough to RED spawn for RED to be able to form a backward hold after losing their forward hold.
A similar dead space needs to be placed between the backward hold area of one point and the forward hold area of the next. This ensures that RED can set up a forward hold on the next point, but it will also act as BLU's lobby to attack that same forward hold. So, it'll need health, ammo and fairly easy access to all of BLU's routes into the forward hold area.
In fact, the rotate time between these entrances needs to be very, very short, and the routes need to be very separated from each other - this is to ensure that RED faces a disadvantage while pushing the lobby area, so they can't reasonably push into it. The separation of the routes ensures that BLU still has a longer rotation time when pushing into the forward hold area, since they need to backtrack for a while to access health and the other entrances.
Here's the approach to the forward hold area of Dustbowl 2-B as an example:
The only options RED has to access BLU's lobby area are routes 1 and 2. While in the lobby area, BLU has easy access to health and ammo thanks to the nearby building, and can watch the entrances to routes 1 and 2 so easily that it's near-impossible for RED to take over the lobby area.
However - despite facing this disadvantage - RED still has a strong forward hold, because they can fall back to their own entrances to routes 1 and 2, and from there they have short rotate times while BLU have very long rotate times. Therefore, the "forward-hold, backward-hold" gameplay loop of control point 2-B is preserved.
I'll leave off with a few, less substantial notes:
-You usually want to give BLU a forward spawn at some point - even if your map/stage only has two control points, BLU's walk time to the second point can easily get ridiculous, to the point where RED can kill BLU and then push into the lobby BLU was meant to use to attack the second point. Dustbowl doesn't have this problem, but its stages are really short and RED often loses the first point of each stage after a single lost fight as a result, which is no fun. Better to just make your map longer than Dustbowl, and give BLU a forward spawn right before their lobby into the second point.
-Another thing Dustbowl does wrong is the size of connectors between control points - the routes to 2-B's forward hold are all super cramped tunnels, so explosive classes frequently dominate this area - it can get so bad that RED has 6 demomen, and as a BLU sniper it doesn't matter what route you take, you're gonna run into at least one, and die. It's a similar story leading up to 1-B and 3-B, too. Luckily, I wrote a whole guide about avoiding this. The gist is basically to have at least one route that forces long-range combat and one that forces close-range combat.
-Health is generally best placed in the BLU lobby and in each point's backward hold area. It can also do well when placed in the forward hold area; this'll make RED's forward hold stronger, but it'll make it easier for BLU to push RED's backward hold, so it's a gentle balancing act.
-Payload requires slightly less dead space between its control points than A/D does, because the cart moves much slower than players do. This means BLU can often attack two control points in a row without needing a forward spawn. However, this lessened amount of dead space often means that BLU gets to occupy RED's forward hold area for free after capping the previous point, creating a serious risk of BLU overpowering RED's backward hold and winning the point after just one fight. There are a few methods of avoiding this (generally, they make it so that the path the cart travels is much longer than the paths the player travels, or slow down the cart which is the same thing) and I may someday write a Payload guide detailing these, amongst other things.
-For multi-stage maps, two stages is better than three. Control points, if designed well, take a pretty long time to attack, and having to attack six in a row (if your team is good enough to do it) before getting to play on defense is seriously fatiguing. Making some of your control points pushovers to get around this is just disappointing for the players, and unnecessary effort for you as a mapper. Better to just make two well-designed stages instead. Also, it's really easy to make two-stage maps logic wise. You just take the three-stage prefab, delete the third team_control_point_round and both of the team_control_point and trigger_capture_area entities associated with it.


