KotH 72_crash
- Thread starter Crash
- Start date
You are using an out of date browser. It may not display this or other websites correctly.
You should upgrade or use an alternative browser.
You should upgrade or use an alternative browser.


Download is not working. 
EDIT:
Fixed that for you.
EDIT2:
Looks good, maybe a bit overscaled.
How about closing this?
Would also give attackers a way to deal splash damage to the capping players.
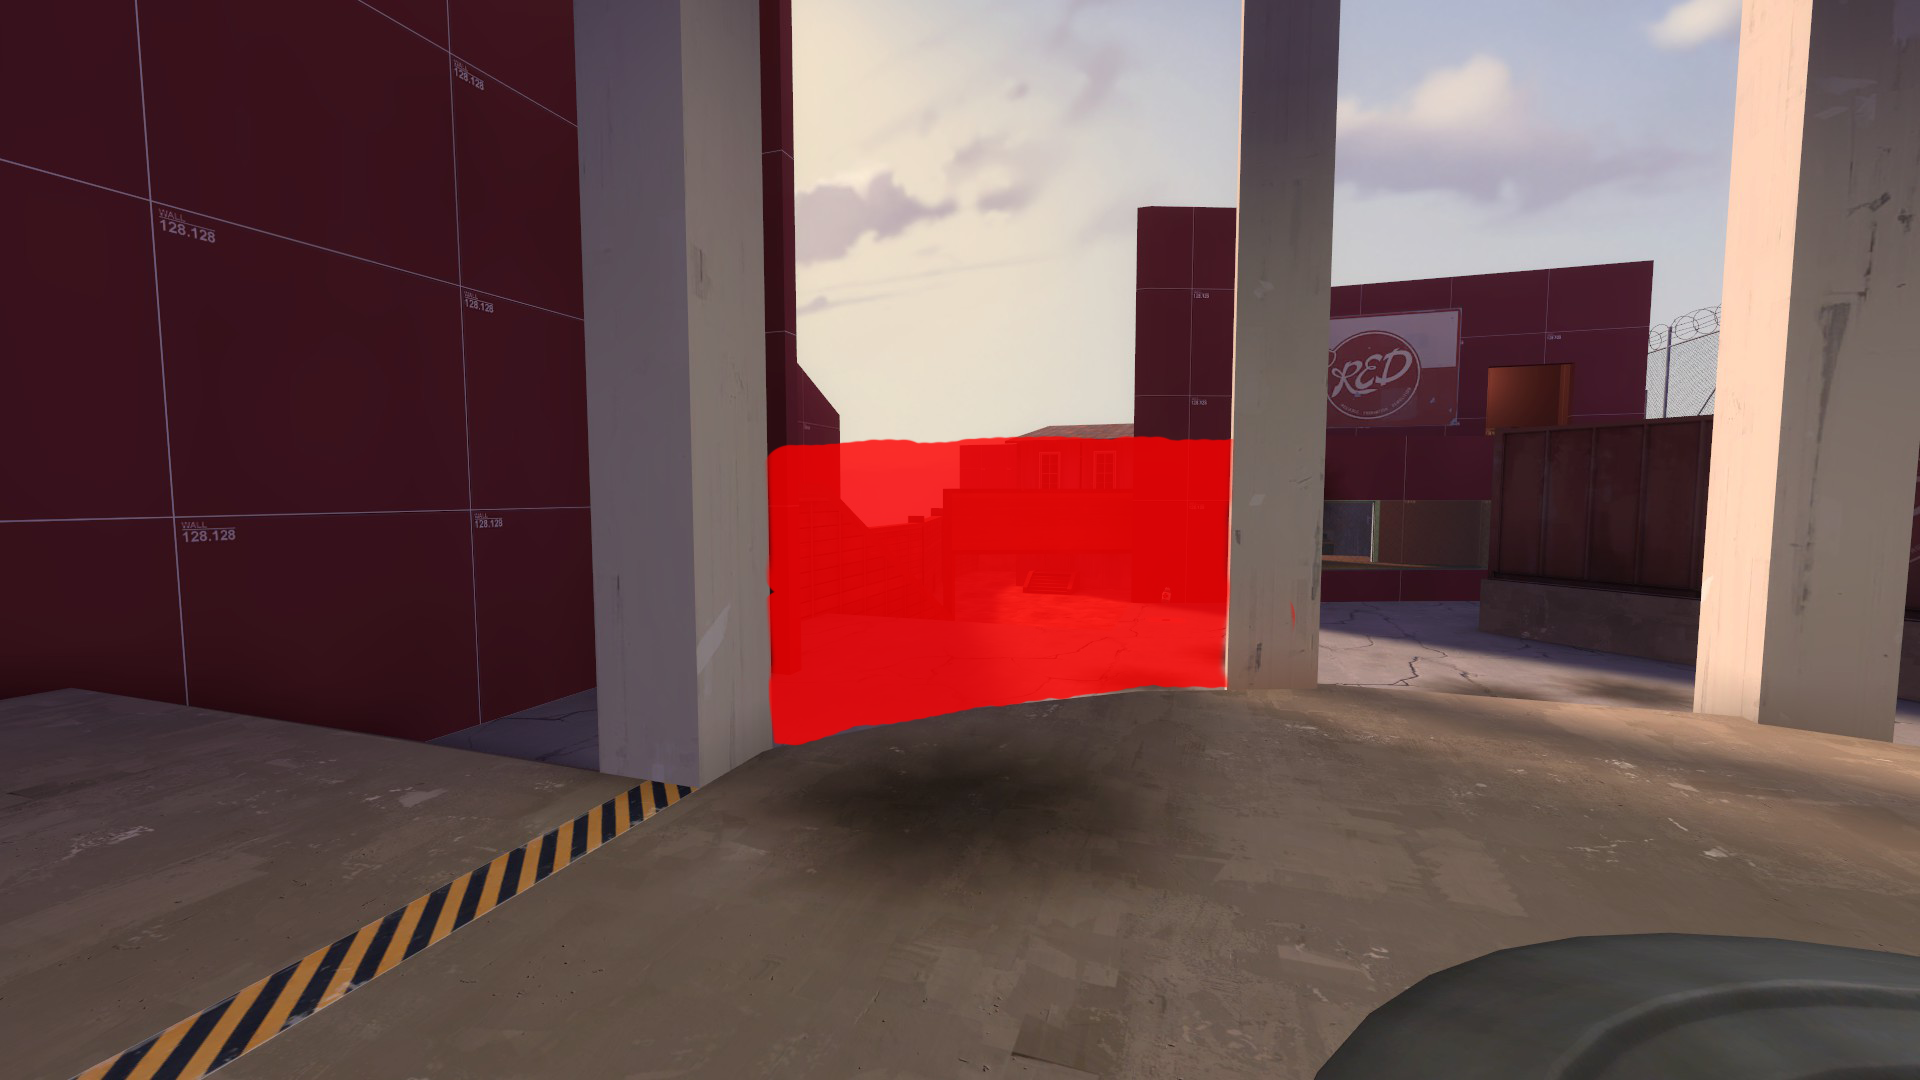
There is a missing texture in a red building near the door frame with the container in it.
But I think you know this and will packrat it later.
EDIT:
Fixed that for you.
EDIT2:
Looks good, maybe a bit overscaled.
How about closing this?
Would also give attackers a way to deal splash damage to the capping players.
There is a missing texture in a red building near the door frame with the container in it.
But I think you know this and will packrat it later.
Last edited:
I'm worried about tossing more health in anywhere, though.
Right now I've got 2 smalls on either side of the point, and 2 more smalls just to the side of the ramp coming up from the right side. Then there is a medium behind each teams building for a good "fall back" location, and finally a medium downstairs in the sewer, but that's more for the people down there to fight over. Not sure where I could toss any more in without it being too health-kit jammed.
I'm honestly surprised there hasn't been an engy nest set up in the sewer yet, it would make for an awesome location to teleport into.
I'm honestly surprised there hasn't been an engy nest set up in the sewer yet, it would make for an awesome location to teleport into.
Do it yourself! I frequently try to fuck up my own map testing by playing Obnoxious Engineer. Better if there's 4 of us. Good testing strategy I think.
Do it yourself! I frequently try to fuck up my own map testing by playing Obnoxious Engineer. Better if there's 4 of us. Good testing strategy I think.
I've been doing that on rust a lot more recently, working well.
I'm having trouble deciding if I want to keep the health packs on the ramps next to the point or inside the building. Inside the building promotes hunkering down in there a bit too much, but people (frozen) are saying it's a bit too hectic and could use safe zones, so that might help.
On the ramps gives people specific spots to fight after around the point and focuses combat a bit. Also helps predict where people are going to go, but then again inside the buildings does too.
I going to toss them back inside for the next test.
On the ramps gives people specific spots to fight after around the point and focuses combat a bit. Also helps predict where people are going to go, but then again inside the buildings does too.
I going to toss them back inside for the next test.
I've heard a few complaints about sightlines and I thought I'd make some overhead sketches to show the predominant ones and how I feel I took care of them:
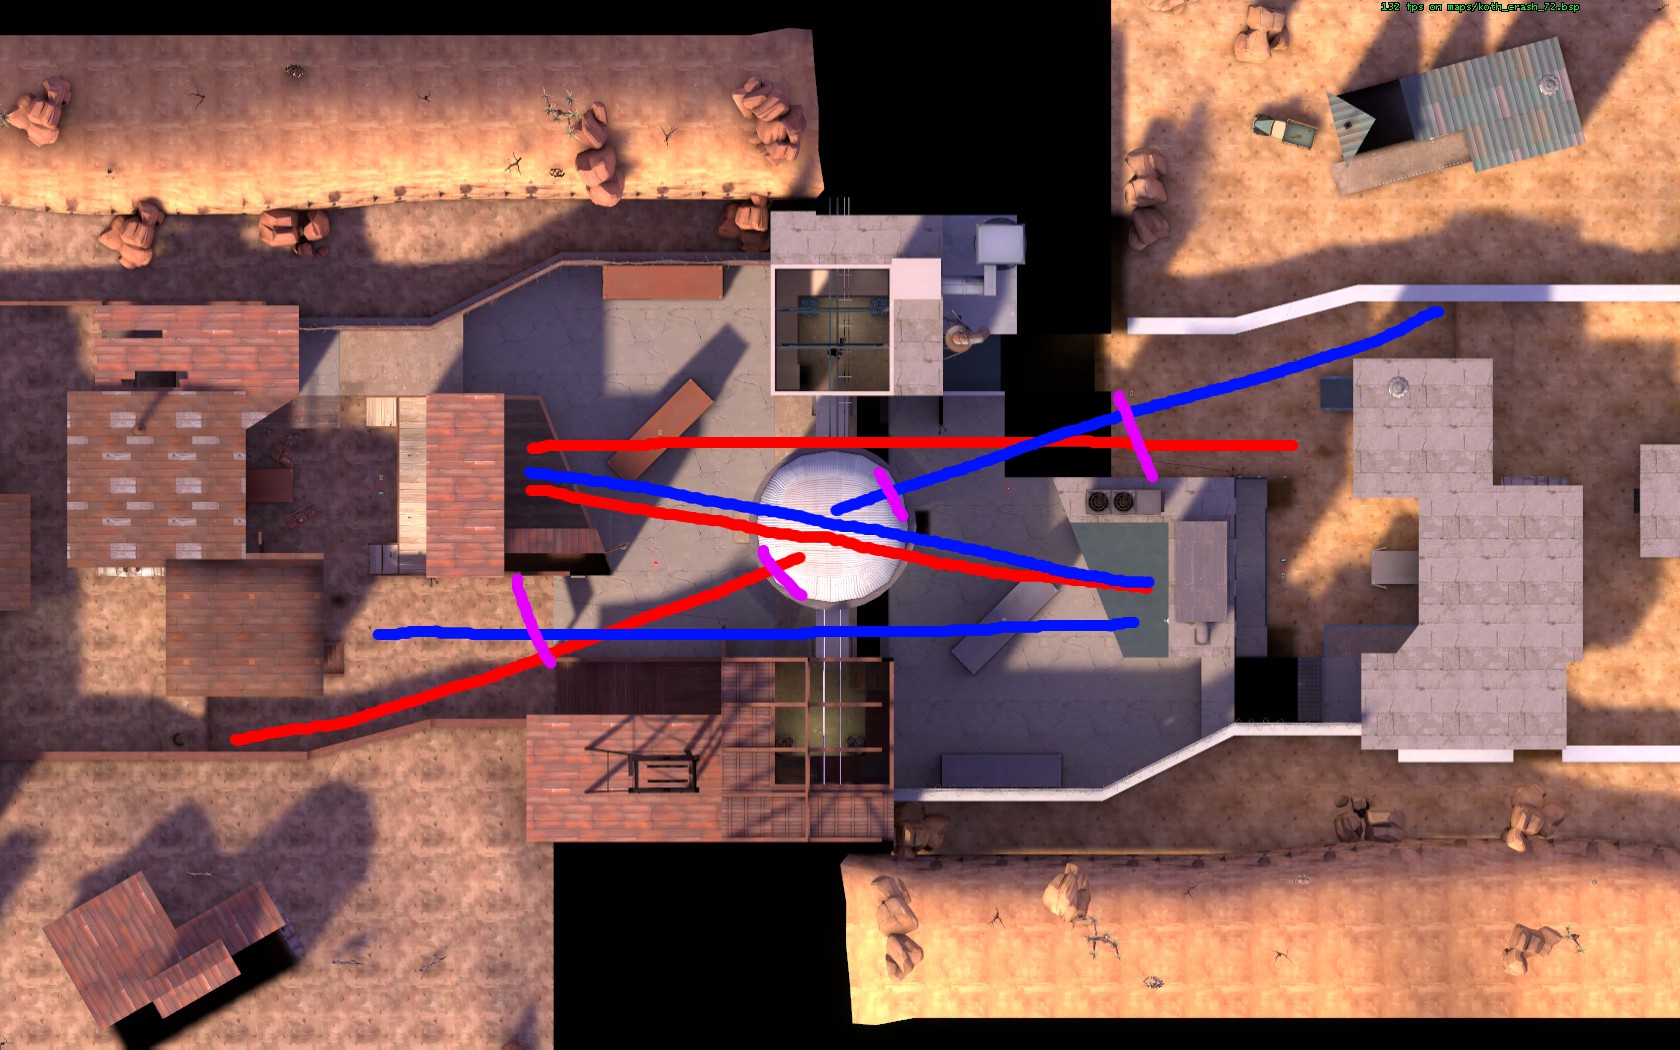
The first shot shows the primary sightlines as the round starts and each team is coming out of their spawns and into positions. The longest lines on the map are heavily constrained by the partial cover (purple lines) heading towards the center. The lines away from the point are the overhead barriers that block the majority of the cap area.
The two buildings opposite the point have a direct counter against each other, and can look down onto the point itself. Each building can see down into the courtyard behind the buildings, but are limited again by the overhead barrier indicated by the purple line.
The cap area itself has tall barriers (thanks to Bloodhound for the suggestion) that completely conceal players from the longest sniper lane, but leave them more exposed to the snipers on the building's ledge area.
The two dominant sniper locations can be flanked in the ways indicated by the colored lines. The yellow lines indicate a drop off that can't be backtracked on. The sniper has to go past this line to get the best lane on the center point, leaving him boxed in for pushes from either direction.
An opposing player can either duck between the containers for cover (although this leaves them open to the sniper deck, albeit at an uncomfortable range) and into the building opening them up routes to both locations, or take the underground "sewer" route (indicated by the dotted line) at the cost of a slightly obtuse run (but completely concealed to the sniper.)
The sewer route can be accessed by either the opposing buildings (the window in front should alert more observant snipers of this eminent danger) or by dropping down the openings in the buildings directly adjacent to the control point.
The downside to the sewer route is that it can be an active fighting area in itself, leaving the flanking player open to attacks prior to getting to their target.
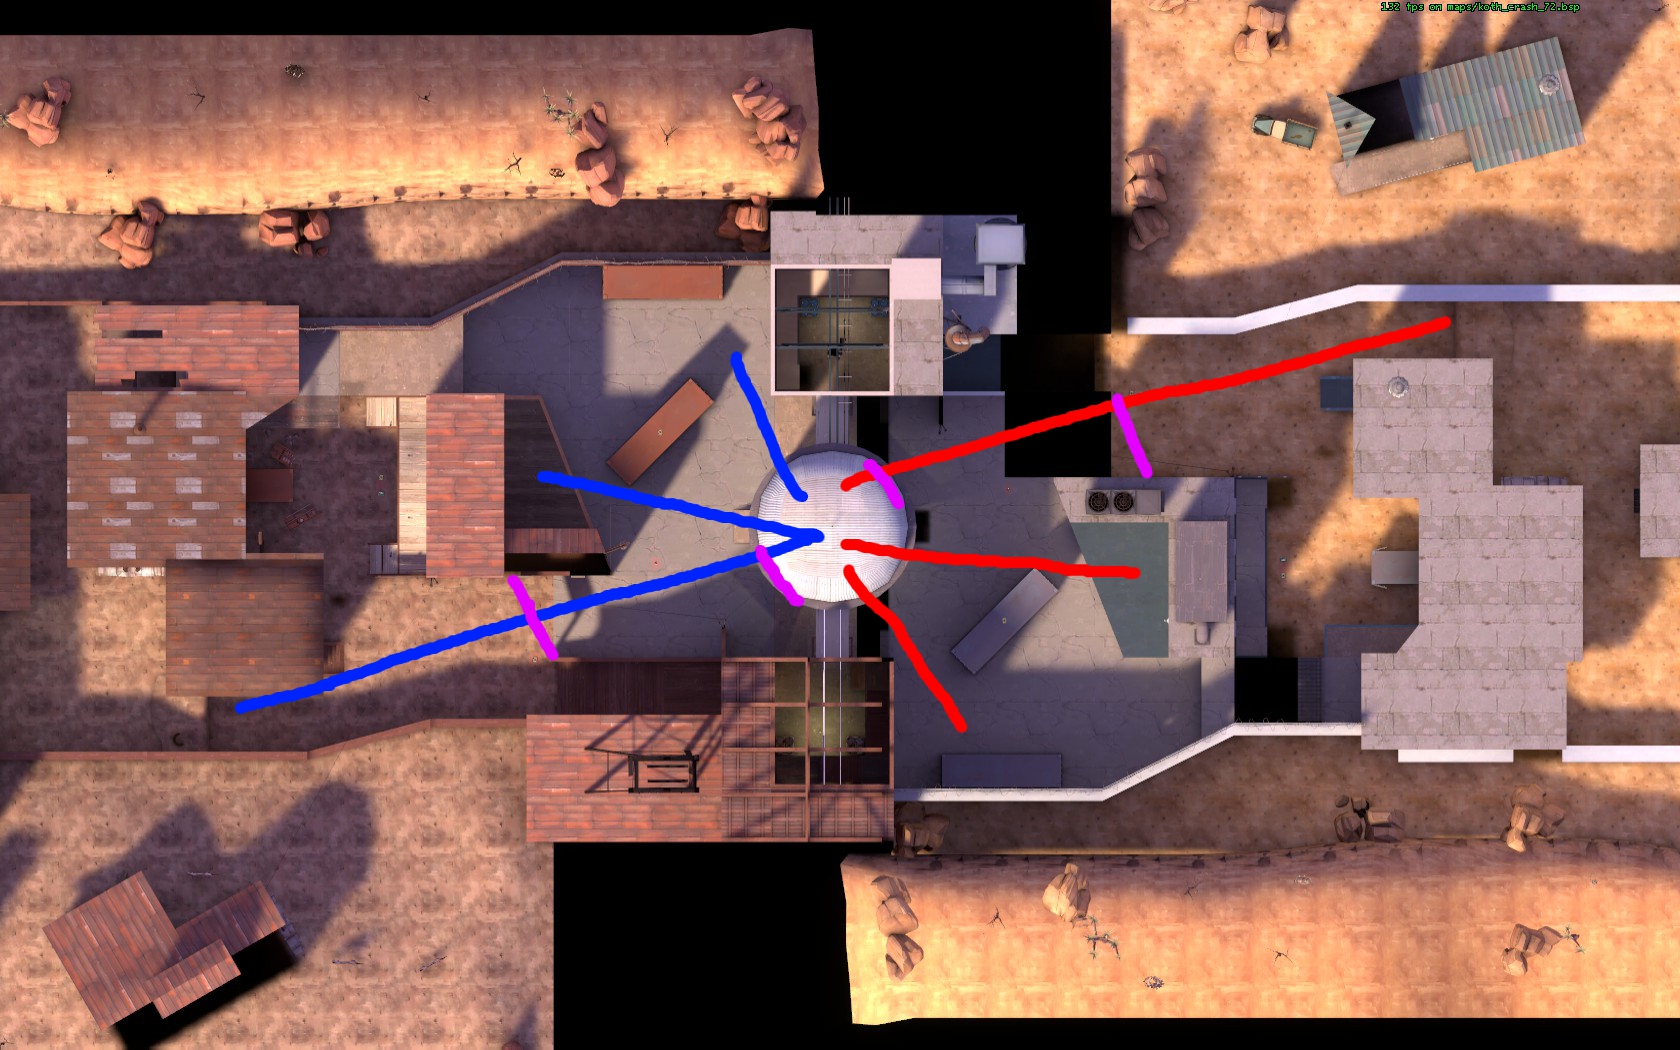
The other set of sniping lanes occur when one team has control of the hill area and has pushed the opposing team back.
The center point provides a decent amount of cover, but also leaves the sniper open to almost every direction, albeit with team support on their side.
The longest lane points down towards the fastest route for attackers. This spot is again limited by the overhead barrier. This is counter sniper-able, at the disadvantage for attackers of a drastic lack of cover. You only get the corner of the building to hide behind.
The middle lane points towards the sniper deck, and the shortest lane into the heart of the container area.
Looking at the angles this way, you see a pattern. The slightly shorter run of the "main route" provides the least amount of cover when the opposing team has pushed you back towards your spawn area. The sniper has an excellent vantage here, and this is fully intended in the map. The center and the far left path are the optimal paths to take in this situation, the latter of which can almost push you all the way up tot he sniper, just inside of his uncomfortable range to snipe at. With proper team-mate support, this is a good route to push through when in this situation.
Everything I wrote is my take on the design of the map, and what I was thinking when I built it. I may be wrong, and I would love some feedback on if I'm handling these things the right way or not.
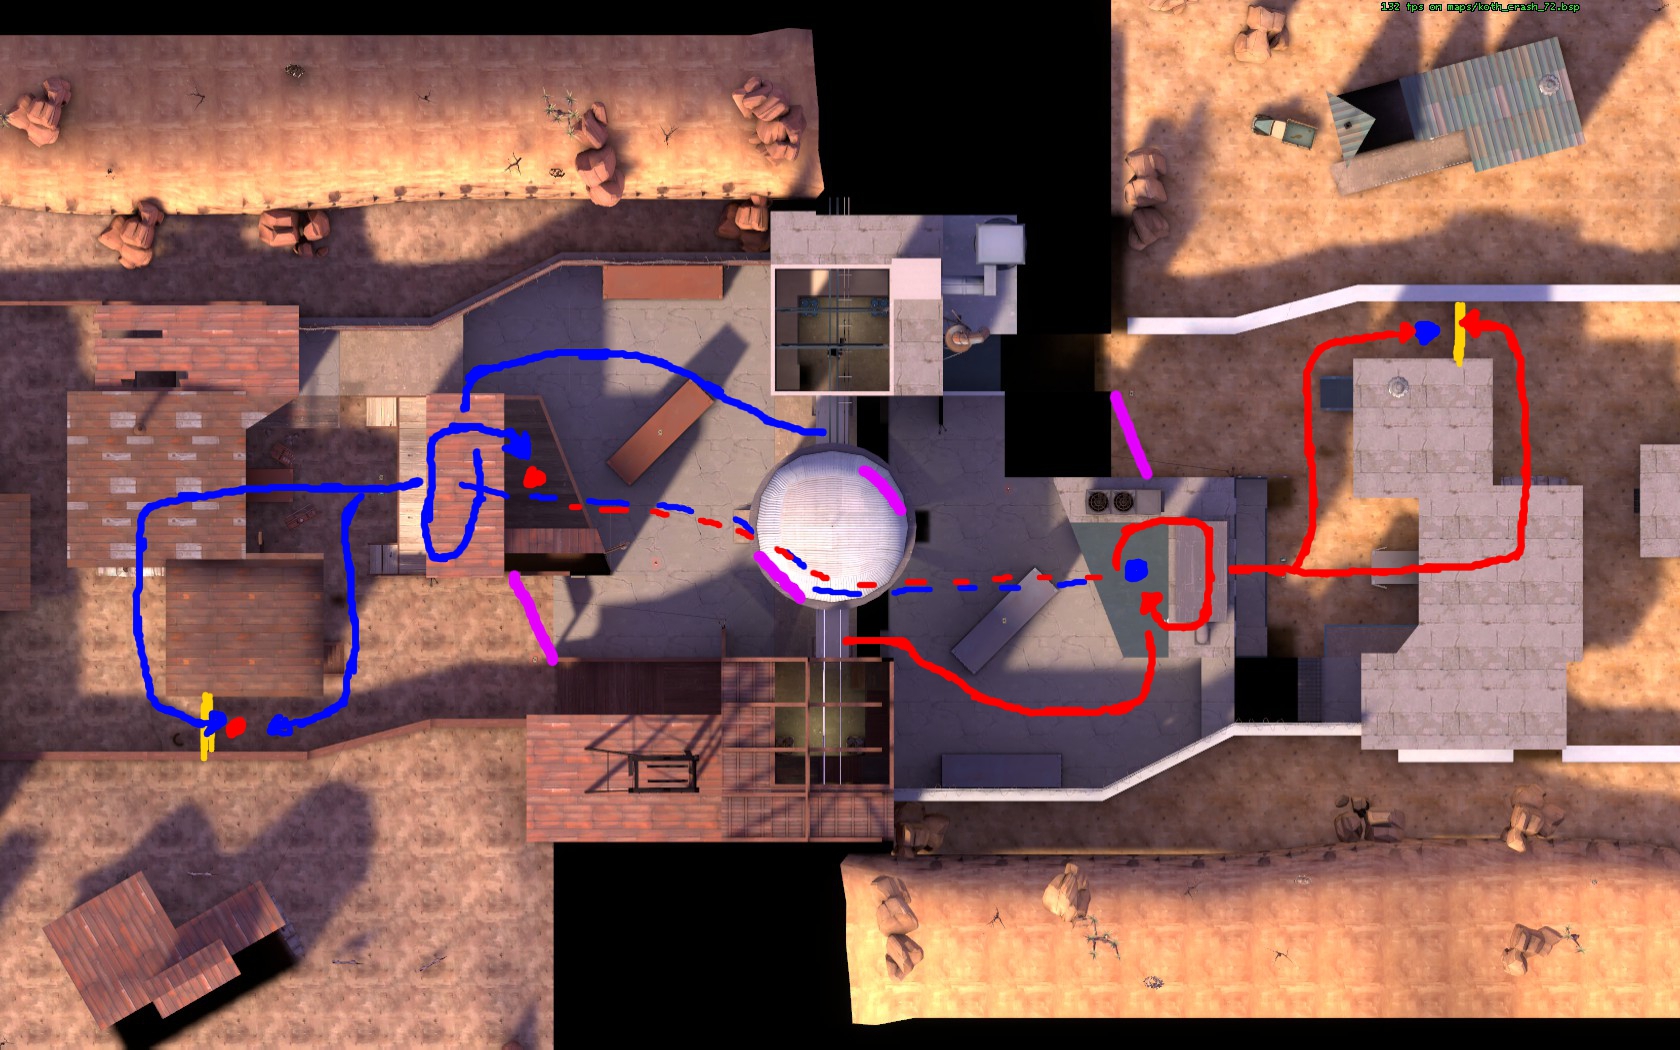
And finally an overall look at the routes on the map:
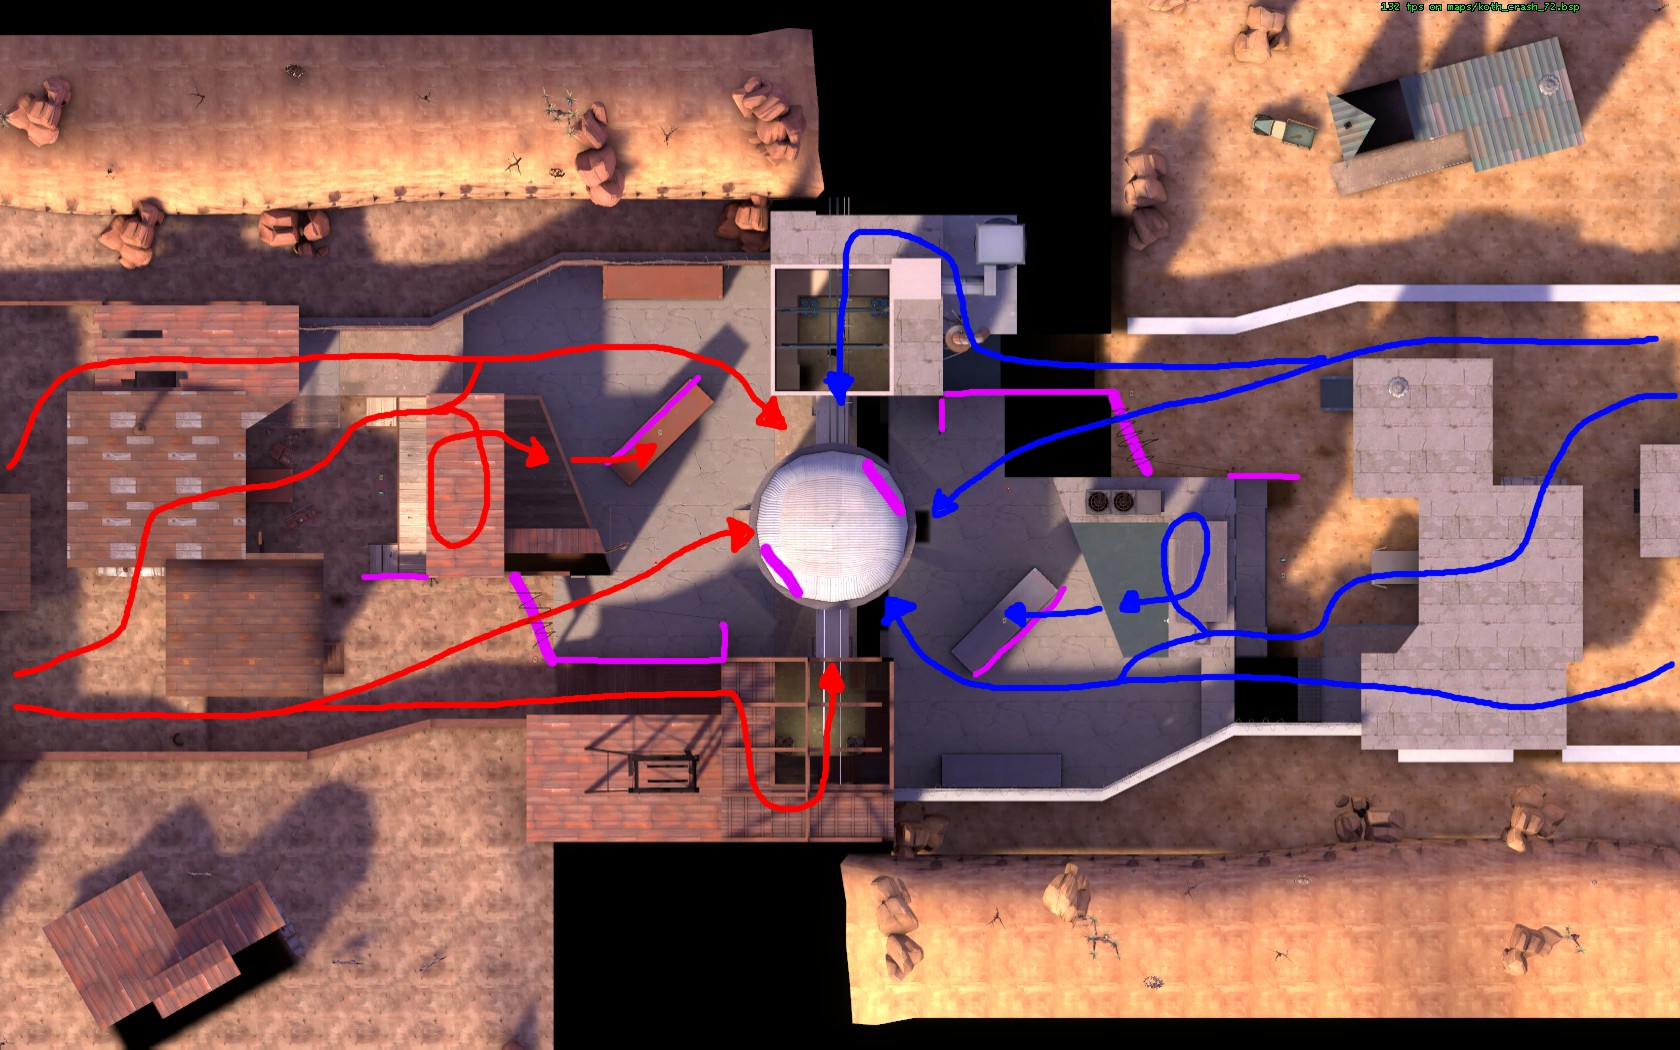
Purple lines are significant cover. The black-slashed lines indicate the overhead barriers that only provide partial cover, and less and less cover as you get closer to them.
This shot doesn't take into account the underground area.
The first shot shows the primary sightlines as the round starts and each team is coming out of their spawns and into positions. The longest lines on the map are heavily constrained by the partial cover (purple lines) heading towards the center. The lines away from the point are the overhead barriers that block the majority of the cap area.
The two buildings opposite the point have a direct counter against each other, and can look down onto the point itself. Each building can see down into the courtyard behind the buildings, but are limited again by the overhead barrier indicated by the purple line.
The cap area itself has tall barriers (thanks to Bloodhound for the suggestion) that completely conceal players from the longest sniper lane, but leave them more exposed to the snipers on the building's ledge area.
The two dominant sniper locations can be flanked in the ways indicated by the colored lines. The yellow lines indicate a drop off that can't be backtracked on. The sniper has to go past this line to get the best lane on the center point, leaving him boxed in for pushes from either direction.
An opposing player can either duck between the containers for cover (although this leaves them open to the sniper deck, albeit at an uncomfortable range) and into the building opening them up routes to both locations, or take the underground "sewer" route (indicated by the dotted line) at the cost of a slightly obtuse run (but completely concealed to the sniper.)
The sewer route can be accessed by either the opposing buildings (the window in front should alert more observant snipers of this eminent danger) or by dropping down the openings in the buildings directly adjacent to the control point.
The downside to the sewer route is that it can be an active fighting area in itself, leaving the flanking player open to attacks prior to getting to their target.
The other set of sniping lanes occur when one team has control of the hill area and has pushed the opposing team back.
The center point provides a decent amount of cover, but also leaves the sniper open to almost every direction, albeit with team support on their side.
The longest lane points down towards the fastest route for attackers. This spot is again limited by the overhead barrier. This is counter sniper-able, at the disadvantage for attackers of a drastic lack of cover. You only get the corner of the building to hide behind.
The middle lane points towards the sniper deck, and the shortest lane into the heart of the container area.
Looking at the angles this way, you see a pattern. The slightly shorter run of the "main route" provides the least amount of cover when the opposing team has pushed you back towards your spawn area. The sniper has an excellent vantage here, and this is fully intended in the map. The center and the far left path are the optimal paths to take in this situation, the latter of which can almost push you all the way up tot he sniper, just inside of his uncomfortable range to snipe at. With proper team-mate support, this is a good route to push through when in this situation.
Everything I wrote is my take on the design of the map, and what I was thinking when I built it. I may be wrong, and I would love some feedback on if I'm handling these things the right way or not.
And finally an overall look at the routes on the map:
Purple lines are significant cover. The black-slashed lines indicate the overhead barriers that only provide partial cover, and less and less cover as you get closer to them.
This shot doesn't take into account the underground area.
Last edited:
Melvin D Engineere
L4: Comfortable Member
- Feb 25, 2012
- 173
- 192