Mann vs Machine maps are a bit of a hassle to get uploaded. You need several files included in your download for others to play them, and if any of your waves use custom icons, those need to be included as well. Luckily though, we can just pack those icons in, reducing clutter in your download, and (somewhat negligible) reduce file size.
Now, while you could just get every icon you use and put it into a list for use in bspzip, this method will allow for use in automatic compiling, such as VIDE and CompilePal.

Where to place
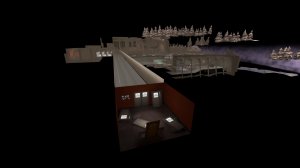
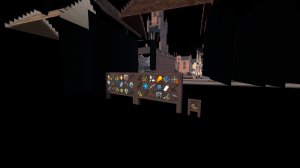
Not a big surprise, but we're going to be placing our icons into the map physically. Due to how HUD textures work, we'll need to put our icons in a place where players can't see them. Icons take render priority over any world geometry, so this requires a bit of creativity.


In both of the above examples, the icons are placed in a way where players wouldn't be able to see them, even if they could see through walls. While you could have some fun with them, you can also just have an empty box outside your map with the icons in them. Once you've found a spot for your icons, it's time to get them into Hammer.

Making icons visible in Hammer
If you don't want to go editing fgd files, head to the last part of this tutorial.
What we can do to speed up our work is by editing the tf.fgd file to make Hammer recognize the HUD materials folder. This can be found in Team Fortress 2/bin, and opened with your favorite text editor. In this file, we're looking for this portion of code:

Removing "hud" will allow Hammer to view all textures within this folder, allowing us to quickly access, place, and modify our icons once they're placed. Just note that opening this folder to Hammer will inflate your Material Browser a good amount, especially if you play a lot of custom MvM, which shouldn't be a problem if you use name filters.

Placement
Now we can head back into Hammer and place our icons. For this, we can use the Overlay tool to place our icons. When selecting what icons to place, we can put "leaderboard" into our texture filter to get just our wave icons.

Now it's just a matter of placing all of the icons you'll need to pack. Do note that if you are using any _giant versions of icons in your missions, you'll need to place a separate icon for them on this wall to properly place. For example: if a mission was using both "sniper_carbine" and "sniper_carbine_giant," both will have to be placed in the level.
Once you have placed everything you need, it's only a matter of packing your map! CompilePal will automatically detect what icons are in your level and pack them in.

Placing icons without editing tf.fgd
If you don't want to edit anything, we can instead just manually insert the filepath for the icon into an overlay.
To start, place down an overlay and modify it to the size you want. Open the Object Properties window for it, and change the "Material" field to the filepath and filename of your icon. copy-pasting "hud/leaderboard_class_" is useful for speeding this process up. While the icon will show up as missing (a solid white box) in Hammer, it'll show up as normal in game.

What now?
Once you've compiled your map and packed your icons, there's nothing else you need to do! You can ship your map without a materials folder, and players will see them as if they had installed them manually. Hope this helps!
A thanks to @Blade x64 for starting this trick in the first place.
Now, while you could just get every icon you use and put it into a list for use in bspzip, this method will allow for use in automatic compiling, such as VIDE and CompilePal.
Where to place
Not a big surprise, but we're going to be placing our icons into the map physically. Due to how HUD textures work, we'll need to put our icons in a place where players can't see them. Icons take render priority over any world geometry, so this requires a bit of creativity.


In both of the above examples, the icons are placed in a way where players wouldn't be able to see them, even if they could see through walls. While you could have some fun with them, you can also just have an empty box outside your map with the icons in them. Once you've found a spot for your icons, it's time to get them into Hammer.
Making icons visible in Hammer
If you don't want to go editing fgd files, head to the last part of this tutorial.
What we can do to speed up our work is by editing the tf.fgd file to make Hammer recognize the HUD materials folder. This can be found in Team Fortress 2/bin, and opened with your favorite text editor. In this file, we're looking for this portion of code:
Removing "hud" will allow Hammer to view all textures within this folder, allowing us to quickly access, place, and modify our icons once they're placed. Just note that opening this folder to Hammer will inflate your Material Browser a good amount, especially if you play a lot of custom MvM, which shouldn't be a problem if you use name filters.
Placement
Now we can head back into Hammer and place our icons. For this, we can use the Overlay tool to place our icons. When selecting what icons to place, we can put "leaderboard" into our texture filter to get just our wave icons.
Now it's just a matter of placing all of the icons you'll need to pack. Do note that if you are using any _giant versions of icons in your missions, you'll need to place a separate icon for them on this wall to properly place. For example: if a mission was using both "sniper_carbine" and "sniper_carbine_giant," both will have to be placed in the level.
Once you have placed everything you need, it's only a matter of packing your map! CompilePal will automatically detect what icons are in your level and pack them in.
Placing icons without editing tf.fgd
If you don't want to edit anything, we can instead just manually insert the filepath for the icon into an overlay.
To start, place down an overlay and modify it to the size you want. Open the Object Properties window for it, and change the "Material" field to the filepath and filename of your icon. copy-pasting "hud/leaderboard_class_" is useful for speeding this process up. While the icon will show up as missing (a solid white box) in Hammer, it'll show up as normal in game.
What now?
Once you've compiled your map and packed your icons, there's nothing else you need to do! You can ship your map without a materials folder, and players will see them as if they had installed them manually. Hope this helps!
A thanks to @Blade x64 for starting this trick in the first place.


