After searching for a tutorial such as this one to no avail, and after finally figuring it out, I have to decided to make the tutorial myself to help anyone that wants to make a pile of bricks/rubble.
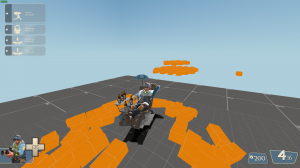
The following tutorial will go over how to make rubble piles with bricks such as the ones pictured. (Rubble pile and brick pile will be used interchangeably). I used this technique for making the crater bricks on koth_luftangriff as seen here:
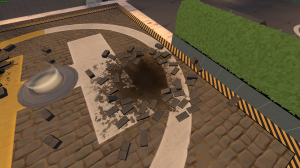
The tutorial is based off of map_edit. If you wish to figure all of this out on your own go here. Otherwise, just keep reading.
At first glance, it may seem as though each brush was placed individually by manually rotating each one to a specific angle. However, there is a method that will let the source engine automatically place each one for you!
For this tutorial, I will be using a small demo map that can be downloaded here. It will include the finished brick pile as well as the starting template.
---------------------------------------------------------------------------------------------------------------------------------------------
Step 1
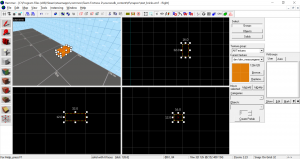
Start by making one brick. In this case, I opted for one 16x32x12 hu (rather large), but it really only matters on the texture you want to use. Here, I’m not going to bother with textures for the sake of simplicity. Nevertheless, you are going to want to align the texture using the Texture Application Tool ( ) so that your block actually looks like a brick on all six sides.
Step 2
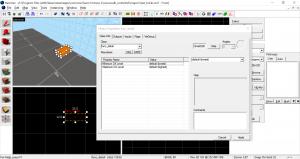
Hit Ctrl + T to make your brick a func_detail. It will save time in the future.
Step 3
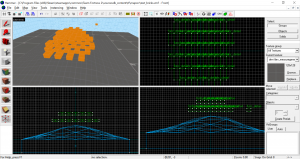
Enable Texture Lock ( ) (or don’t, it depends) and copy your brick over the area you want the rubble pile to go over, next just spam as many bricks as needed for your pile (but don’t get carried away).
Step 4
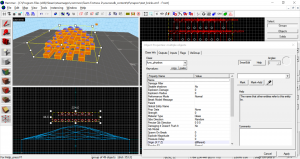
Now select all of your bricks and group them. Now, since they are all already entities, you can easily change them all to func_physbox at the once. Most of the settings will be unchanged, but you can mess around with the mass scale if you want.
Step 5
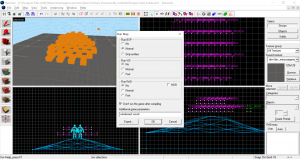
Now this is where the magic starts. Make sure the 3D View has a view of your brick pile’s landing spot, then Save and Compile your map*. To save time, you only really need to compile the BSP, leaving VVIS and VRAD disabled. Don’t quit hammer.
*Warning: There can be no differences between the .vmf and the .bsp during Steps 6-9, and saving the .vmf in hammer after compiling counts as a change. Therefore, autosave must be disabled until you've finished Step 9.
Step 6
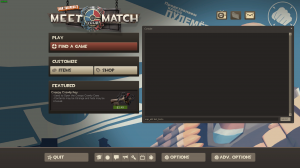
Minimize Hammer (DON’T CLOSE IT!) and open TF2. From the main menu, open the developer console (`) and enter “map_edit <mapname>”. Here I entered “map_edit test_bricks”.
Now wait for your map to load, if you are being disconnected then it’s because you didn’t compile your map, or some other error (also check if sv_lan is set to 1).
Step 7
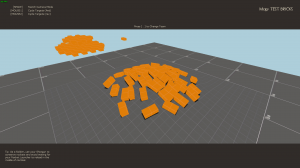
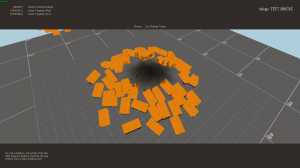
Once the map loads, it should play exactly as if it were a normal server. However, you have now created a bridge between the game, and the hammer editor. Now you can go over to where you made your bricks, and voila! They are now settled on the ground! For an added effect, you can shoot them with rockets (stickies won’t stick) to make it look like they exploded. (Note: if you mess up how you want them to look you’ll have to use “mp_restartgame 1” The bricks will reset when the round restarts).
Step 8
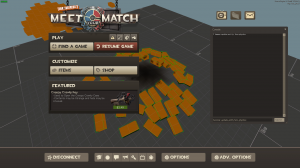
Now, in order to save the bricks’ new positions, you will have to open the console and enter “hammer_update_entity <entity name/class>”. The command will allow you to save the new positions of multiple entities, including specific ones if you named them. However, since we are only worried about func_physbox, we enter “hammer_update_entity func_physbox”. The bricks will be outlined green if done successfully.
Step 9 (The pic for this step broke )
)
Switch back to hammer (don’t close the game just yet), and BOOM! Your brick pile is now automatically made! If it isn’t then something went wrong. You might also notice that you can’t do anything in hammer, so if the bricks did update (assuming you adjusted the 3D view before compiling to see them), then you can switch back to the game and type “quit” into the console to quit the game.
*After the game is closed, you can now enable autosaving again (phew)
Step 10
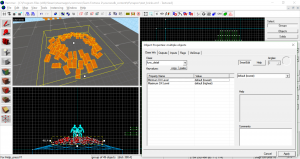
Now you have control again. When you click on the bricks, they’ll still be grouped, and since they don’t need to have physics anymore, you can change them back to func_detail. However, if the rubble pile is going to be in a walkable zone, then you should make it a nonsolid func_brush.
Edit: You won't want every single brick to be its own func_detail or func_brush, so ungroup them, then press Ctrl + Shift + W to make them world geometry. Then with all of the bricks still selected, you can make them all one singular func_detail or func_brush (Ctrl + T).
Step 11
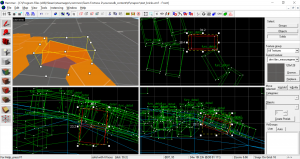
You might notice how some bricks are “inside out.” They are missing sides, and have to be deleted (Use use Ctrl + W to select them individually). You can start over and try again, but you’re probably going to end up with some bugged bricks every time.
Also If you had shot your bricks to make them go flying everywhere, then when you selected your grouped bricks, you may have noticed where the farthest ones landed. I would recommend deleting any outlying bricks, but it’s up to you. Also, you can select individual bricks and make adjustments as necessary.
Step 12
You can now celebrate because you just saved potential hours meticulously rotating each brick into position!
---------------------------------------------------------------------------------------------------------------------------------------------
Important Notes:
For some reason, you can only use map_edit once. After that you will have to recompile the map again in order to use map_edit again. For instance, if you messed up your bricks by shooting them, you can’t just quit and reopen the map using map_edit. You will have to recompile the map, THEN reopen it with map_edit.
If you checked the wiki page, it explains mainly how to use map_edit for physics props, but nothing really much about brush entities.

Edit: added autosave warning
The following tutorial will go over how to make rubble piles with bricks such as the ones pictured. (Rubble pile and brick pile will be used interchangeably). I used this technique for making the crater bricks on koth_luftangriff as seen here:

The tutorial is based off of map_edit. If you wish to figure all of this out on your own go here. Otherwise, just keep reading.
At first glance, it may seem as though each brush was placed individually by manually rotating each one to a specific angle. However, there is a method that will let the source engine automatically place each one for you!
For this tutorial, I will be using a small demo map that can be downloaded here. It will include the finished brick pile as well as the starting template.
---------------------------------------------------------------------------------------------------------------------------------------------
Step 1
Start by making one brick. In this case, I opted for one 16x32x12 hu (rather large), but it really only matters on the texture you want to use. Here, I’m not going to bother with textures for the sake of simplicity. Nevertheless, you are going to want to align the texture using the Texture Application Tool (

Step 2
Hit Ctrl + T to make your brick a func_detail. It will save time in the future.

Step 3
Enable Texture Lock (

Step 4
Now select all of your bricks and group them. Now, since they are all already entities, you can easily change them all to func_physbox at the once. Most of the settings will be unchanged, but you can mess around with the mass scale if you want.

Step 5
Now this is where the magic starts. Make sure the 3D View has a view of your brick pile’s landing spot, then Save and Compile your map*. To save time, you only really need to compile the BSP, leaving VVIS and VRAD disabled. Don’t quit hammer.
*Warning: There can be no differences between the .vmf and the .bsp during Steps 6-9, and saving the .vmf in hammer after compiling counts as a change. Therefore, autosave must be disabled until you've finished Step 9.

Step 6
Minimize Hammer (DON’T CLOSE IT!) and open TF2. From the main menu, open the developer console (`) and enter “map_edit <mapname>”. Here I entered “map_edit test_bricks”.
Now wait for your map to load, if you are being disconnected then it’s because you didn’t compile your map, or some other error (also check if sv_lan is set to 1).

Step 7
Once the map loads, it should play exactly as if it were a normal server. However, you have now created a bridge between the game, and the hammer editor. Now you can go over to where you made your bricks, and voila! They are now settled on the ground! For an added effect, you can shoot them with rockets (stickies won’t stick) to make it look like they exploded. (Note: if you mess up how you want them to look you’ll have to use “mp_restartgame 1” The bricks will reset when the round restarts).


Step 8
Now, in order to save the bricks’ new positions, you will have to open the console and enter “hammer_update_entity <entity name/class>”. The command will allow you to save the new positions of multiple entities, including specific ones if you named them. However, since we are only worried about func_physbox, we enter “hammer_update_entity func_physbox”. The bricks will be outlined green if done successfully.

Step 9 (The pic for this step broke
Switch back to hammer (don’t close the game just yet), and BOOM! Your brick pile is now automatically made! If it isn’t then something went wrong. You might also notice that you can’t do anything in hammer, so if the bricks did update (assuming you adjusted the 3D view before compiling to see them), then you can switch back to the game and type “quit” into the console to quit the game.
*After the game is closed, you can now enable autosaving again (phew)
Step 10
Now you have control again. When you click on the bricks, they’ll still be grouped, and since they don’t need to have physics anymore, you can change them back to func_detail. However, if the rubble pile is going to be in a walkable zone, then you should make it a nonsolid func_brush.
Edit: You won't want every single brick to be its own func_detail or func_brush, so ungroup them, then press Ctrl + Shift + W to make them world geometry. Then with all of the bricks still selected, you can make them all one singular func_detail or func_brush (Ctrl + T).

Step 11
You might notice how some bricks are “inside out.” They are missing sides, and have to be deleted (Use use Ctrl + W to select them individually). You can start over and try again, but you’re probably going to end up with some bugged bricks every time.
Also If you had shot your bricks to make them go flying everywhere, then when you selected your grouped bricks, you may have noticed where the farthest ones landed. I would recommend deleting any outlying bricks, but it’s up to you. Also, you can select individual bricks and make adjustments as necessary.

Step 12
You can now celebrate because you just saved potential hours meticulously rotating each brick into position!

---------------------------------------------------------------------------------------------------------------------------------------------
Important Notes:
For some reason, you can only use map_edit once. After that you will have to recompile the map again in order to use map_edit again. For instance, if you messed up your bricks by shooting them, you can’t just quit and reopen the map using map_edit. You will have to recompile the map, THEN reopen it with map_edit.
If you checked the wiki page, it explains mainly how to use map_edit for physics props, but nothing really much about brush entities.

Edit: added autosave warning
Last edited:


