

I see this question is still being asked a lot so I thought I'd write up a guide for it. There is a similar solution to clipping spiral stairs with instanced clip brushes, but those can cause snagging issues, and really this is the best way to do it.
Before I start in on how to do this, I want to make it clear that spiral staircases in TF2 should be a rarity. The taller/longer they are, the more players need to move their mouse to ascend them, which is annoying. Plus, as you'll soon see, they are a challenge to make with the current tools. In general, you probably want to make normal stairs. If you are putting spiral stairs into your map, they should either be small, or around/near something important. Ask yourself: How many spiral staircases can you think of in Valve maps? Where are the spiral stairs on popular community maps?
When making anything in TF2, the key is to use either multiples of 64 and/or powers of 2 for the majority of your brushwork. Many of the door props, for example, fit these measurements. Making a spiral staircase is no different. If you work in powers of 2, your arches will always be on grid. If you use a lot of brushes in an arch, it might be the 1u grid, but it will be on grid.
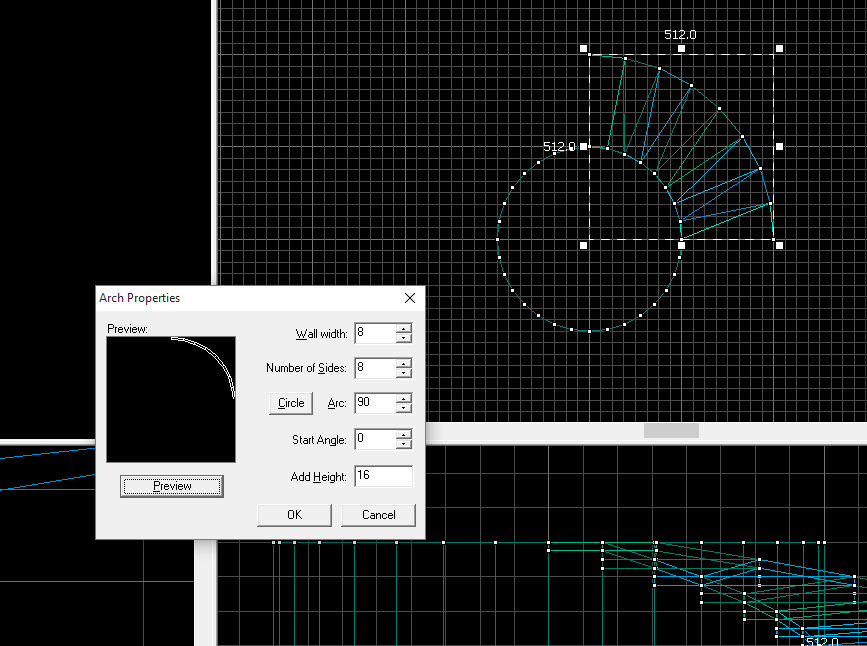
Start by selecting the brush tool and changing the brush type to arch.
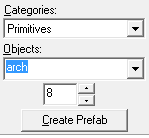
Next, you need to think about what size and shape staircase you want. To keep it simple, I am going to make a staircase that is 128u wide at the top and bottom and curves 90 degrees. (I don't think a staircase that curves around more than 90 degrees is a good idea.) You should always leave some space in the middle of your staircase. The hole will need a cylinder with the same dimensions as your arch.
Make your brush as tall as you want each step to be. In my case, I want 8u tall steps.
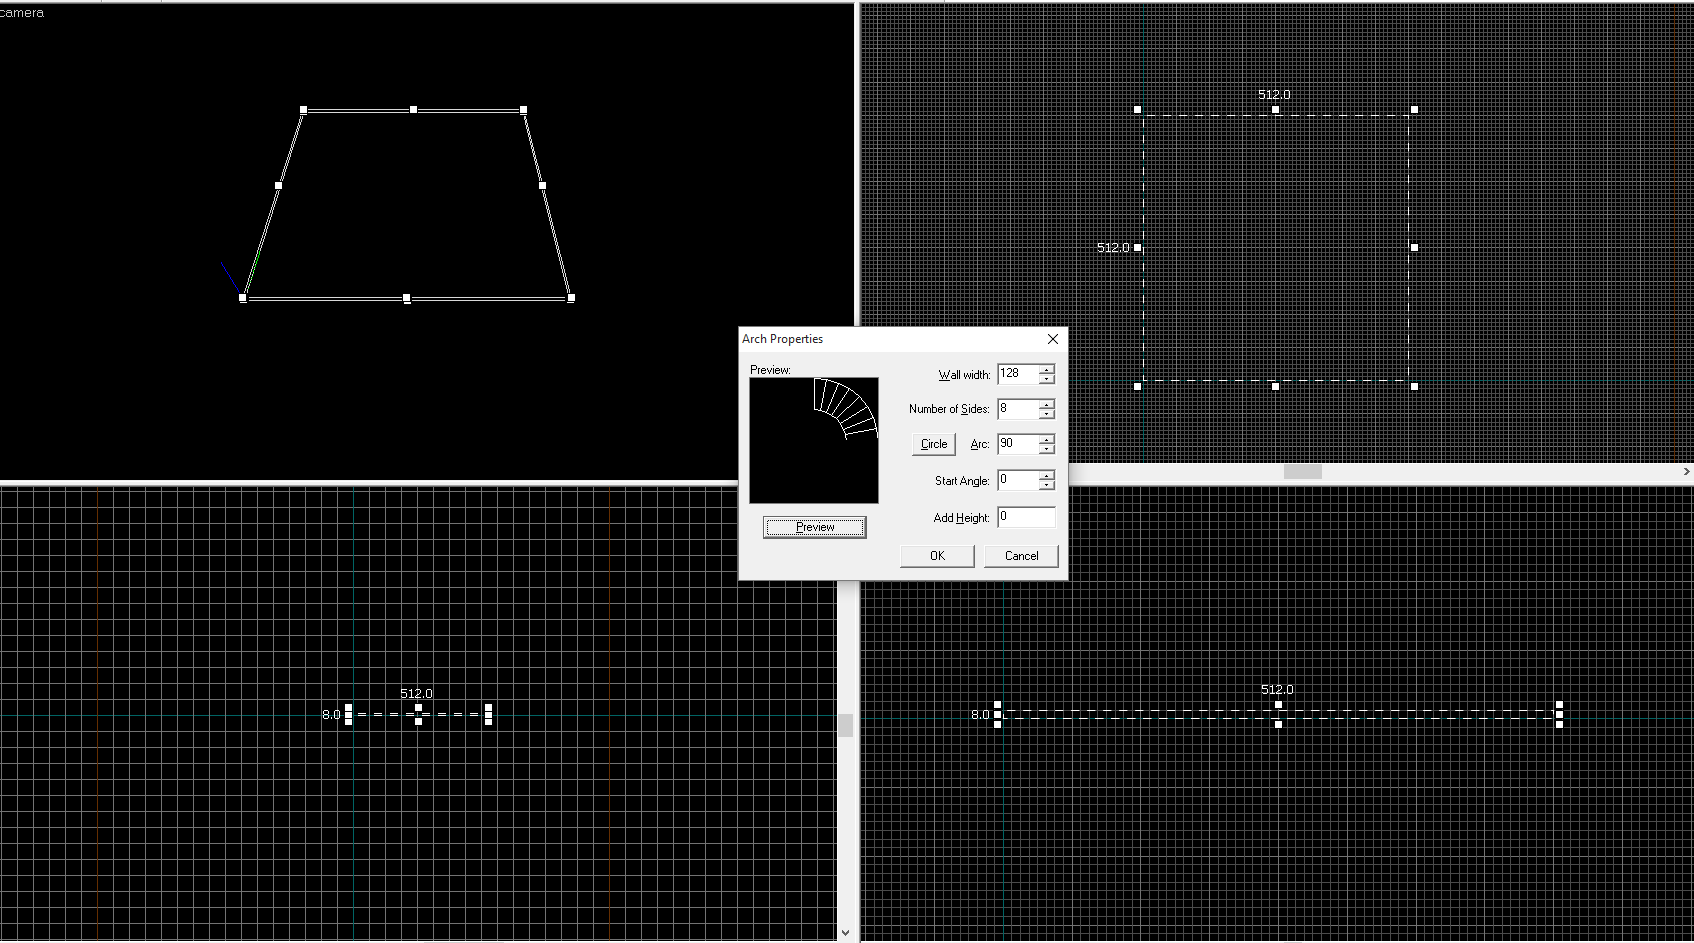
Here's the arch I'm about to make. Here, "Wall width" means how wide you want each step to be.
"Number of sides" is how many steps you want. You need to use a power of 2 here, too. I'm using 8 steps for this tutorial, but if I was doing this for a real map I'd probably do 16. Set the arc field to whatever you're using. Try not to stray from 45 degree intervals for simplicity.
The "Add Height" field can be used to automatically stagger your stairs. My stairs will be 8u thick, but I want them to be spaced a bit apart. I'm going to use 16 units. You can click Preview to check the shape ahead of time. When you're ready, click OK.
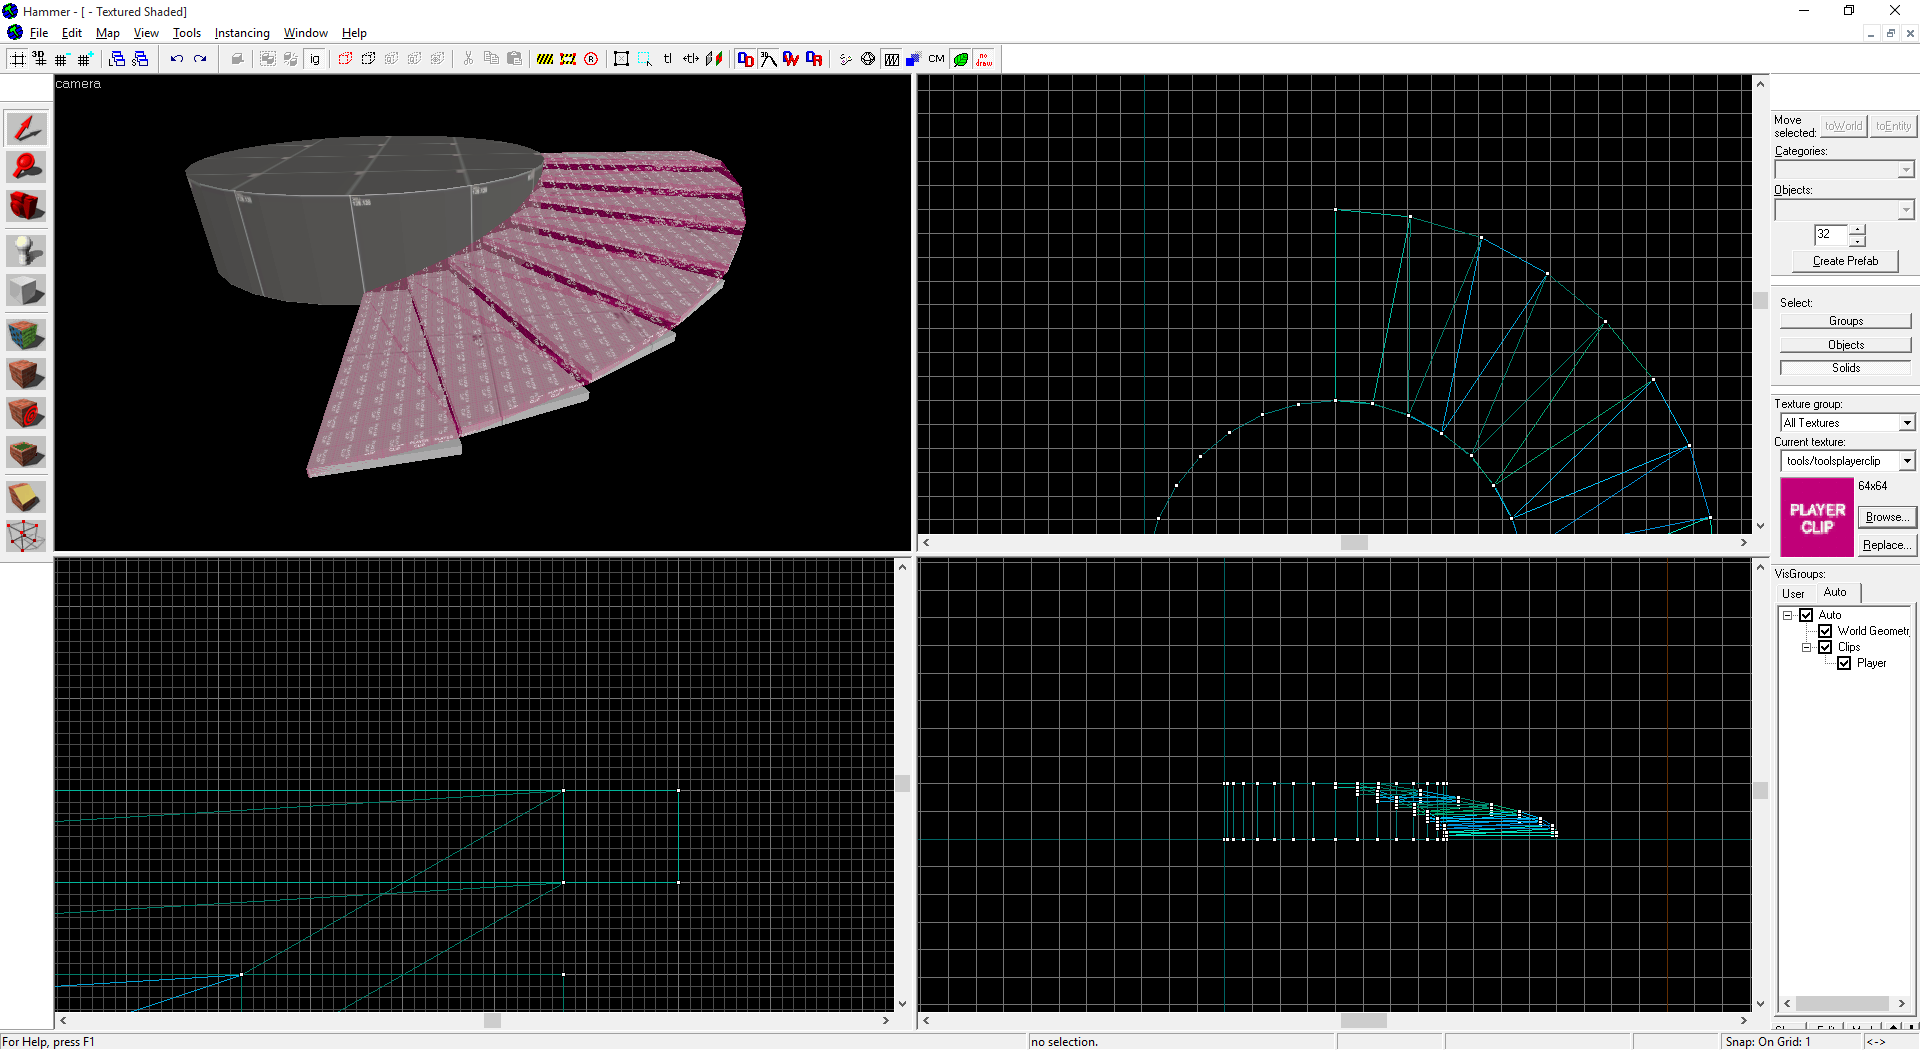
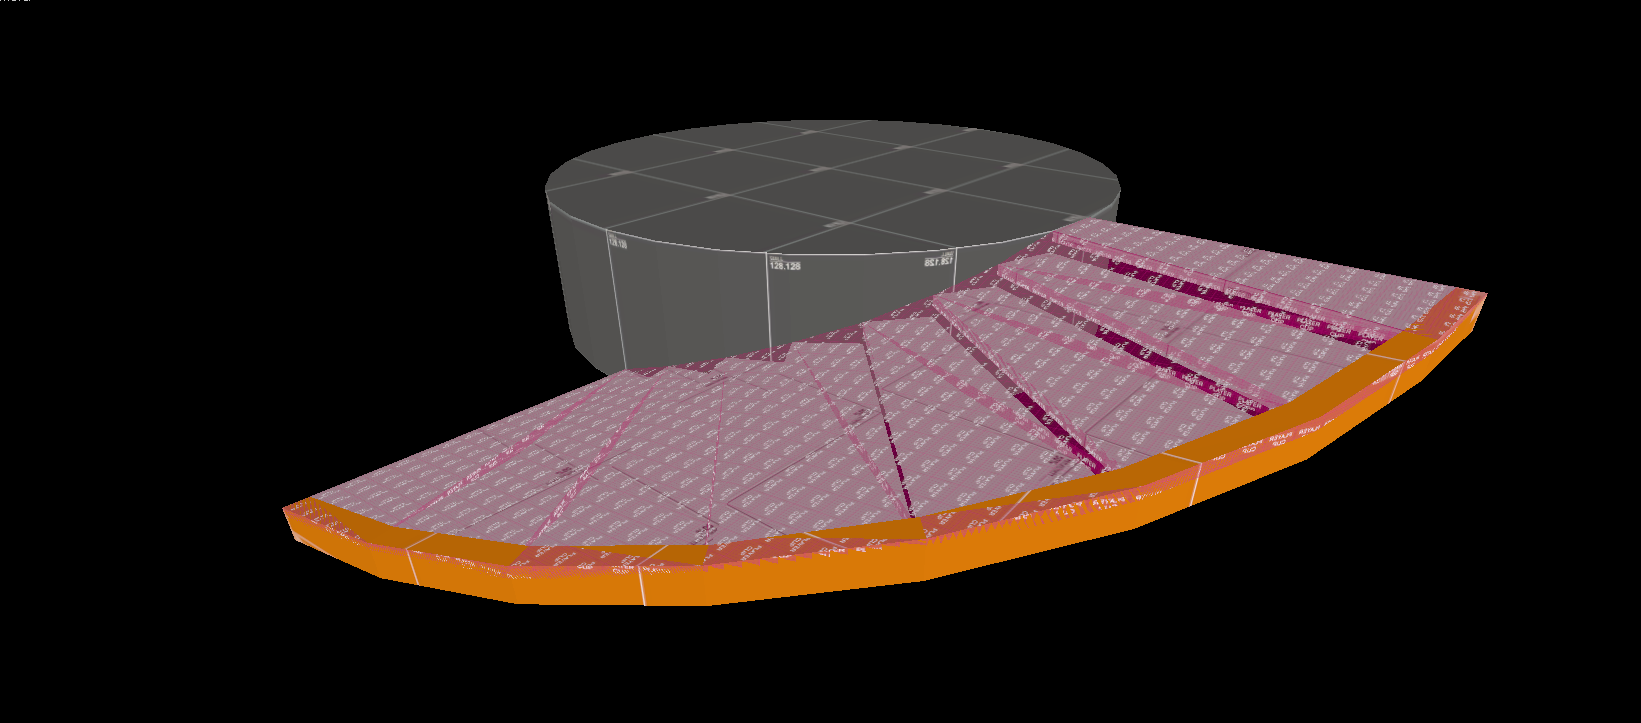
Here's my arch. It looks like stairs! I put the cylinder in too.
I had 8 steps and I raised each one 16u above the last. You might notice that the total height is now 128u, a common height of geometry in TF2. It's no coincidence!
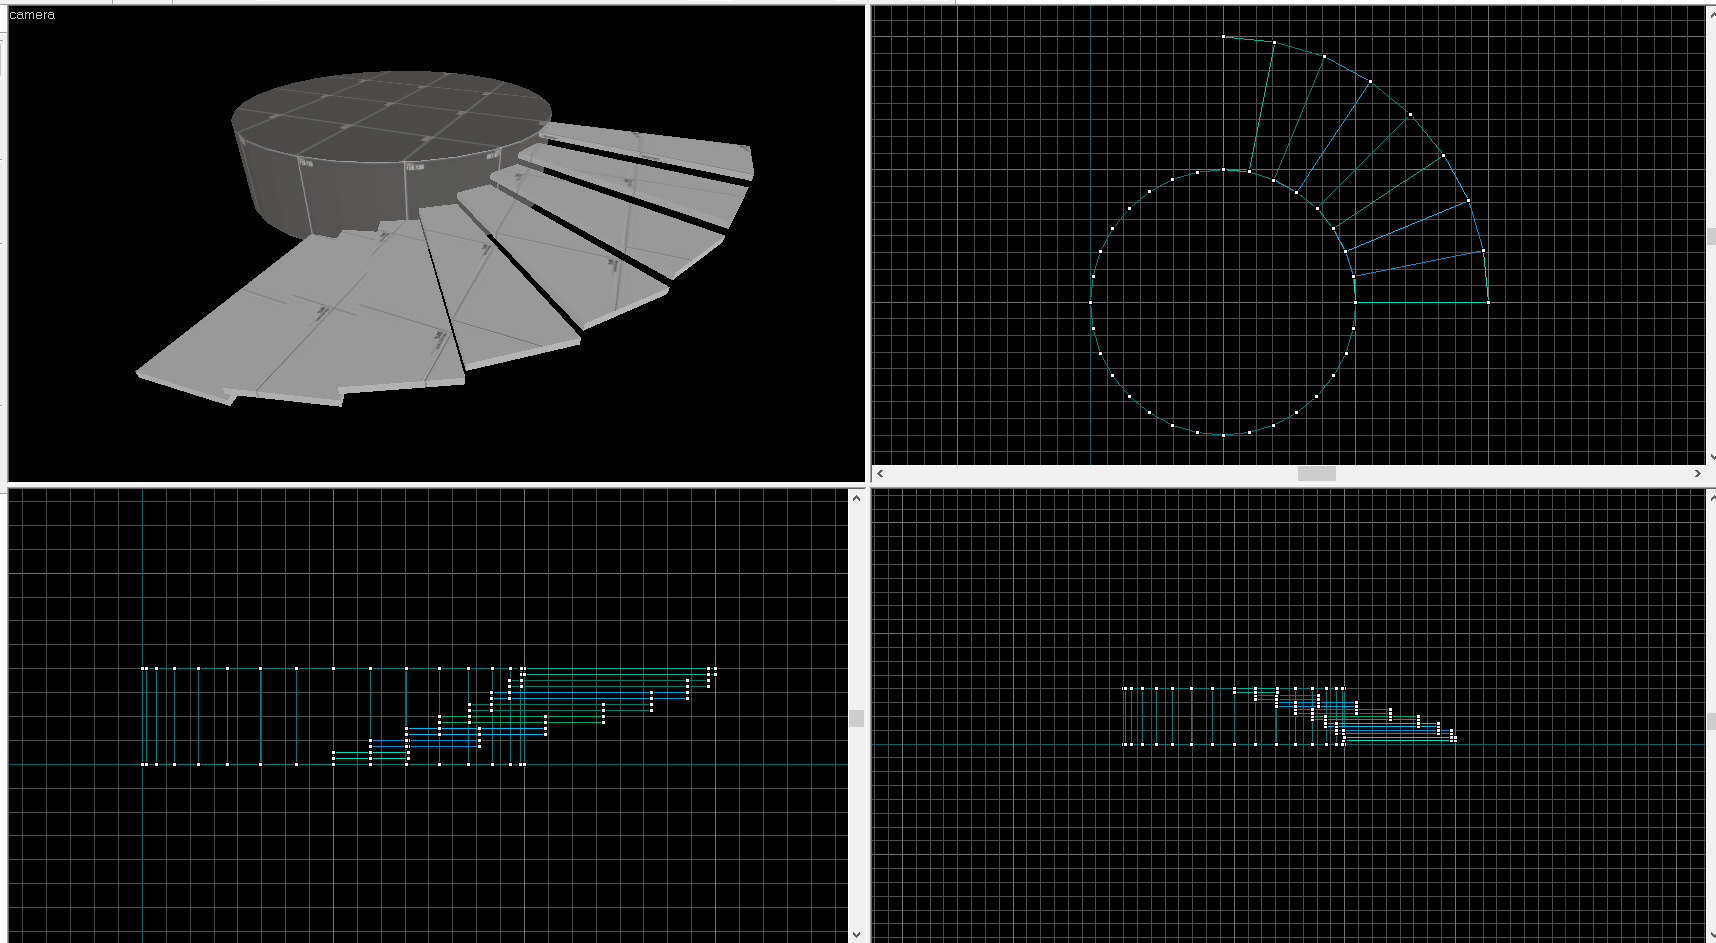
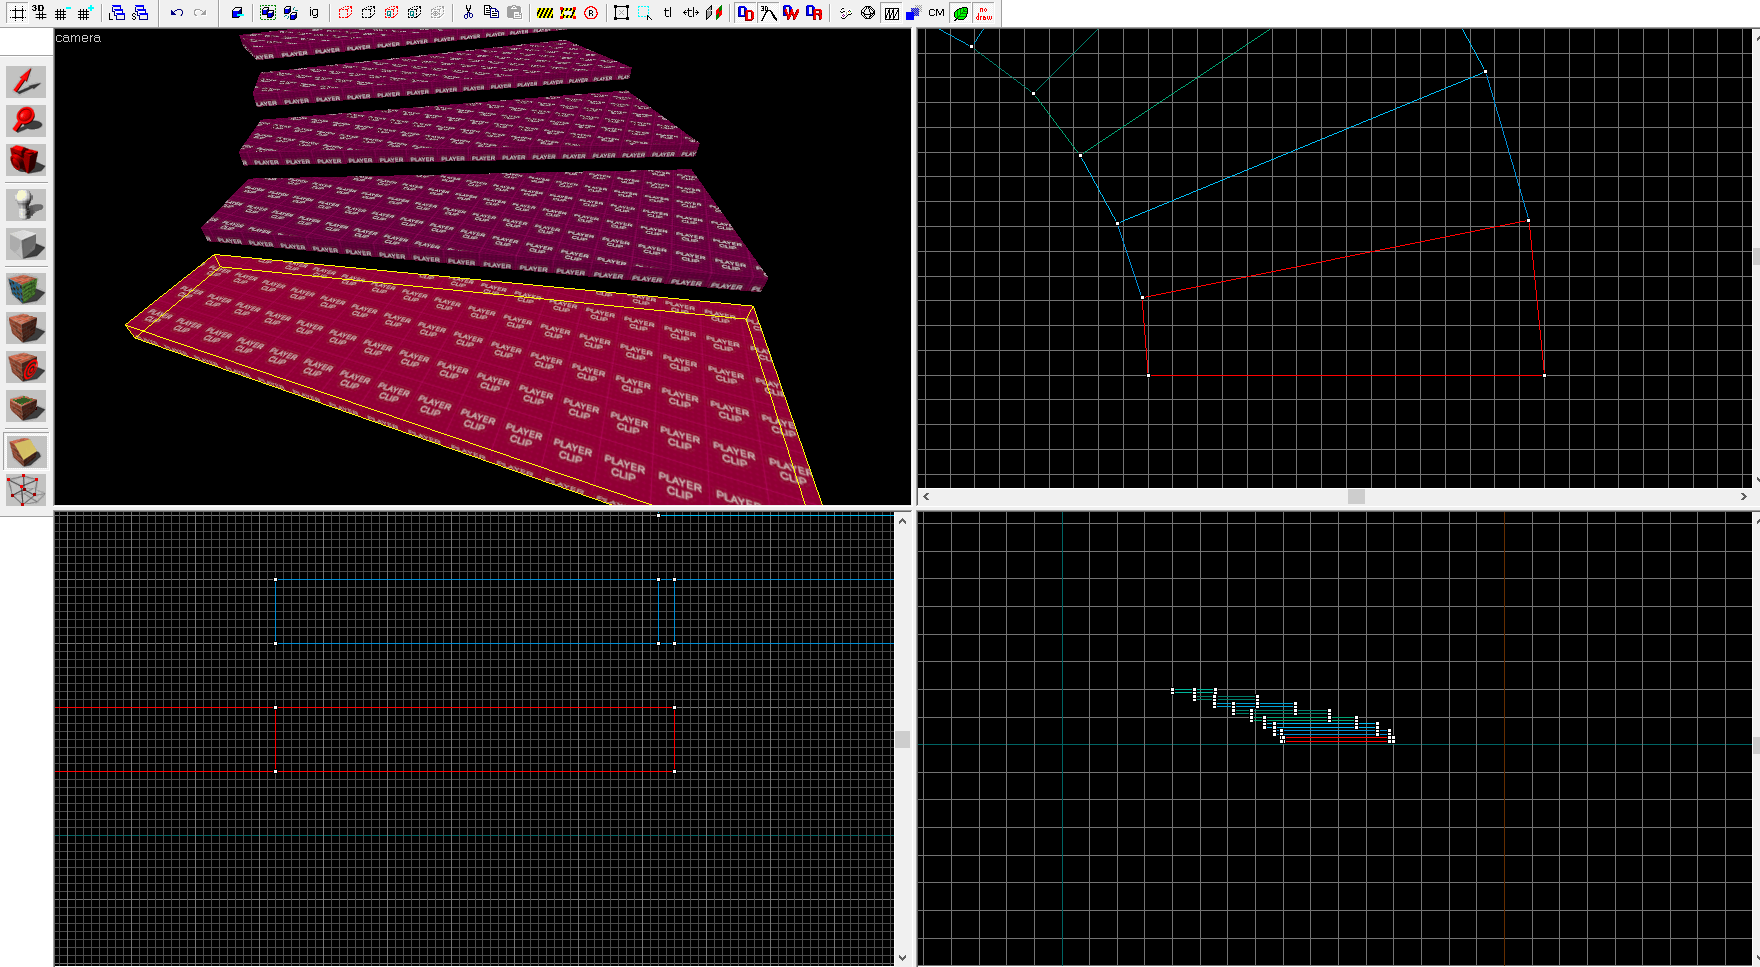
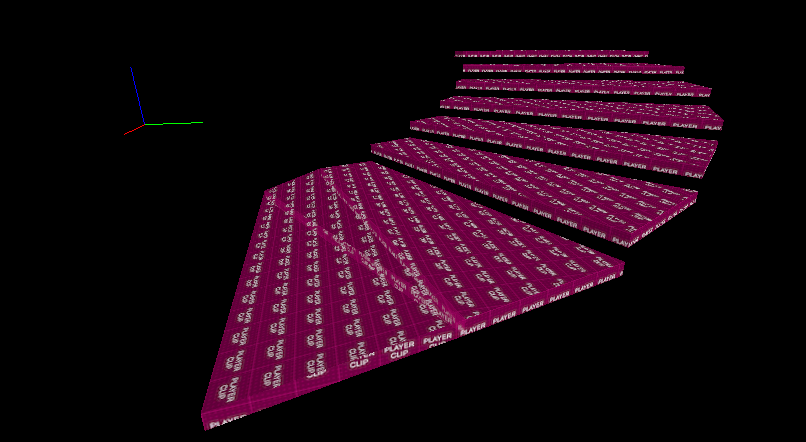
This is great, but players walking up will bounce as they hit each step. We need to playerclip it.
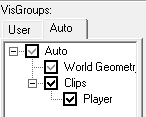
First, select your whole arch, and then clone it. I hold shift and drag it in the top down view. Texture it playerclip. In your visgroups panel, uncheck Auto and then check Clips.
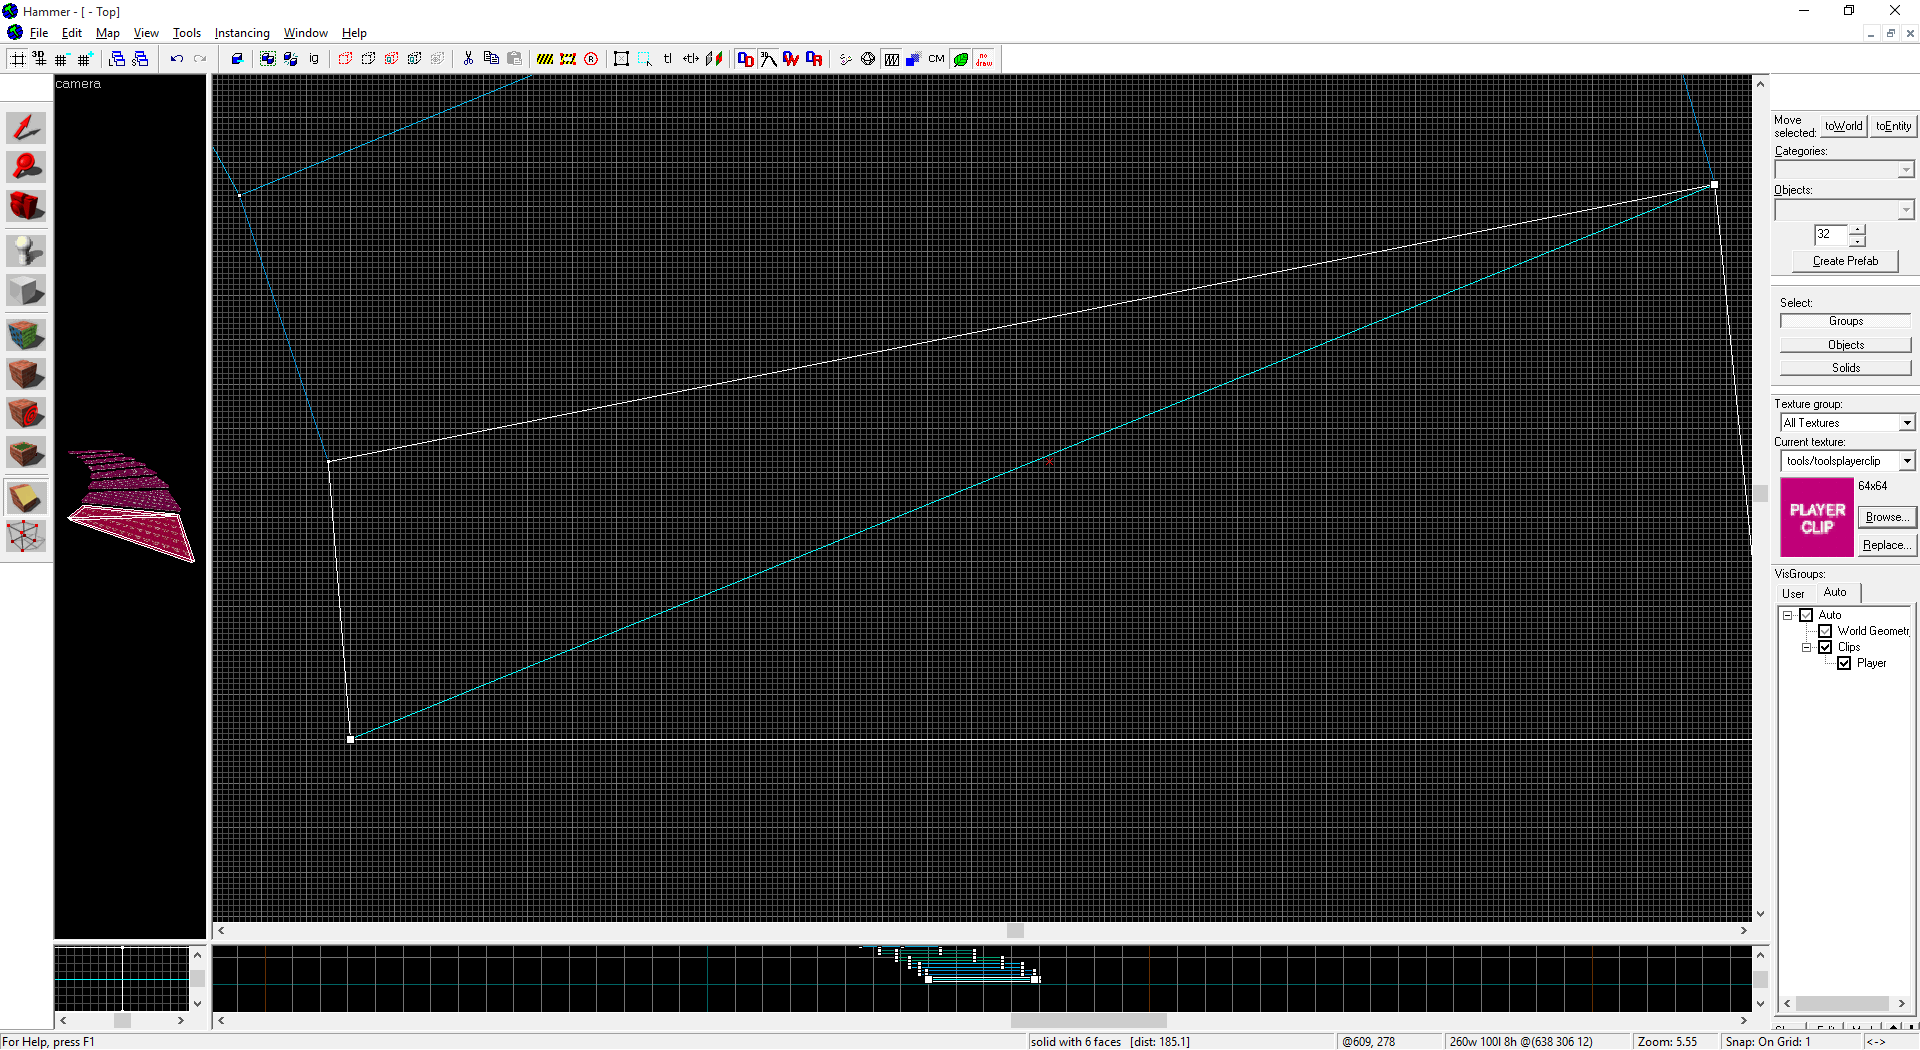
Select only the bottom stair, and then select the Clipping Tool.
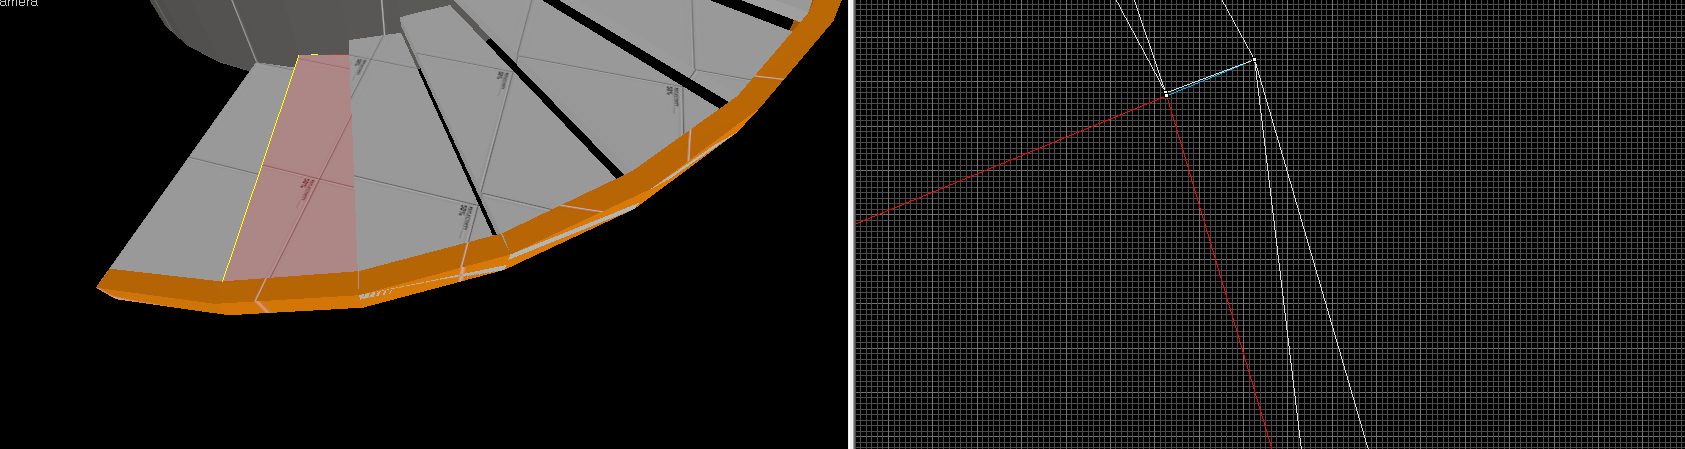
Resize your viewports so you get a good look at the top down view. Clip the stair in half from the bottom inside corner to the upper outer corner. In this case, that's bottom left to top right. You probably need to be at the 1u level to do it. Make sure you get it right!
You don't really need to resize your viewport every time. But it helps when you're getting used to it.
Switch to the vertex tool and select the top vertices.
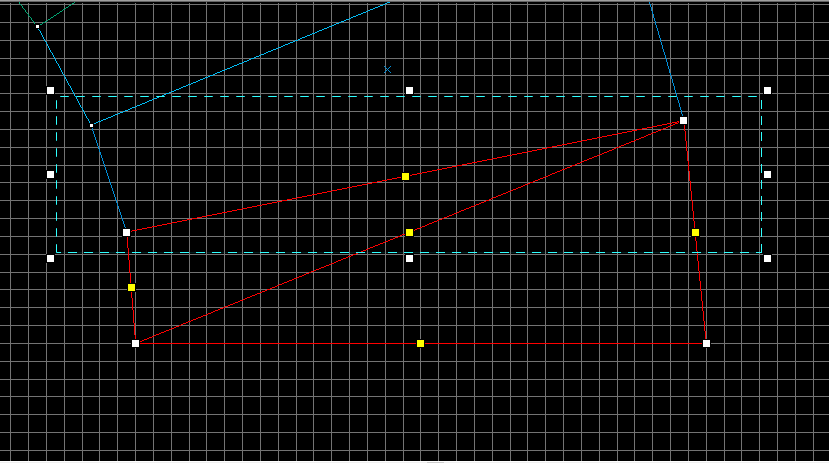
Move to the side view now, and select the vertices that are on the outside edge and raise them up to meet the next stair. If you select the inside edge, it's possible to grab a center (yellow) handle instead. All the vertices should line up nice and neat.
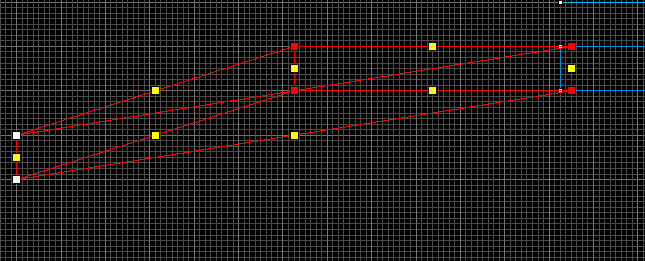
That gives you a nicely shaped clip brush. We just have to repeat that process on every step. You can clip them all first, or clip and vertex edit each one individually. I find it reduces mistakes if I alternate the tasks, but it goes faster if you clip them all first.
At the end you should have something like this:
That's good for alphas, but what about later on when you need to add trim and detail? Well, you add trim just like making the original arch, except you make a few changes...
First your arch needs to be as tall as the total height of each step plus half that height again. In my case, thats 8u (step) + 8u (air) + 8u (half the total so far) = 24u. Second, you need to change the wall width to be the width you want your trim to be. Make sure your Add Height field is the same as it was before!
Click OK when you've got it.
You'll get a similar but thinner arch. Line it up with the top of your stairs and now start cutting and vertex editing it just like you did the playerclip brushes.
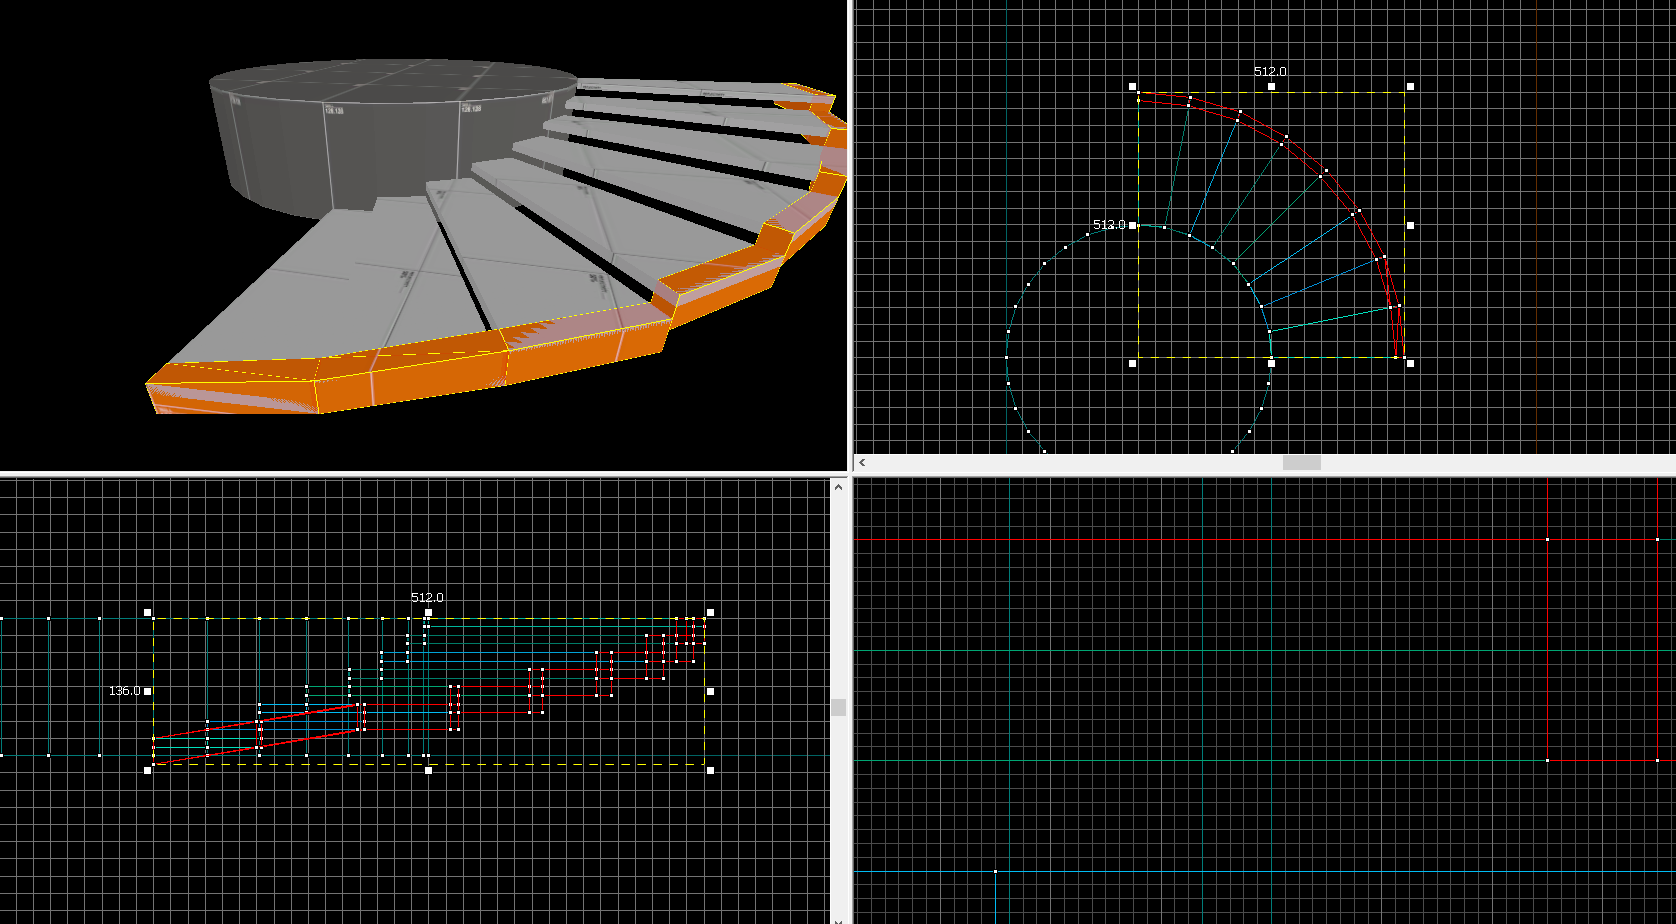
Now simply clip the edges off your original stair brushes, using the new trim as a guide. The edges of the steps will get messy, but they'll be buried and no one will know.
That leaves you with this beautiful thing:
You can use these principles to build a spiral staircase of any size. Just remember to keep it square and keep it a power of 2. It requires some math, but you get used to doing it instinctively pretty quick if you're already using these measurements a lot anyway.
For railings, duplicate the trim for use as a handrail. To add vertical supports, create another, taller arch (probably 64u) with three times as many sides. Choose which brushes to use as supports and just delete the rest. (You have to use only 8 steps to do this, because you can't make an arch with more than 32 brushes. You could also try combining multiple arches, but things could get messy fast.)
It's really a simple task, but easy to mess up and also time consuming. Take it slow, and if you feel like things look funky, check for invalid solids!
Post if you have any questions.
Before I start in on how to do this, I want to make it clear that spiral staircases in TF2 should be a rarity. The taller/longer they are, the more players need to move their mouse to ascend them, which is annoying. Plus, as you'll soon see, they are a challenge to make with the current tools. In general, you probably want to make normal stairs. If you are putting spiral stairs into your map, they should either be small, or around/near something important. Ask yourself: How many spiral staircases can you think of in Valve maps? Where are the spiral stairs on popular community maps?
When making anything in TF2, the key is to use either multiples of 64 and/or powers of 2 for the majority of your brushwork. Many of the door props, for example, fit these measurements. Making a spiral staircase is no different. If you work in powers of 2, your arches will always be on grid. If you use a lot of brushes in an arch, it might be the 1u grid, but it will be on grid.
Start by selecting the brush tool and changing the brush type to arch.
Next, you need to think about what size and shape staircase you want. To keep it simple, I am going to make a staircase that is 128u wide at the top and bottom and curves 90 degrees. (I don't think a staircase that curves around more than 90 degrees is a good idea.) You should always leave some space in the middle of your staircase. The hole will need a cylinder with the same dimensions as your arch.
Make your brush as tall as you want each step to be. In my case, I want 8u tall steps.
Here's the arch I'm about to make. Here, "Wall width" means how wide you want each step to be.
"Number of sides" is how many steps you want. You need to use a power of 2 here, too. I'm using 8 steps for this tutorial, but if I was doing this for a real map I'd probably do 16. Set the arc field to whatever you're using. Try not to stray from 45 degree intervals for simplicity.
The "Add Height" field can be used to automatically stagger your stairs. My stairs will be 8u thick, but I want them to be spaced a bit apart. I'm going to use 16 units. You can click Preview to check the shape ahead of time. When you're ready, click OK.
Here's my arch. It looks like stairs! I put the cylinder in too.
I had 8 steps and I raised each one 16u above the last. You might notice that the total height is now 128u, a common height of geometry in TF2. It's no coincidence!
This is great, but players walking up will bounce as they hit each step. We need to playerclip it.
First, select your whole arch, and then clone it. I hold shift and drag it in the top down view. Texture it playerclip. In your visgroups panel, uncheck Auto and then check Clips.
Select only the bottom stair, and then select the Clipping Tool.
Resize your viewports so you get a good look at the top down view. Clip the stair in half from the bottom inside corner to the upper outer corner. In this case, that's bottom left to top right. You probably need to be at the 1u level to do it. Make sure you get it right!
You don't really need to resize your viewport every time. But it helps when you're getting used to it.
Switch to the vertex tool and select the top vertices.
Move to the side view now, and select the vertices that are on the outside edge and raise them up to meet the next stair. If you select the inside edge, it's possible to grab a center (yellow) handle instead. All the vertices should line up nice and neat.
That gives you a nicely shaped clip brush. We just have to repeat that process on every step. You can clip them all first, or clip and vertex edit each one individually. I find it reduces mistakes if I alternate the tasks, but it goes faster if you clip them all first.
At the end you should have something like this:
That's good for alphas, but what about later on when you need to add trim and detail? Well, you add trim just like making the original arch, except you make a few changes...
First your arch needs to be as tall as the total height of each step plus half that height again. In my case, thats 8u (step) + 8u (air) + 8u (half the total so far) = 24u. Second, you need to change the wall width to be the width you want your trim to be. Make sure your Add Height field is the same as it was before!
Click OK when you've got it.
You'll get a similar but thinner arch. Line it up with the top of your stairs and now start cutting and vertex editing it just like you did the playerclip brushes.
Now simply clip the edges off your original stair brushes, using the new trim as a guide. The edges of the steps will get messy, but they'll be buried and no one will know.
That leaves you with this beautiful thing:
You can use these principles to build a spiral staircase of any size. Just remember to keep it square and keep it a power of 2. It requires some math, but you get used to doing it instinctively pretty quick if you're already using these measurements a lot anyway.
For railings, duplicate the trim for use as a handrail. To add vertical supports, create another, taller arch (probably 64u) with three times as many sides. Choose which brushes to use as supports and just delete the rest. (You have to use only 8 steps to do this, because you can't make an arch with more than 32 brushes. You could also try combining multiple arches, but things could get messy fast.)
It's really a simple task, but easy to mess up and also time consuming. Take it slow, and if you feel like things look funky, check for invalid solids!
Post if you have any questions.
Last edited:

