[TUTORIAL] Making a cool 3d skybox.

Oct 25, 2007
219
690
Basically, a 3D skybox, is a sky with added props and brushes. A properly build 3D skybox will be faster to compile and run, rather than expanding your map and adding full sized props and brushes.

STEP 1. Creating a basic skybox.
First take notice of where the coordinates 0,0,0 are. YOu can tell, because as you move you mouse cursor around, you'll see the coordinates at the bottom of Hammer, as I've circled:
gVtETTO.jpg

The 0,0,0 coordinates are a reference spot of the sky camera entity, which we'll be discussing further down.

Second, build a floor that's 512x512x64. Create blocks at each corner, these will act as a reference of where the floor ends.

Next, choose the toolsskybox texture and draw a box that covers the entire floor and will give you enough height. The dimensions should be 640x640x640. Once created, right click on it and select make hollow. The thickness should be 64.

Add a info_player_teamspawn and a light_environment. This is what you should get inside Hammer:
wo0mYZD.jpg


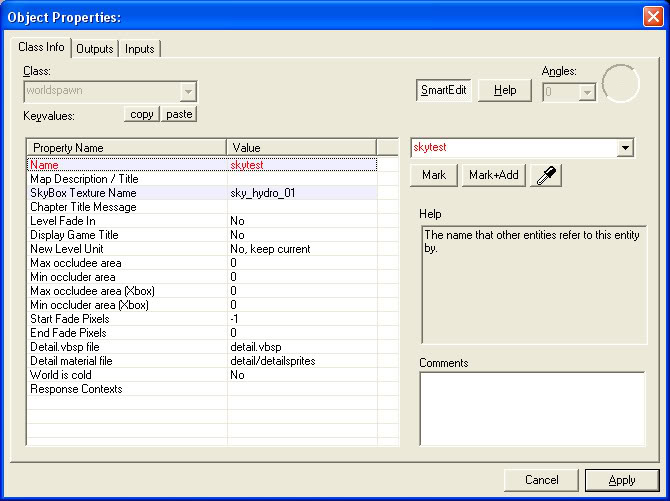
Click on the Map menu and select Map Properties. Under skybox_texture_name, type sky_hydro_01.
Ab1TXav.jpg


TIP: The TF2 skybox textures by VALVe are:
sky_dustbowl_01
sky_granary_01
sky_gravel_01
sky_well_01
sky_tf2_04
sky_hydro_01
You can find out more about these sky textures here.

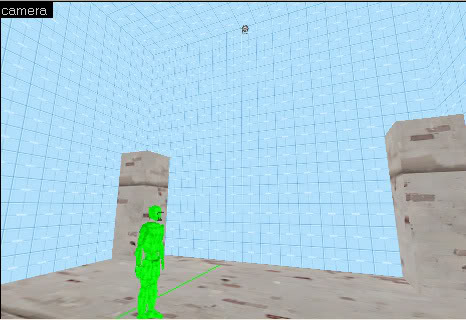
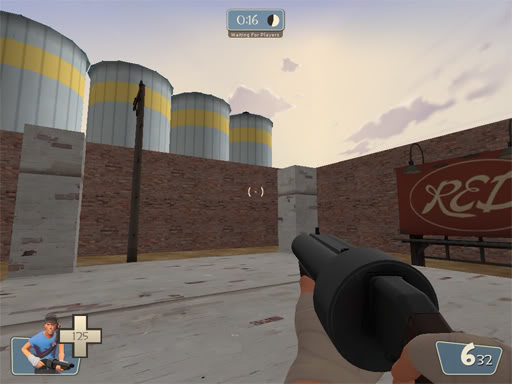
If you compile and run your map, you should get this:
7Txsaij.jpg


It's nice, but it looks like we're floating in the sky.
 
Last edited by a moderator:
Oct 25, 2007
219
690
Part 2. Preparing for the 3D Skybox

As we're seen above, we've created a sky, but it doesn't give much information about the world outside this map. We want to add the idea of a world beyond this map.

Remember where the 0,0,0 coordinates are? Place an entity called sky_camera there. It doesn't matter if the sky_camera entity is inside a brush, entity or even outside the skybox. The one we're placing right now is just a reference point. The important part is that the sky_camera has to be at 0,0,0.

Once the sky_camera has been placed, hold down the CTRL key and click the floor brush, the four corner brushes and the light_environment entity. Essentially, you should have everything selected except for the sky brushes and the info_player_teamspawn entity. While those mentioned items are selected, go to the Edit men and select Copy, and then Paste. So you've created a copy of the items selected. Move them away from the originals.

Now we're going to shrink them. Now, where did I put that shrink ray?? The default model for a 3d skybox is 1/16th (or 1:16). That ratio works well for us, because the skybox models by VALVe are also on the 1/16th ratio.

Right click on the selected items, select transform. Make sure you have the scale button selected. Under the fields of X, Y and Z, type 0.0625 (which is the numerical value for 1/16th).
o9bdZgK.jpg


Now you should have a very small selected package:
DtVozfN.jpg


Now create a new brush, with one of the dirt textures on it. This will be the extended ground for the 3d skybox. You'll need to change the scale of the textures as well. Use the texture application tool on the top of the ground brush you created. In the fields for texture scale for X and Y, type 0.01625, this is 1/16th the 25% scale normally used by those textures.
AgokN7t.jpg


Now create a new skybox for you model, in the same way before. Draw a box that covers the ground texture and is high enough. Right mouse click and select Make Hollow with the thickness of 64.

Now we can also start adding brushes and props to our model. There's a whole plethora of skybox models that VALVe included in TF2. The all have skybox in their name, so you can search by that.
ZM1sQMk.jpg


I'll leave the skybox modeling to you.
 
Last edited by a moderator:
Oct 25, 2007
219
690
Part 3. Clean up and compiling.

Alright, now that you have the skybox model created, there are a few redundant parts we should remove.

Inside the model, delete to copies of the floor and the four posts. They aren't necessary in the skybox (we were just using them for reference to know where the game field ends). Keep the sky_camera and light_environment entities though.

In the real playing map, delete the sky_camera at coordinates 0,0,0. Again, this entity was just a reference to know the distance between the playing ground and the 3D skybox. Optionally, you can also delete the four corner posts, again used as references.

Now compile and run the map. This is how mine came out:
SzswEc1.jpg

The sign, the pole, the redbrick wall ,the silos and the dirt ground are all part of the 3D skybox.

If it's too dark for you, you can always change the settings in both light_environment entities.

DOWNLOAD MY 3D SKYBOX VMF FILE HERE!


Tip: What if you place a skybox brush or prop into the modelled playing area? Well, you'd get the item appearing in the play area, but it wouldn't be solid. It would be like an illusionary item.
 
Last edited by a moderator:

drp

aa
Oct 25, 2007
2,273
2,628
wow, thanks. the skybox has always been my dead end when trying to release maps. :thumbup1:
 
Oct 25, 2007
219
690
wow, thanks. the skybox has always been my dead end when trying to release maps. :thumbup1:

No problem, hope it helps. It took me a while to get 3D skyboxes working properly. What few tutorials about it on the internet were pretty threadbare. My tutorial might be a bit longer than those I found, but I tried to be thorough in my explanations.
 
A

Alexforcefive

Spaceweasels, your heroism knows no bounds. So the 3d skybox is always built around 0 0 0, and the sky_camera entity tells your skybox where that is, right?
 
Oct 25, 2007
219
690
Spaceweasels, your heroism knows no bounds. So the 3d skybox is always built around 0 0 0, and the sky_camera entity tells your skybox where that is, right?

Thanks, glad you like it. Basically, anything the sky_camera entity sees, will be reproduced, begining at coordinates 0,0,0.
 

Logo

L3: Member
Oct 25, 2007
115
26
Great guide but mention 2 things that I believe you need to make sure to do.

1. Your 3-d skybox needs to have a it's own light_environment to properly light
2. Your 3-d skybox needs to have its own fog controller to be affected properly by your fog.
 
Oct 25, 2007
219
690
Great guide but mention 2 things that I believe you need to make sure to do.

1. Your 3-d skybox needs to have a it's own light_environment to properly light

Yes, that's true. In the steps, I do say to select and copy everything but the info_player_teamspawn and the skybox brushes. The light_environment entity you created in the play area ealier should have been included the the selecting and copying process. The reason why I include it with the copying and pasting, instead of creating the light_environment after setting up the 3d skybox, is that you could get lighting and shadows that are a bit off.

2. Your 3-d skybox needs to have its own fog controller to be affected properly by your fog.

Actually it doesn't, I've tested it myself. The sky_camera entity will do the fog effect for the 3D skybox.

Thanks for the feedback.
 

Snipergen

L13: Stunning Member
Nov 16, 2007
1,051
150
nice tut, will help a lot of people and maps look better, but a little question... its nooby but i just have to know it: if you select a part of your map and you place/rotate it, the textures change their position. I just smell that there is a button for that to fix this but i dont know where:/
 

Intraman

L4: Comfortable Member
Nov 4, 2007
191
0
I also have a question.
Do you absolutely need that bottum skybox brush? I.E. Should I always put skybox floor under the regular floors in my maps?
Hope that makes sense.
 
Oct 25, 2007
219
690
I also have a question.
Do you absolutely need that bottum skybox brush? I.E. Should I always put skybox floor under the regular floors in my maps?

It's a good question. In most scenarios, you don't need it, as long as you do have brushes enclosing the rest of the map to avoid leaks.
 
Oct 25, 2007
219
690
if you select a part of your map and you place/rotate it, the textures change their position. I just smell that there is a button for that to fix this but i dont know where:/

Yeah, there is an option to lock/unlock the textures on a brush. However, I don't have Hammer right now to answer that. ;)

I'll put up an update regarding that question.
 
A

Alexforcefive

While those mentioned items are selected, go to the Edit men and select Copy, and then Paste. So you've created a copy of the items selected. Move them away from the originals.

Now we're going to shrink them.

Before you do this, remember to turn off the props visgroup. Don't ask me how I know =/

[edit] never mind, even if you turn the visgroup off, they still get selected and copied. annoying!
 
Last edited by a moderator:
Oct 25, 2007
219
690
Before you do this, remember to turn off the props visgroup. Don't ask me how I know =/

[edit] never mind, even if you turn the visgroup off, they still get selected and copied. annoying!

Yeah, actually this is a good point. At that point of my tutorial, I hadn't started populating the playing area. You definitely shouldn't try copying and pasting entities like props, which won't shrink properly.

In an actual map that you construct, you won't want to copy everything into the skybox, just the border walls as reference of where the skybox should start.
 
A

Alexforcefive

Also, I figured it out tonight - if you hit the "ignore groups" button before you select everything, you shouldn't have any hidden visgroups popping up again
 

Splatt<cnasty

L1: Registered
Dec 3, 2007
10
0
How do you make skyboxes that cover large/huge areas? or maps? everytime I try I keep getting "error area to large" when I render.
 
Oct 25, 2007
219
690
How do you make skyboxes that cover large/huge areas? or maps? everytime I try I keep getting "error area to large" when I render.

I haven't seen that error before. The only thing I can think, is that you still have a sky_camera entity in the playing field. You should only have one Sky_Camera, and it should be the the 1/16th scale skybox.
 
H

Hatchetman

Thanks for the tut, the skybox is one of my weak points...as you may tell from this question...

I followed this tut up to you said..."Now create a new brush, with one of the dirt textures on it. This will be the extended ground for the 3d skybox. "

Where do I make this? What size do I make it? Is it 1.0 units thick and make it even with the 1/16 model?

And, also, what exactly does this mean..."Draw a box that covers the ground texture and is high enough."

Does the 1/16 model skybox have to be a certain hight?

Also, why are my props so huge...I must have messed up something...maybe I dont understand exactly why we did a 1/16 model...is that what we build our skybox around?

skybox.gif
 
Last edited by a moderator:
Oct 25, 2007
219
690
Thanks for the tut, the skybox is one of my weak points...as you may tell from this question...

I followed this tut up to you said..."Now create a new brush, with one of the dirt textures on it. This will be the extended ground for the 3d skybox. "

Where do I make this? What size do I make it? Is it 1.0 units thick and make it even with the 1/16 model?

For a skybox, I usually make my brushes 4 units thick, which translates to 64 units thick (4 units x 16 scale = 64 scaled units).The length and width is up to you. In the example skybox I made, I extended the ground by 192 units in the four directions. When scaled up, this gives a huge amount of land to work on.


And, also, what exactly does this mean..."Draw a box that covers the ground texture and is high enough."

Does the 1/16 model skybox have to be a certain hight?

In that step, we're making a cube, a scaled 2d skybox. You want it to be high enough to accommodate most skybox models.

In my example map, I made the skybox cube 576 units high.


Also, why are my props so huge...I must have messed up something...maybe I dont understand exactly why we did a 1/16 model...is that what we build our skybox around?

Make sure the props you're using have the work "skybox" in the prop name. If you look at the example picture I took of the props, you'll notice all have the name "chimney_skybox" in them.

We use 1/16th scale, because the skybox props that VALVe included are 1/16th in scale. You can change the scale in the sky_camera entity, but the skybox props won't be scaled properly.


Try downloading my VMF file and take a look at the props and brushes I use.
You can download my example map here!