-fixed a roof at C that didn't have collisions
-the doors that open after B is captured now take 15 seconds to start opening instead of 10, since I felt watching the demos that it was too easy for BLU to get through them too quickly without RED setting up a consistent defense

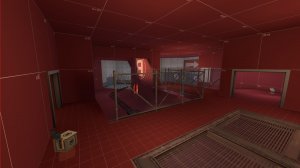
I know C sucks and am already working on a fixed version.
I plan to also change A a little, since RED Snipers seem to currently have a hard time on it.

Still, though, I was really happy with how A2 played, even with fairly imbalanced teams. It's the kind of feeling that makes me want to keep mapping, and it makes me wonder why I spent a month not releasing any new versions of this map, thereby denying myself of this feeling.

Also, it probably would've taken me at least another week, or longer, to realise that C is terrible. Who could've guessed that testing maps is actually a really good thing?
A is the good, B the bad, and C, the ugly.


Change | Reasoning
made the BLU spawn -> B connector a sniper tower |
this tower can only watch the longer-range side of pre-A, and BLU can only access it from there - this is to encourage class balance in that RED snipers can contest the side of pre-A towards which BLU's snipers will gravitate, but close-range classes on BLU naturally want to avoid the sniper tower by going beneath it, which brings them to the more spammy part of A and discourages them from trying to spawncamp or attack RED from behind - this change also has the helpful effect of making it take longer for BLU to reach the sniper tower and thus attack B/flank, which means that RED doesn't automatically lose A after one push from BLU
added more doors to the B -> C connector |
the single door was terrible, given that RED was given time to start camping it and it was directly connected to BLU's only spawn door.
made the cart more seethrough and made the track flatter and wider |
sometimes RED could block the cart really cheesily by hiding in some corner near the payload or on top of it, and they'd essentially be invisible and invincible. Situations like that where BLU has no counterplay and doesn't know why they're losing just aren't fun, so I've focused on letting BLU see RED players whenever they're on top of the cart, and reducing the number of slopes in important stretches of the cart path - this has the additional benefit of reducing the chance of players getting stuck in the cart
made it so that BLU takes over RED's first spawn instead of getting a new, single-exit one of their own |
This allows me to use more than one spawn exit for BLU - I also gave them a spawn exit that exits directly onto the far-forward hold before C, so they can push through it more easily and still have a short walk time to last.
redesigned the connectors between B and C to involve more than just one route |
this combined with the previous change should help to reduce the ability of RED to brutally spawncamp BLU and stop them from attacking C, generally making the area between B and C more interesting and encouraging use of all the height I built into it - although, it turned out a little more, shall we say, 2008-y than I expected.
reduced RED's respawn wave time when defending A from 8 seconds to 6 seconds |
this is to make it so that RED uses their new sniper tower and reduced respawn times to actually rotate between using the sniper tower and A itself to defend as I had originally intended - a change promoted by the idea that rotating between two places to defend makes defending wayyyy harder than on a linear map, so I can't use the same respawn times as Badwater. While defending B, they can't use the same sniper tower tactic, since now they respawn slowly, so after one push BLU can push pretty far forward before RED respawns, so BLU should hopefully own the sniper tower by default when attacking B
changed RED's respawn wave time when defending C from 8 seconds to 6 seconds and made them spawn closer to C |
RED's spawn being on low ground was a deliberate decision made to make their backward hold desperate, but it was a little too desperate when RED spawned so far from their backward hold and took so long to respawn - this should make it so that they can more reliably form a strong-ish forward hold after losing their hold over the slow-opening B doors, as well as making it better for each individual RED player, because they're dead for less time, so they don't have to watch the cart progress towards an inevitable loss while they're not even alive to stop it
changed BLU's respawn wave time when attacking C from 3 seconds to 5 seconds |
It was too easy for BLU to just constantly apply pressure on C since they could die, respawn and come back before RED had even pushed forward at all, denying the possiblity of a forward hold
added a fence at C that blocks sightlines between the high ground (which now has a medium health) and BLU's main entrance |
This allows RED to have a potent backward hold on the high ground where they can drop down to defend the cart or, due to the nature of this cart, stand on top of it and block it (thereby forcing BLU to use the two high platforms to clear them off it). The rollback zone ensures that once RED get off it, the cart goes back behind the fence where RED can't employ their cheesy strategy anymore, so they're encouraged to move forward.
added platforms to the area outside the C building |
These, combined with the rollback zone that forces the cart to the outside of the building whenever a push fails, allow BLU to jump on top of the cart if they so choose, while also allowing RED to hold beneath the platforms and discourage this behaviour, which in turn forces BLU to use the actual cart path to form a push
shortened the height of the payload's capture zone |
this means that whenever the payload is beneath a bridge, RED can no longer block it by standing on top of the bridge. It also means that BLU stops capping if they jump while on top of the cart which is a bit sad but oh well
the control points no longer have their holograms hidden |
this is just something that generally improves readability
added some clouds and a fog gradient to the 3D skybox |
I actually tried to add fog to the map before A1, but it didn't look that good, and at the ranges where it looked alright, it interfered with gameplay, so I just cut it. These clouds are an attempt to recreate that feeling - it makes the skybox look like it came straight out of Counter-Strike: Source, which might be worrying, but I think it looks decent, and breaks away from the low-contrast nature of the map's aesthetics as a whole
added pickup patches |
the kangaroos are still watching yuo

Attachments

  • bluspawn1.jpg
    bluspawn1.jpg
    185 KB · Views: 45
  • bluspawn2.jpg
    bluspawn2.jpg
    165.2 KB · Views: 48
  • a1.jpg
    a1.jpg
    181.9 KB · Views: 45
  • b1.jpg
    b1.jpg
    197.9 KB · Views: 45
  • b2.jpg
    b2.jpg
    125.5 KB · Views: 49
  • c1.jpg
    c1.jpg
    154.3 KB · Views: 49