- Jan 2, 2020
- 20
- 38
Introduction
This simple step-by-step walkthrough demonstrates how to create custom envmaps for Source!
This thread will show you how to capture in-game cubemap images. It will then walk you through the steps to implement those images into our envmap texture.
Ultimately, you may use any images you want as long as they are seamless. Using non-seamless textures will create visible boundaries between the textures within the envmap.
Valve Template
Within
...Half-Life 2\hl2\hl2_textures_dir.vpk, you will find the file, cubedemo.vtf.
It should look something like this:
You will see that incrementing the face value in the Image section will change the face of the cubemap. You will notice that there are six images (Faces 0 to 5) as well as an additional image on Face 6. This spherical image is generated automatically, so we do not need to create it manually.
Here is what the spherical image looks like. As you can see, it displays each face stitched together.
Notice the direction of the arrows. The bottom (DN) face encapsulates the rest of the faces:
To extract the faces from the .vtf file go to File -> Export All. Save this in a relevant directory. We will be using these images as a reference so save them in whichever format is easiest. I would recommend .png or .jpeg.
After exporting, you will notice that each face is named incrementally. Take note of this order as this is vitally important for the process. Our images must be named so that, alphabetically, our faces follow this order. Right -> Left -> Back -> Front -> Up -> Down.
Capturing Our Images
Though we may use any images we want for our envmap, this guide will demonstrate how to take in-game envmap screenshots.For this guide, we will be using Rotunda as our map. Here it is on the Steam Workshop!
Once you have loaded into your map you want to use the following commands:
mat_envmapsizemat_envmaptgasizeThe default values for these are
128 and 32.0 respectively. You can change these values to increase the output resolution of our envmap faces. You should keep these to a power of 2 as we will be importing these textures into VTFEdit.Please note: The game appears to crash when a value greater than 512 is used, at least from my own testing.
You can create envmaps in both HDR and non-HDR formats. This guide will proceed under the assumption that you will be using the non-HDR workflow. To change between HDR and non-HDR mode you must disable HDR using the
mat_hdr_level command. Setting this value to 0 will disable HDR. The map will need to be restarted. To re-enable HDR after you are finished type the same command again but with the value 2.Once you have set the aforementioned values find a location in your map that you wish to have as the origin of your envmap. Navigating through the map in spectator mode is the most effective way to do this.
When you are satisfied, type
envmap in the console. You will see the following as your images are captured.(TW: Flashing imagery)
These images will be output to your game directory. You should find them in
...\Team Fortress 2\tf\cubemap_screenshots.Here are the images output from Rotunda. Note that you will see .pfm files if you capture your envmap in HDR mode.
To have .tga files you want to capture your envmap in non-HDR mode.
Using these images immediately will yield unfavorable results. They need to be reoriented.
Preparing Our Images
Using the cubedemo images as a reference we need to edit our image outputs.Open your favorite image editing software and manipulate your images to match the cubedemo example images. For further reference, here is how our image faces for Rotunda have been oriented.
koth_rotunda_rc13rt - Right:
Flip the image horizontally
Rotate the image 90° counter-clockwise
Save and export as cubemap_rotunda_0
koth_rotunda_rc13lf - Left:
Flip the image horizontally
Rotate the image 90° clockwise
Save and export as cubemap_rotunda_1
koth_rotunda_rc13bk - Back:
Flip the image vertically
Save and export as cubemap_rotunda_2
koth_rotunda_rc13ft - Front:
Flip the image horizontally
Save and export as cubemap_rotunda_3
koth_rotunda_rc13up - Up:
Flip the image horizontally
Rotate the image 90° counter-clockwise
Save and export as cubemap_rotunda_4
koth_rotunda_rc13dn - Down:
Flip the image horizontally
Rotate the image 90° counter-clockwise
Save and export as cubemap_rotunda_5
Notice how we are saving our images incrementally. You can name your files whatever you want, so long as they follow the above order when listed alphabetically.
Here is how your images should look when compared to your original images.Importing Our Images
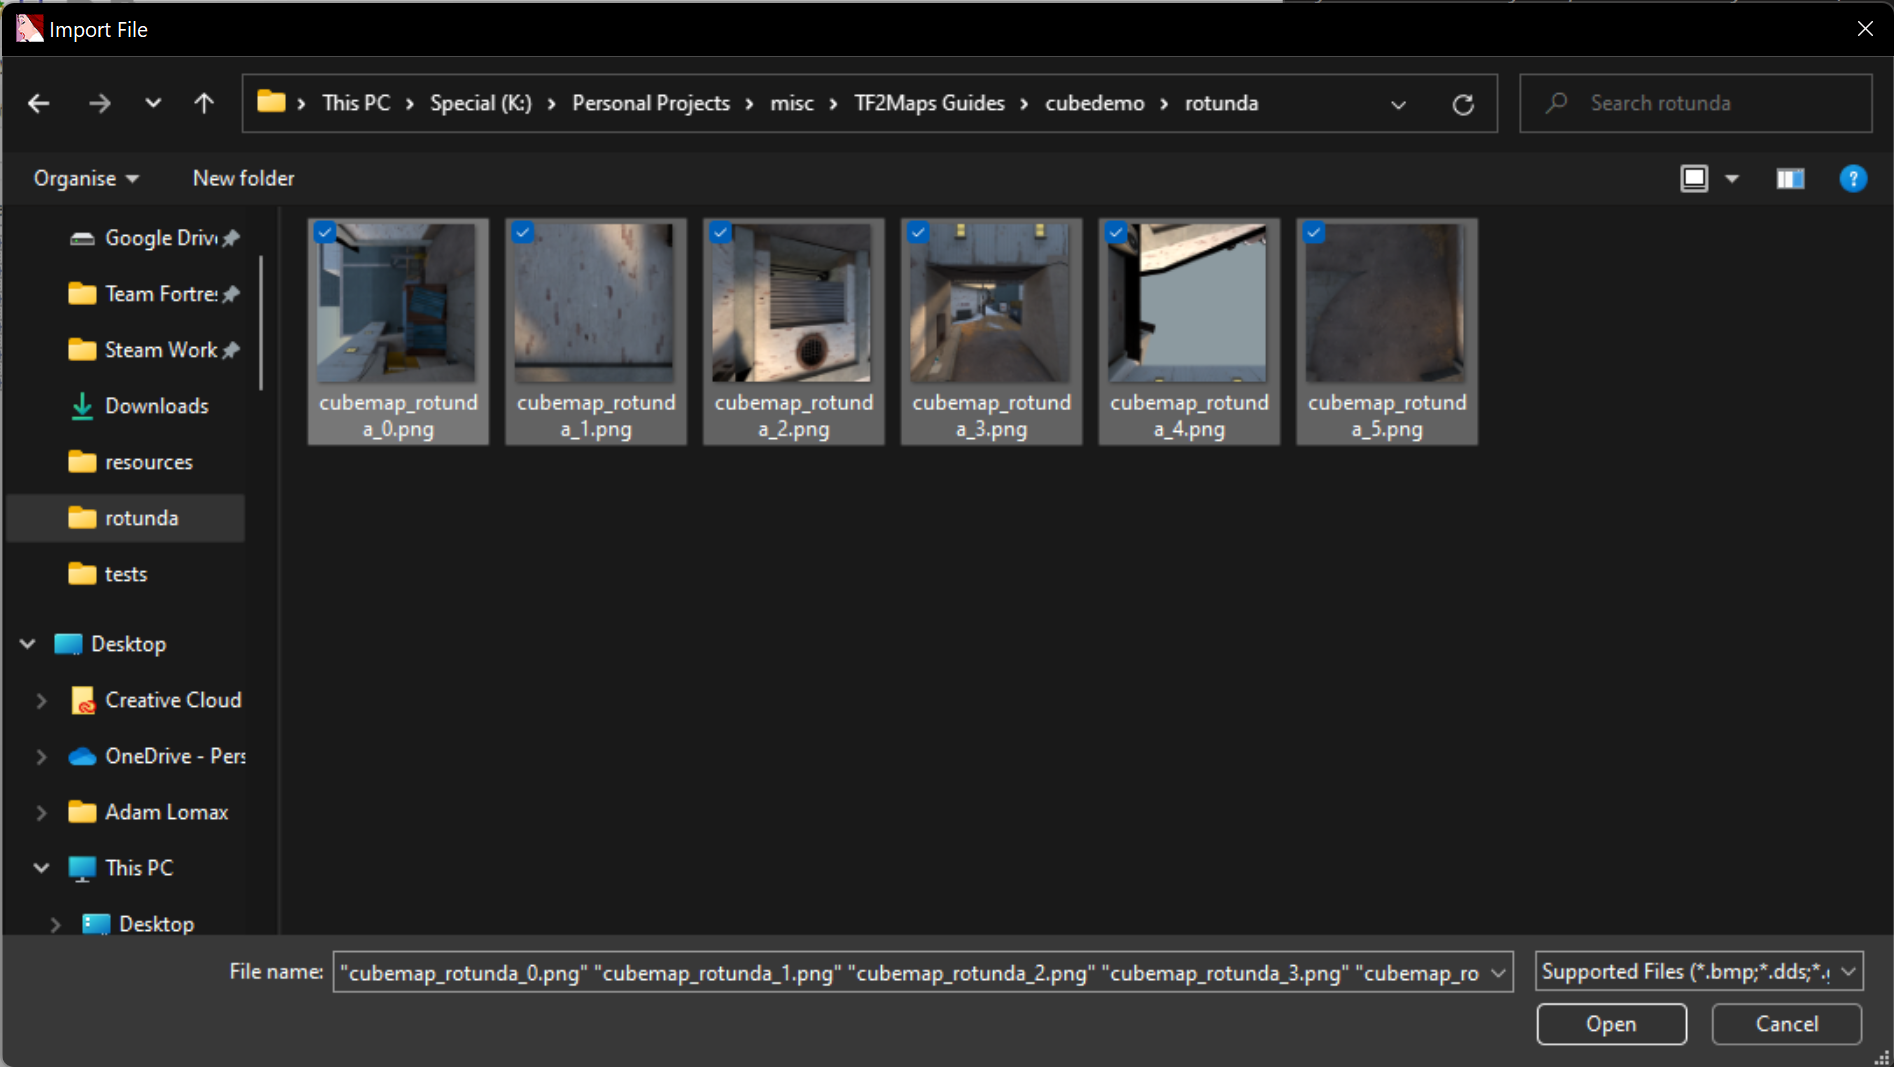
Open up VTFEdit and import your images. Select all of the relevant images for importing.Select all of the files that we want to import. Remember, they must be named so that they follow the correct order when selected. You want to be sure that your images are imported in the following order: Right -> Left -> Back -> Front -> Up -> Down.

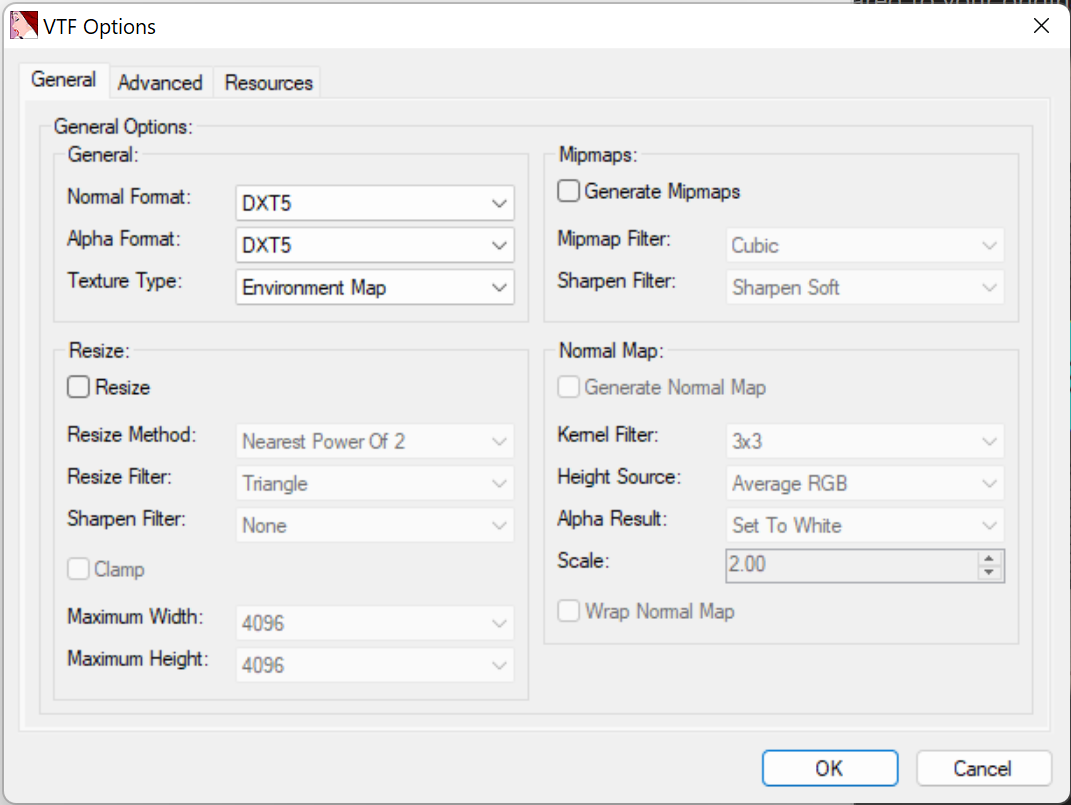
The General import settings should look like this, though you may find that you can safely change some of these settings and still successfully create your envmap. Just be sure that if you resize your image it remains a square with a 1:1 aspect ratio.

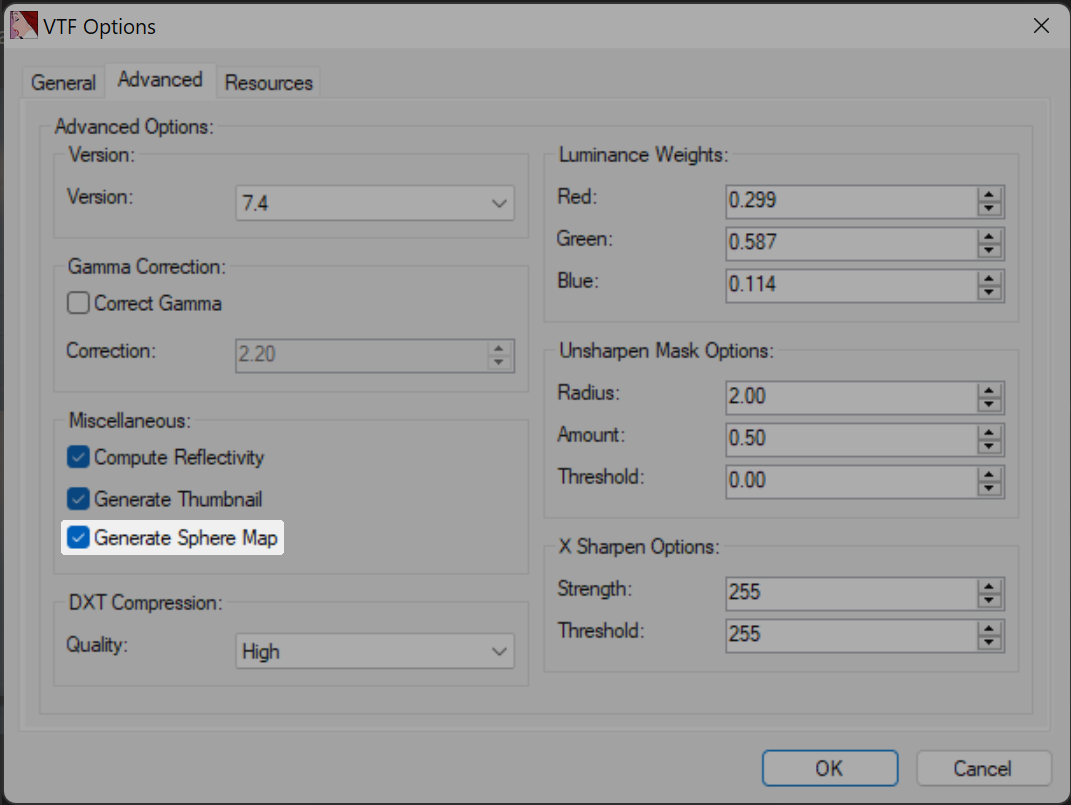
The crucial option to select is found under the Advanced tab. You want to be sure to highlight

With these settings selected click OK.
The General import settings should look like this, though you may find that you can safely change some of these settings and still successfully create your envmap. Just be sure that if you resize your image it remains a square with a 1:1 aspect ratio.
The crucial option to select is found under the Advanced tab. You want to be sure to highlight
Generate Sphere Map.With these settings selected click OK.
After importing your images, navigate to the final Face under the Image options.
It should look something like this:
If you have incorrectly organized your faces or named them incorrectly you will be able to tell immediately that something is wrong.
For instance, the following image is an incorrectly imported envmap where the faces were not appropriately named:
If everything looks correct then you've successfully created your envmap!
A quick way to check if your envmap looks good in-engine is to load up Team Fortress 2 in tools mode. You can accomplish this by going to the game's properties within Steam and entering the following launch options:
-tools -nop4.When you open up the game tools, on the top bar navigate to
Tools -> Material Editor. Once you have done this go to File -> New.Navigate down to where it says
$basetexture and select the ellipses [...].Assuming you have placed your envmap in the appropriate game directory you should be able to search it here.
Conclusion
Following the above steps you should be able to create new envmaps/cubemaps for use within your projects! Remember that you do not just have to stick to in-game screenshots for your cubemaps! You can use anything so long as the end result is seamless or looks appropriate.Here is a janky example of an envmap made using pictures of my eye:
Acknowledgments
I'd like to thank Brokkhouse for letting me use koth_rotunda as an example map for this guide!If there are any errors in this guide please comment!
Last edited:


