This tutorial will be covering how to convert .VTF files, used by Source, to .VMAT files, which are used by Source2. I will be using the Destinations Workshop Tools for this tutorial. This tutorial assumes you know the basics about using the Hammer and Material Editors for said tools, and have an addon set up correctly. This tutorial will cover all steps necessary for the process.
Part 1: Setting up the Destinations Workshop Tools
Part 3: Porting models to Source 2
Getting everything set up:
To start, open GCFscape and browse to tf2_textures_dir.VPK, which can be found in your /tf folder. Use the Find tool with Match set to 'Substring' and search for your material's name. If there are multiple instances with the same name, open them and find out which is your desired material. Next, extract the .VTF to a folder by right clicking the desired .VTF and selecting 'Extract'. The folder can be wherever you want. For this example, I am using 'wall029'. You can also use a custom .VTF that you have downloaded or created.
Now that you've extracted the .VTF to a folder, open it using VTFedit and click 'Export' under File, or press CTRL+E. Make sure to save the file as a .TGA in a subpath of \materials, in your Destinations folder. Your path should look something like this:
C:\Program Files (x86)\Steam\steamapps\common\Destinations\content\steamtours_addons\<mapname>\materials\<any folder name>
Save the .TGA file as your texture's name (for simplicity) with _color added onto the end. This will help later on, when setting up your .VMAT. At this point, mine will look something like 'wall029_color.TGA', and yours will probably look similar.
*If you wish to create a blend, an overlay or glass, some additional steps will need to be taken which will be discussed later on.*
Repeat this process with the respective normal map if you wish to have normal maps for your .VMAT (with _normal instead of _color).
Basic Materials:
Now that you have your .TGAs set up, open the Material Editor from the Destinations Asset Browser (this will be opened by default after launching the tools) and create a new file. You may see an error which looks something like this:
Don't worry, this is normal. Save the file to somewhere in the previously mentioned Materials folder, and name it what you called your original texture (for simplicity). Now, a lot more options should have appeared in the Editor. The shader 'VR Standard' should be selected, but if it isn't, make sure it is. Next, tick 'Specular', 'Ingame Cube Map' and 'Specular Cube Map Projection'. These aren't necessary but I personally like using them.
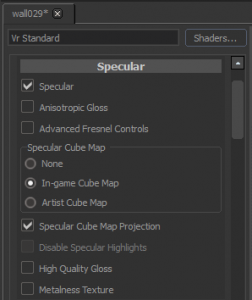
This is everything you really need to have set up for the material before actually making it. Additional settings are needed for different types of materials which will be covered later. Next, under the Variables tab, select your main texture by clicking the small folder icon next to the thumbnail preview:

Select the main texture (using the different endings such as _color and _normal help differentiate between your textures and help speed this up a bit, which is why I'd highly recommend it) and in your preview window, it should appear on your object! I personally like using the cube the most, as it shows a scaled preview of your texture.
Use WASD and right click to move and look around, and see your texture from different angles. Click the little gear at the top right of the preview window to change settings about it, such as background colour and lighting. You should have something looking similar to this (potentially with a different texture):
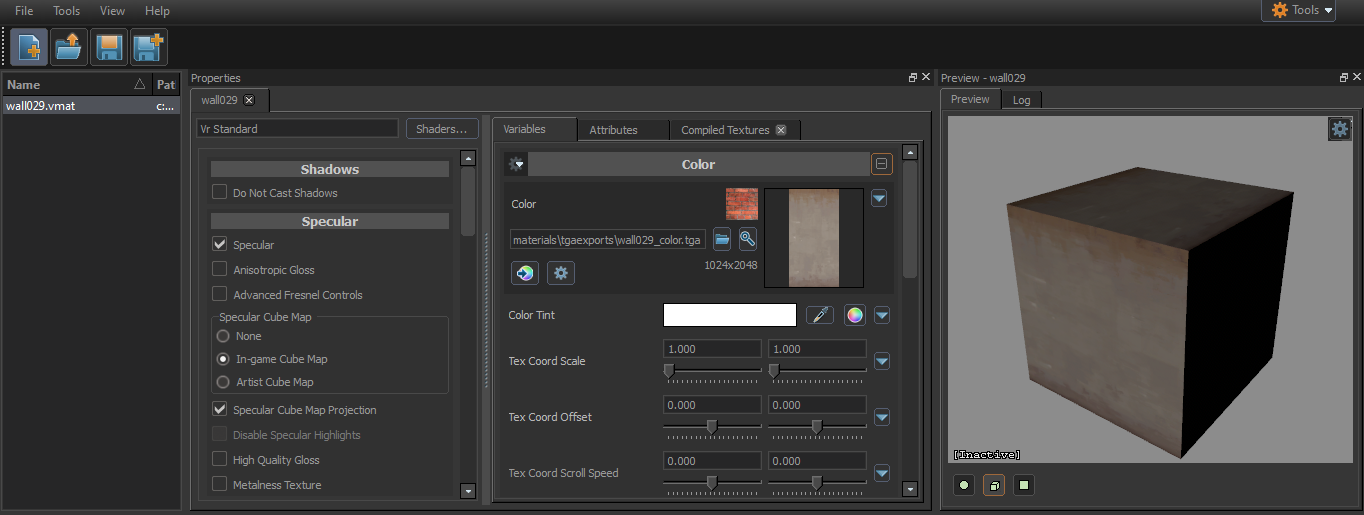 Now that you have this set up, it is all you really need for the texture to work in your map. Yes, it is that easy! At this point though, you may want to delve further to improve your texture. The main settings you will need are for the normal map and lighting. Settings such as Reflectance will only appear if you have Specular enabled, so don't worry if it disappears. Apply your normal map if you have one, and tweak the Reflectance and Gloss values to your liking. I have personally found a Gloss of 0.100 and a Reflectance of 0.025 is a good starting value although you may want to tweak these to give different effects, such as wet concrete. You may also want to tweak the Metalness value if it is a metallic texture, to help tints and such look better.
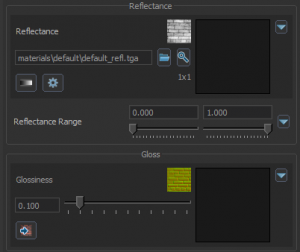
This is all you need to know for a basic texture! You should be able to apply it in the Hammer Editor now!
Blends:
Creating a blend is slightly more complex. For my example here, I will be using the blendgroundtograss008 texture. First, go into GCFscape and open tf2_misc_dir.VPK (also found in the \tf folder) and search for your blend's name using the same settings. You should find a .VMT under the same name as your texture. Open this with VTFedit as well, and you should see something similar to this:
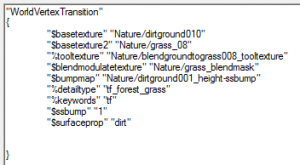
Now, go back into tf2_textures_dir.VPK and find then extract all the textures your blend's .VMT requires (the detailtype and tooltexture aren't necessary, but everything else is good to have), with _color for basetexture and basetexture2, _blend for your blendmodulatetexture and _normal for the normal map. If the texture uses a bumpmap, like mine does, convert it to a normal map using a site such as https://cpetry.github.io/NormalMap-Online or edit it in photoshop. This is the best method I could find, but you can do it any way you'd like, although in some cases, bump maps work fine without having to be converted to normal maps.
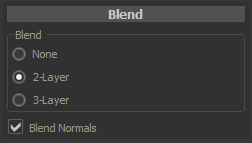
Next, go back to the Material Editor and create a new material, before saving it with your blend's full name (not the name of the individual materials). Set up the Specular the same way as earlier, if you want to include specular, then scroll down in that menu until you come across a sub-menu titled 'Blends'. Set this to 2-layer and turn on 'Blend Normals' as well. This improves the texture's quality quite a bit.
Now, you need to set up your material as before. This time, another sub-menu should have appeared under 'Variables', this time called 'Layer 1'. This controls what your main texture will blend into, and should have an additional setting, this being the 'Reveal Mask'. You should put your blend modulate texture here (with the _blend suffix) and set up the rest of Layer 1 as you would with a normal texture. Make sure to use a different _color and _normal map for both, as they are the two seperate materials that you'll be blending between. If you set it up correctly, you should end up with something similar to this:
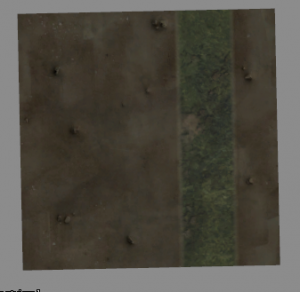
You should be able to use your blend in Hammer now!
Overlays:
For this example, I will use sign018 as my example and Paint.Net as my image editing tool, although almost any image editing software can do this.
To start off, extract your overlay from tf2_textures_dir.VPK and export the .TGA to your chosen location with the _color suffix. Now, open the .TGA file in your chosen image editing software and create a new layer behind the existing one with the image on, and fill it with black. Now, select your main overlay and fill the space completely with white. Don't leave any areas coloured and do not extend the white past the borders of the image. You should end up with something like this:
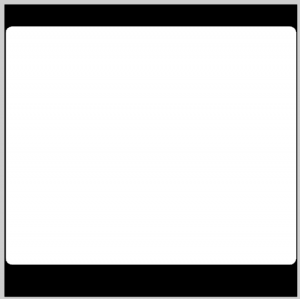
Now you need to save this file as your texture's name, but this time use the suffix _trans. This is because Source2 doesn't use alpha layers, but instead uses transparency maps. Now, you need to flip your image horizontally. This will be useful later as sometimes the texture will apply inverted, and using this flipped texture will render it the correct way round. Save the flipped texture with an _inverted tag just before your suffix (such as sign018_inverted_color) and repeat this for the transparency layer. You should have ended up with 4 image files: The colour, inverted colour, transparency and inverted transparency.
Create a new material file and save it with a prefix such as 's1' in front of your overlay's name. This helps distinguish it and will also avoid conflicts with currently existing textures from Destinations. Try and keep this prefix universal among your overlays as it helps when searching through them to find one you like!
In your new texture, there is only one setting that really matters: The 'Translucent' tickbox underneath the 'Translucent' submenu. I'd recommend avoiding specular settings here, unless there's an effect you really need to achieve and can't do it without the settings. A new option should appear in the Variables tab, which is where you will put your transparency map. Set it up, and you will probably end up with something similar to this:
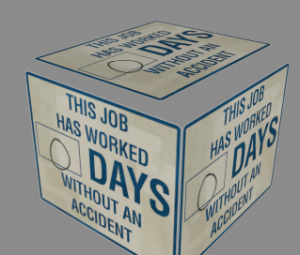
The overlay is almost already done! Save it and go to your folder where the .VMAT file is. Duplicate it and this time, put the _inverted suffix on the file's name. Open this duplicate and put in your _inverted_color instead of the normal _color, and use the _inverted_trans instead of the normal _trans. Save this file, and use it when you need to!
Once in Hammer, to use my workaround, create a nodraw-textured box at the location where you want your overlay to be, and make it 0.5HU thin, pressed right up against the surface you want. It can be as long or as wide as desired. Now, using the face tool, select the face of the brush that you wish the texture to be on and select it from the material browser. Click 'Apply current material' and then 'Fit' (and potentially 'Justify Center' if it isn't aligned properly). This should apply the material to your face, leaving you with a near perfect clone of an overlay!
Glass:
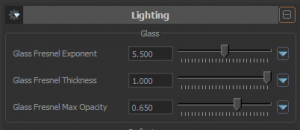
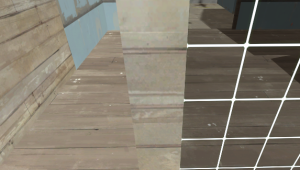
To create glass, simply set it up like an overlay, except you also need to check the 'Glass' option under 'Translucent'. This will open up a new tab in Variables, where you can modify a few options. Here's my result with one of these settings compared to a lack of glass:
Experiment with these settings to produce the desired result!
Thank you for reading this really long guide, I just wanted to get in as much detail as possible. Leave any suggestions or things I missed out in the comments. I hope this helps someone!
Part 1: Setting up the Destinations Workshop Tools
Part 3: Porting models to Source 2
Getting everything set up:
To start, open GCFscape and browse to tf2_textures_dir.VPK, which can be found in your /tf folder. Use the Find tool with Match set to 'Substring' and search for your material's name. If there are multiple instances with the same name, open them and find out which is your desired material. Next, extract the .VTF to a folder by right clicking the desired .VTF and selecting 'Extract'. The folder can be wherever you want. For this example, I am using 'wall029'. You can also use a custom .VTF that you have downloaded or created.
Now that you've extracted the .VTF to a folder, open it using VTFedit and click 'Export' under File, or press CTRL+E. Make sure to save the file as a .TGA in a subpath of \materials, in your Destinations folder. Your path should look something like this:
C:\Program Files (x86)\Steam\steamapps\common\Destinations\content\steamtours_addons\<mapname>\materials\<any folder name>
Save the .TGA file as your texture's name (for simplicity) with _color added onto the end. This will help later on, when setting up your .VMAT. At this point, mine will look something like 'wall029_color.TGA', and yours will probably look similar.
*If you wish to create a blend, an overlay or glass, some additional steps will need to be taken which will be discussed later on.*
Repeat this process with the respective normal map if you wish to have normal maps for your .VMAT (with _normal instead of _color).
Basic Materials:
Now that you have your .TGAs set up, open the Material Editor from the Destinations Asset Browser (this will be opened by default after launching the tools) and create a new file. You may see an error which looks something like this:
Don't worry, this is normal. Save the file to somewhere in the previously mentioned Materials folder, and name it what you called your original texture (for simplicity). Now, a lot more options should have appeared in the Editor. The shader 'VR Standard' should be selected, but if it isn't, make sure it is. Next, tick 'Specular', 'Ingame Cube Map' and 'Specular Cube Map Projection'. These aren't necessary but I personally like using them.

This is everything you really need to have set up for the material before actually making it. Additional settings are needed for different types of materials which will be covered later. Next, under the Variables tab, select your main texture by clicking the small folder icon next to the thumbnail preview:

Select the main texture (using the different endings such as _color and _normal help differentiate between your textures and help speed this up a bit, which is why I'd highly recommend it) and in your preview window, it should appear on your object! I personally like using the cube the most, as it shows a scaled preview of your texture.
Use WASD and right click to move and look around, and see your texture from different angles. Click the little gear at the top right of the preview window to change settings about it, such as background colour and lighting. You should have something looking similar to this (potentially with a different texture):

This is all you need to know for a basic texture! You should be able to apply it in the Hammer Editor now!
Blends:
Creating a blend is slightly more complex. For my example here, I will be using the blendgroundtograss008 texture. First, go into GCFscape and open tf2_misc_dir.VPK (also found in the \tf folder) and search for your blend's name using the same settings. You should find a .VMT under the same name as your texture. Open this with VTFedit as well, and you should see something similar to this:

Now, go back into tf2_textures_dir.VPK and find then extract all the textures your blend's .VMT requires (the detailtype and tooltexture aren't necessary, but everything else is good to have), with _color for basetexture and basetexture2, _blend for your blendmodulatetexture and _normal for the normal map. If the texture uses a bumpmap, like mine does, convert it to a normal map using a site such as https://cpetry.github.io/NormalMap-Online or edit it in photoshop. This is the best method I could find, but you can do it any way you'd like, although in some cases, bump maps work fine without having to be converted to normal maps.
Next, go back to the Material Editor and create a new material, before saving it with your blend's full name (not the name of the individual materials). Set up the Specular the same way as earlier, if you want to include specular, then scroll down in that menu until you come across a sub-menu titled 'Blends'. Set this to 2-layer and turn on 'Blend Normals' as well. This improves the texture's quality quite a bit.

Now, you need to set up your material as before. This time, another sub-menu should have appeared under 'Variables', this time called 'Layer 1'. This controls what your main texture will blend into, and should have an additional setting, this being the 'Reveal Mask'. You should put your blend modulate texture here (with the _blend suffix) and set up the rest of Layer 1 as you would with a normal texture. Make sure to use a different _color and _normal map for both, as they are the two seperate materials that you'll be blending between. If you set it up correctly, you should end up with something similar to this:

You should be able to use your blend in Hammer now!
Overlays:
Overlays are a bit more complex. I, for some reason, have not been able to get them working properly as my overlays will always render as a solid black, no matter how I approach them. I've devised a workaround for this, which is what this particular section will cover.
For this example, I will use sign018 as my example and Paint.Net as my image editing tool, although almost any image editing software can do this.
To start off, extract your overlay from tf2_textures_dir.VPK and export the .TGA to your chosen location with the _color suffix. Now, open the .TGA file in your chosen image editing software and create a new layer behind the existing one with the image on, and fill it with black. Now, select your main overlay and fill the space completely with white. Don't leave any areas coloured and do not extend the white past the borders of the image. You should end up with something like this:

Now you need to save this file as your texture's name, but this time use the suffix _trans. This is because Source2 doesn't use alpha layers, but instead uses transparency maps. Now, you need to flip your image horizontally. This will be useful later as sometimes the texture will apply inverted, and using this flipped texture will render it the correct way round. Save the flipped texture with an _inverted tag just before your suffix (such as sign018_inverted_color) and repeat this for the transparency layer. You should have ended up with 4 image files: The colour, inverted colour, transparency and inverted transparency.
Create a new material file and save it with a prefix such as 's1' in front of your overlay's name. This helps distinguish it and will also avoid conflicts with currently existing textures from Destinations. Try and keep this prefix universal among your overlays as it helps when searching through them to find one you like!
In your new texture, there is only one setting that really matters: The 'Translucent' tickbox underneath the 'Translucent' submenu. I'd recommend avoiding specular settings here, unless there's an effect you really need to achieve and can't do it without the settings. A new option should appear in the Variables tab, which is where you will put your transparency map. Set it up, and you will probably end up with something similar to this:

The overlay is almost already done! Save it and go to your folder where the .VMAT file is. Duplicate it and this time, put the _inverted suffix on the file's name. Open this duplicate and put in your _inverted_color instead of the normal _color, and use the _inverted_trans instead of the normal _trans. Save this file, and use it when you need to!
Once in Hammer, to use my workaround, create a nodraw-textured box at the location where you want your overlay to be, and make it 0.5HU thin, pressed right up against the surface you want. It can be as long or as wide as desired. Now, using the face tool, select the face of the brush that you wish the texture to be on and select it from the material browser. Click 'Apply current material' and then 'Fit' (and potentially 'Justify Center' if it isn't aligned properly). This should apply the material to your face, leaving you with a near perfect clone of an overlay!
Glass:
To create glass, simply set it up like an overlay, except you also need to check the 'Glass' option under 'Translucent'. This will open up a new tab in Variables, where you can modify a few options. Here's my result with one of these settings compared to a lack of glass:


Experiment with these settings to produce the desired result!
Thank you for reading this really long guide, I just wanted to get in as much detail as possible. Leave any suggestions or things I missed out in the comments. I hope this helps someone!
Last edited:

