This tutorial will be covering how to port Source 1 model files (.MDL + some other stuff) into Source 2 viable files (.VMDL). Part 3 of my Source 2 tutorial series! You can find parts 1 and 2 below:
Part 1: Setting up the Destinations Workshop tools for Source 2
Part 2: Porting Source 1 materials over to Source 2
Tools you'll need for this:
*Crowbar
*HLMV.exe (found in your /team fortress 2/bin folder)
*VTFedit (not necessary but highly recommended)
*The Destinations Workshop Tools, or other method of accessing Source 2's editors. I cover how to set up the Workshop Tools in Part 1 of my series.
*GCFscape
Getting everything prepared:
Files you'll need
To start off, you need to get all of your files ready for porting over. What you'll need will be the model's files and the model's material files (One or more .VTF files, depending on your model). I will be using the prop 'track_straight_256.mdl' for this tutorial.
Extracting your files (not necessary if your files are not stock tf2 files, this is for models located within the .VPKs of the /tf/ folder):
To obtain your model's files: Open GCFscape and navigate to the /tf/ folder. Now, open the file 'tf2_misc_dir.vpk'. Now, hit the 'find' icon. It looks like a magnifying glass. Type your model's name into the field, and set Match to 'substring'. It should look something like this:
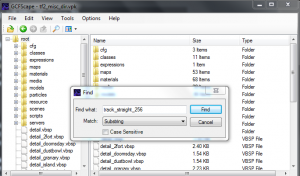
After you hit 'Find', it will show you all files that contain the string that you searched. If you wanted something like 'window001' but also found 'window001b', don't worry about porting the latter unless you want to. If there are multiple models with the same name, click the folder called 'Root' on the right, and then navigate to the model's path manually. For me, it is something like Models -> Props_mining and my model is located in that folder. There should be 5 files for your model, shown here with my example:

To extract them, simply drag them from GCFscape onto an open folder, or right click them and select 'extract'. The folder can be anywhere
To obtain your model's textures, open 'tf2_textures_dir.vpk' from the same location, and then open HLMV.exe. Click 'File', then 'Load Model' and then navigate to the folder in which you placed your model's files. Open the .MDL file and then go to the 'Model' tab within GCFscape. It will show you what materials your model uses, and their location.
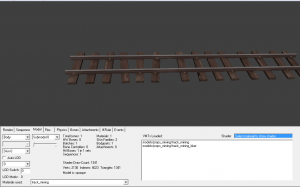
As you can see here, my model uses two materials, 'track_mining' and 'track_mining_blue'. The latter is an alternate skin, so I won't worry about that just yet. Keep the names and paths in mind.
Now, within GCFscape and search for your texture's name with the same settings. If there are multiple of the same name, do the same path navigation strategy as I showed before with the tf2_misc_dir.vpk file. Extract them to the same folder as your model's files (for convenience).
Getting them into the correct format:
Now that you've got the files you're going to port, you need to have them in a format that Source 2 can import. For models, they need to be .SMD files, and for your textures, they should be image files such as .TGA or .PNG. I'd recommend .TGA over other formats for this.
To convert models to the correct format, open up Crowbar, and making sure you are in the 'Decompile' tab, set the 'MDL file or folder' to the one of the model you need the SMD of. For an output folder, I recommend putting it within your Source 2 project folder, you can see my paths and settings below:
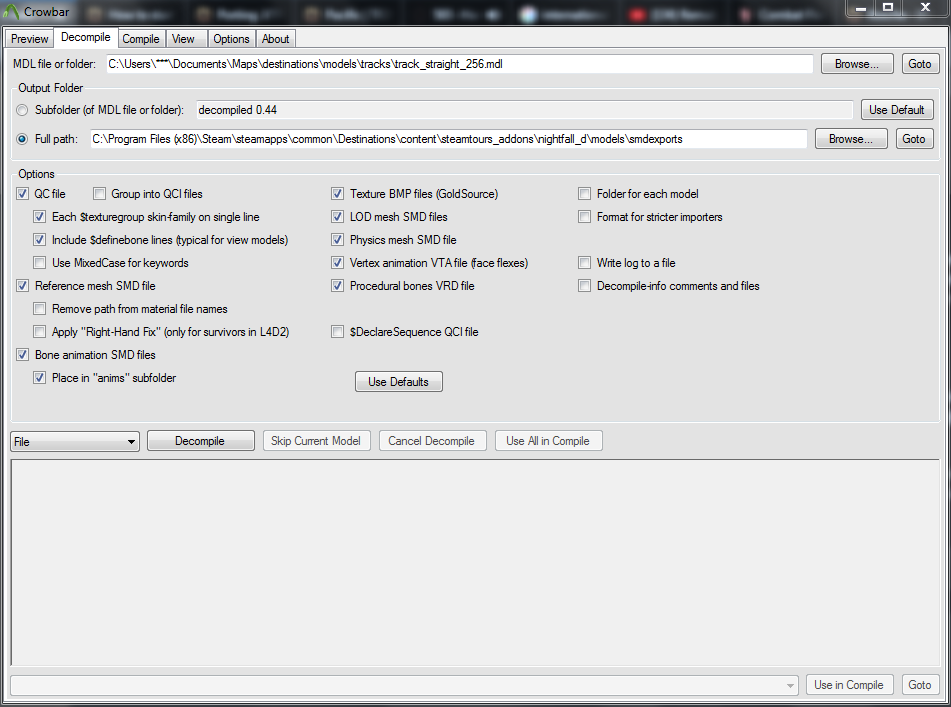
There are a few settings you can change for less cluttered folders, but I do other things with Crowbar so leave them checked (Namely unchecking 'Bone animation SMD files' and 'QC files'. There are others so decide for yourself). Now, just hit 'Decompile' and your mesh is ready for now.
To convert your model's material(s), just open the .VTF file from earlier, and hit ctrl+e or 'File' -> 'Export'. Export it to somewhere within your Source 2's project folder (C:\Program Files (x86)\Steam\steamapps\common\Destinations\content\steamtours_addons\<your project's name here>) and add the suffixes that you need, which is explained within Part 2 of my tutorials. If your texture is something like a security_fence model, you'll also need a _trans texture. This is a transparency mask for your texture, which Source 2 uses instead of alpha masks. If your model does use one, go back to VTFedit, go to 'View' -> 'Channel' and then select just 'A' (your alpha channel). Now, right click on the image, select 'Copy', and open your image editing program of choice. Paste it into a blank canvas, and save it as '<your texture's name>_trans'. My model doesn't need one, but if it did, I'd name it track_mining_trans. Save this within the same folder as your _color .TGA file.
Porting everything into your correct Source 2 formats:
Porting materials:
To get your materials ported, first launch the workshop tools, then open the Material Editor. Do 'File' -> 'New' and then save this blank material in your project's folder under /materials/models/<whatever other folders come after>/<exact name of the material used by your model, shown in HLMV.exe>. The path and name MUST be exactly correct. In my case it is /materials/models/props_mining/track_mining.vmat. Now, simply follow the basic steps on setting up your material as covered in Part 2 of my series. Also set up the transparency mask if you need to, also covered in Part 2. Don't worry about how it looks in the preview, it doesn't matter (unless you're trying transparency things). Now, save and close the Material Editor.
Porting models:
Finally, the meat of the tutorial, the 3rd new editor I am covering in the series. Open up the Model Editor from the Asset Browser, and in this new window, select 'New VMDL from mesh file'. Select your .SMD file (track_straight_256_reference.SMD in my case, and select 'Let Me Choose' in the window that pops up. Now, this step is important, especially if porting your model to replace ones in a map: navigate back to your project's /model/ folder, and create any new folders inside which need to be made. Mine is /models/props_mining/, and then save your VMDL file into that folder, without the _reference or any other added suffixes that are on it. The name should be exactly the same as your .MDL file's. The one I am using will be within this path: (C:\Program Files (x86)\Steam\steamapps\common\Destinations\content\steamtours_addons\nightfall_d\models\props_mining\track_straight_256.vmdl). Once you've set it up, hit enter and the Model Editor will open up.
Getting your model's texture working:
You've ported them succesfully, but your model will be a red wireframe. This is because your texture hasn't been set up. It will look something like this:
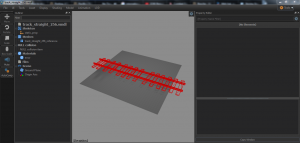
To get the texture working, simply select your mesh under 'Meshes' within the heirachy, and under material search path on the right window, type your material's location within the project folder. The name shouldn't be included. For this track, it should be 'materials/models/props_mining/'. Hit enter, and your model should appear with the texture on it! Save it, and the basic model is done.
NOTE: If your model is something like the security_fence props, you will need to enable 'Render Backfaces' under '2 Sided Rendering' on the material within the Material Editor (Such as the wire mesh one for the fences) to get it to appear on both sides
Getting your model's collisions working:
To give your mesh a collision model, click 'Model' -> 'Collision' -> 'Add simple physics' and select your model's _physics .SMD file if one was created. This is not a necessary step.
Adding skins to your model:
I have not really tried this, however believe this is how it is done. To add multiple skins to your model, repeat the process as shown above for porting the skin's .VTF file, naming the .VMAT whatever the .VTF was called (not necessary, just recommended I believe). Save it in the same location as well (also just recommended). Next, go to 'Model' -> 'Add Material Group' and a new option in the heirachy appears. Expand it, then select the only option under it (Probably called 'Default'). Rename this to '0'. Now, add a new material group, and rename it '1'. In it, type the full path to your material, including the material's name. Mine would be 'materials/models/props_mining/track_mining_blue.vmat'. Then hit enter, and your skin should be added. To add other skins, add them with each additional one being 1 number higher than the last, so your skin will be automatically applied in the map (remember to get the skin's order correct if you want it automatically to be the correct ported skin). To view the seperate skins, just select the material group you want to view.
Thank you for taking your time to read this in-depth guide, I hope it was worth your time. If I missed anything, please leave a comment detailing what I've missed. If you've got a question, feel free to send me a PM or leave a comment.
Part 1: Setting up the Destinations Workshop tools for Source 2
Part 2: Porting Source 1 materials over to Source 2
Tools you'll need for this:
*Crowbar
*HLMV.exe (found in your /team fortress 2/bin folder)
*VTFedit (not necessary but highly recommended)
*The Destinations Workshop Tools, or other method of accessing Source 2's editors. I cover how to set up the Workshop Tools in Part 1 of my series.
*GCFscape
Getting everything prepared:
Files you'll need
To start off, you need to get all of your files ready for porting over. What you'll need will be the model's files and the model's material files (One or more .VTF files, depending on your model). I will be using the prop 'track_straight_256.mdl' for this tutorial.
Extracting your files (not necessary if your files are not stock tf2 files, this is for models located within the .VPKs of the /tf/ folder):
To obtain your model's files: Open GCFscape and navigate to the /tf/ folder. Now, open the file 'tf2_misc_dir.vpk'. Now, hit the 'find' icon. It looks like a magnifying glass. Type your model's name into the field, and set Match to 'substring'. It should look something like this:

After you hit 'Find', it will show you all files that contain the string that you searched. If you wanted something like 'window001' but also found 'window001b', don't worry about porting the latter unless you want to. If there are multiple models with the same name, click the folder called 'Root' on the right, and then navigate to the model's path manually. For me, it is something like Models -> Props_mining and my model is located in that folder. There should be 5 files for your model, shown here with my example:

To extract them, simply drag them from GCFscape onto an open folder, or right click them and select 'extract'. The folder can be anywhere
To obtain your model's textures, open 'tf2_textures_dir.vpk' from the same location, and then open HLMV.exe. Click 'File', then 'Load Model' and then navigate to the folder in which you placed your model's files. Open the .MDL file and then go to the 'Model' tab within GCFscape. It will show you what materials your model uses, and their location.

As you can see here, my model uses two materials, 'track_mining' and 'track_mining_blue'. The latter is an alternate skin, so I won't worry about that just yet. Keep the names and paths in mind.
Now, within GCFscape and search for your texture's name with the same settings. If there are multiple of the same name, do the same path navigation strategy as I showed before with the tf2_misc_dir.vpk file. Extract them to the same folder as your model's files (for convenience).
Getting them into the correct format:
Now that you've got the files you're going to port, you need to have them in a format that Source 2 can import. For models, they need to be .SMD files, and for your textures, they should be image files such as .TGA or .PNG. I'd recommend .TGA over other formats for this.
To convert models to the correct format, open up Crowbar, and making sure you are in the 'Decompile' tab, set the 'MDL file or folder' to the one of the model you need the SMD of. For an output folder, I recommend putting it within your Source 2 project folder, you can see my paths and settings below:
There are a few settings you can change for less cluttered folders, but I do other things with Crowbar so leave them checked (Namely unchecking 'Bone animation SMD files' and 'QC files'. There are others so decide for yourself). Now, just hit 'Decompile' and your mesh is ready for now.
To convert your model's material(s), just open the .VTF file from earlier, and hit ctrl+e or 'File' -> 'Export'. Export it to somewhere within your Source 2's project folder (C:\Program Files (x86)\Steam\steamapps\common\Destinations\content\steamtours_addons\<your project's name here>) and add the suffixes that you need, which is explained within Part 2 of my tutorials. If your texture is something like a security_fence model, you'll also need a _trans texture. This is a transparency mask for your texture, which Source 2 uses instead of alpha masks. If your model does use one, go back to VTFedit, go to 'View' -> 'Channel' and then select just 'A' (your alpha channel). Now, right click on the image, select 'Copy', and open your image editing program of choice. Paste it into a blank canvas, and save it as '<your texture's name>_trans'. My model doesn't need one, but if it did, I'd name it track_mining_trans. Save this within the same folder as your _color .TGA file.
Porting everything into your correct Source 2 formats:
Porting materials:
To get your materials ported, first launch the workshop tools, then open the Material Editor. Do 'File' -> 'New' and then save this blank material in your project's folder under /materials/models/<whatever other folders come after>/<exact name of the material used by your model, shown in HLMV.exe>. The path and name MUST be exactly correct. In my case it is /materials/models/props_mining/track_mining.vmat. Now, simply follow the basic steps on setting up your material as covered in Part 2 of my series. Also set up the transparency mask if you need to, also covered in Part 2. Don't worry about how it looks in the preview, it doesn't matter (unless you're trying transparency things). Now, save and close the Material Editor.
Porting models:
Finally, the meat of the tutorial, the 3rd new editor I am covering in the series. Open up the Model Editor from the Asset Browser, and in this new window, select 'New VMDL from mesh file'. Select your .SMD file (track_straight_256_reference.SMD in my case, and select 'Let Me Choose' in the window that pops up. Now, this step is important, especially if porting your model to replace ones in a map: navigate back to your project's /model/ folder, and create any new folders inside which need to be made. Mine is /models/props_mining/, and then save your VMDL file into that folder, without the _reference or any other added suffixes that are on it. The name should be exactly the same as your .MDL file's. The one I am using will be within this path: (C:\Program Files (x86)\Steam\steamapps\common\Destinations\content\steamtours_addons\nightfall_d\models\props_mining\track_straight_256.vmdl). Once you've set it up, hit enter and the Model Editor will open up.
Getting your model's texture working:
You've ported them succesfully, but your model will be a red wireframe. This is because your texture hasn't been set up. It will look something like this:

To get the texture working, simply select your mesh under 'Meshes' within the heirachy, and under material search path on the right window, type your material's location within the project folder. The name shouldn't be included. For this track, it should be 'materials/models/props_mining/'. Hit enter, and your model should appear with the texture on it! Save it, and the basic model is done.
NOTE: If your model is something like the security_fence props, you will need to enable 'Render Backfaces' under '2 Sided Rendering' on the material within the Material Editor (Such as the wire mesh one for the fences) to get it to appear on both sides
Getting your model's collisions working:
To give your mesh a collision model, click 'Model' -> 'Collision' -> 'Add simple physics' and select your model's _physics .SMD file if one was created. This is not a necessary step.
Adding skins to your model:
I have not really tried this, however believe this is how it is done. To add multiple skins to your model, repeat the process as shown above for porting the skin's .VTF file, naming the .VMAT whatever the .VTF was called (not necessary, just recommended I believe). Save it in the same location as well (also just recommended). Next, go to 'Model' -> 'Add Material Group' and a new option in the heirachy appears. Expand it, then select the only option under it (Probably called 'Default'). Rename this to '0'. Now, add a new material group, and rename it '1'. In it, type the full path to your material, including the material's name. Mine would be 'materials/models/props_mining/track_mining_blue.vmat'. Then hit enter, and your skin should be added. To add other skins, add them with each additional one being 1 number higher than the last, so your skin will be automatically applied in the map (remember to get the skin's order correct if you want it automatically to be the correct ported skin). To view the seperate skins, just select the material group you want to view.
Thank you for taking your time to read this in-depth guide, I hope it was worth your time. If I missed anything, please leave a comment detailing what I've missed. If you've got a question, feel free to send me a PM or leave a comment.
Last edited:

