This tutorial covers how to set up the Destinations Workshop Tools for use with Source 2's Hammer. This tutorial is long overdue, and is Part 1 in my Source 2 tutorial series. Links to other sections can be found below
Links:
Part 2: Porting materials
Part 3: Porting models
Step 1: Acquiring SteamVR
Go to Library -> Tools then scroll down until you reach 'S'. SteamVR should be a tool which you have the ability to download. Install this, you'll need it for the later steps.
Step 2: Acquiring Destinations
Destinations is the main thing that you'll need for this guide. This is where you actually access your map, and how you obtain the Workshop Tools.
It is an interesting case, as it does not appear on the Steam store and does not even have a page on it. To obtain destinations, you need to use a Steam URL protocol to download it - steam://install/453170
Step 3: Acquiring the Workshop Tools
Now that you've installed Destinations and SteamVR, the Workshop Tools should have appeared within the Tools tab of Library, under the name 'Destinations - Workshop Tools'. Install this.
Step 4: Entering the Workshop Tools
Now, go to your Library, and next to the Search tool, click on Games. Now, choose the Installed tab. This will show all your installed applications. Right click on Destinations, and select 'Properties'. Now, click on 'Set Launch Options' and paste this in: -novr -retail -debug -console -condebug -fidelity -noasserts
Now, repeat this with the Workshop tools. Follow the exact same steps, and input the same things into the field. This allows you to launch Destinations and the Workshop tools without requiring VR, as well as a few other things
Step 5: Launching the Workshop Tools
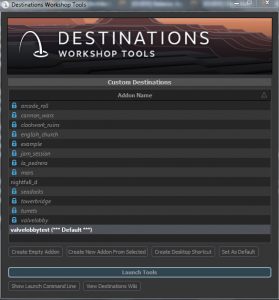
Now you've opened the tools, you should see a screen like this:
Click 'Create Empty Addon' and give it a suitable name for what you want to do. 'Nightfall_d' is a personal project, everything else you see here comes with the tools by default.
Step 6: Finding your project's folder and getting your map ready
First, locate your project's folder. It should be in C:\Program Files (x86)\Steam\steamapps\common\Destinations\content\steamtours_addons under whatever you've called it. Keep this bookmarked for later. Now, back in the Workshop Tools, select your addon and click 'Launch Tools'. After a small amount of loading, you should be greeted with this screen:

This is your base of operations, where you launch all of the tools you'll need. Let me highlight what you'll want to use:

From left to right:
*The Source 2 Hammer editor, for creating your maps. This uses the .VMAP format
*The Source 2 Material editor, for editing and creating materials to use. This uses the .VMAT format for the outputted textures. More on that in the Part 2 guide
- I have not delved much into these following options yet, they will come in later guides
*The Source 2 Model editor
*The Source 2 Particle Editor
*Source film maker
Step 7: Creating your VMAP (and how to port maps)
Now that you've got this far, open up the Hammer Editor. Go to 'File' -> 'Open' and set the file type to 'Source 1.0 Map files (.VMF). Now, choose your map's file, and hit Open.
Ignore the error that pops up, and just hit 'Yes'. Your map will now open, in all its missing textures glory!
Step 8: Fixing your missing textures
To fix the errors, open up the Source 1 Hammer editor, and navigate to your VMF. Select a texture, and open the material browser where it is selected. Now, write down the path somewhere
Next, open up GCFscape (tool for viewing VPKs) and open up tf_textures_dir.VPK from the \tf folder. It can also be good to open up the tf_misc_dir.VPK file, to see if the texture uses normal maps, etc. Extract the VTF file, and then open up VTFedit (tool for viewing VTF files), and hit ctrl+e. I'd recommend exporting it as a .TGA, although other image formats also work.
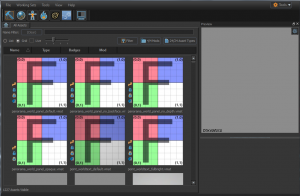
Now, open up your Material Editor from the Asset browser. Click 'File' -> 'New', and you should be presented with this screen:

Relax, this is perfectly normal. To start editing your texture, hit ctrl+s, and save it within the \materials folder of your project's folder (it should open it by default). Save it as the exact texture name of what it's called within your .VMF file, and make sure that all the sub folders are set up as well (for example, if your texture was in materials/nature/, you'd create a folder in /materials called nature, and put it in there), and now you can begin editing! Remember, all custom files must be saved within your project's folder otherwise they won't work properly.
Thanks for reading this guide! I hope I've not left anything out, and that it is formatted properly. If you've got any questions or want to point out an error, please leave a comment, I'd highly appreciate it!
EDIT: Go to C:\Program Files (x86)\Steam\steamapps\common\Destinations\content\steamtours_addons and NOT C:\Program Files (x86)\Steam\steamapps\common\Destinations\game\steamtours_addons. I messed up the path, and under /content is where all the custom things are detected!
Links:
Part 2: Porting materials
Part 3: Porting models
Step 1: Acquiring SteamVR
Go to Library -> Tools then scroll down until you reach 'S'. SteamVR should be a tool which you have the ability to download. Install this, you'll need it for the later steps.
Step 2: Acquiring Destinations
Destinations is the main thing that you'll need for this guide. This is where you actually access your map, and how you obtain the Workshop Tools.
It is an interesting case, as it does not appear on the Steam store and does not even have a page on it. To obtain destinations, you need to use a Steam URL protocol to download it - steam://install/453170
Step 3: Acquiring the Workshop Tools
Now that you've installed Destinations and SteamVR, the Workshop Tools should have appeared within the Tools tab of Library, under the name 'Destinations - Workshop Tools'. Install this.
Step 4: Entering the Workshop Tools
Now, go to your Library, and next to the Search tool, click on Games. Now, choose the Installed tab. This will show all your installed applications. Right click on Destinations, and select 'Properties'. Now, click on 'Set Launch Options' and paste this in: -novr -retail -debug -console -condebug -fidelity -noasserts
Now, repeat this with the Workshop tools. Follow the exact same steps, and input the same things into the field. This allows you to launch Destinations and the Workshop tools without requiring VR, as well as a few other things
Step 5: Launching the Workshop Tools
Now you've opened the tools, you should see a screen like this:

Click 'Create Empty Addon' and give it a suitable name for what you want to do. 'Nightfall_d' is a personal project, everything else you see here comes with the tools by default.
Step 6: Finding your project's folder and getting your map ready
First, locate your project's folder. It should be in C:\Program Files (x86)\Steam\steamapps\common\Destinations\content\steamtours_addons under whatever you've called it. Keep this bookmarked for later. Now, back in the Workshop Tools, select your addon and click 'Launch Tools'. After a small amount of loading, you should be greeted with this screen:

This is your base of operations, where you launch all of the tools you'll need. Let me highlight what you'll want to use:

From left to right:
*The Source 2 Hammer editor, for creating your maps. This uses the .VMAP format
*The Source 2 Material editor, for editing and creating materials to use. This uses the .VMAT format for the outputted textures. More on that in the Part 2 guide
- I have not delved much into these following options yet, they will come in later guides
*The Source 2 Model editor
*The Source 2 Particle Editor
*Source film maker
Step 7: Creating your VMAP (and how to port maps)
Now that you've got this far, open up the Hammer Editor. Go to 'File' -> 'Open' and set the file type to 'Source 1.0 Map files (.VMF). Now, choose your map's file, and hit Open.
Ignore the error that pops up, and just hit 'Yes'. Your map will now open, in all its missing textures glory!
Step 8: Fixing your missing textures
To fix the errors, open up the Source 1 Hammer editor, and navigate to your VMF. Select a texture, and open the material browser where it is selected. Now, write down the path somewhere
Next, open up GCFscape (tool for viewing VPKs) and open up tf_textures_dir.VPK from the \tf folder. It can also be good to open up the tf_misc_dir.VPK file, to see if the texture uses normal maps, etc. Extract the VTF file, and then open up VTFedit (tool for viewing VTF files), and hit ctrl+e. I'd recommend exporting it as a .TGA, although other image formats also work.
Now, open up your Material Editor from the Asset browser. Click 'File' -> 'New', and you should be presented with this screen:
Relax, this is perfectly normal. To start editing your texture, hit ctrl+s, and save it within the \materials folder of your project's folder (it should open it by default). Save it as the exact texture name of what it's called within your .VMF file, and make sure that all the sub folders are set up as well (for example, if your texture was in materials/nature/, you'd create a folder in /materials called nature, and put it in there), and now you can begin editing! Remember, all custom files must be saved within your project's folder otherwise they won't work properly.
Thanks for reading this guide! I hope I've not left anything out, and that it is formatted properly. If you've got any questions or want to point out an error, please leave a comment, I'd highly appreciate it!
EDIT: Go to C:\Program Files (x86)\Steam\steamapps\common\Destinations\content\steamtours_addons and NOT C:\Program Files (x86)\Steam\steamapps\common\Destinations\game\steamtours_addons. I messed up the path, and under /content is where all the custom things are detected!
Last edited:


