NoderNaeta's mapping lessons

Heili

L3: Member
Jul 21, 2016
114
59
I want to share what I've learned with you all.
Every lesson will teach anyone step by step how to build something otherwise complicated.
I'm not going to introduce specific entities as a lesson, I'd like to focus on exercising Hammer skills to provide for teaching people.
I guess below is all I got to give.

LESSON #1 How to build curved curbs
LESSON #2 How to build destroyed bridges
LESSON #3 How to build slanted roofs
LESSON #4 How to curve corners
LESSON #5 How to sculpt mountain paths
CHRISTMAS SPECIAL 2018
LESSON #6 How to build the Atrium window from Mercenary Park
 
Last edited:

Heili

L3: Member
Jul 21, 2016
114
59
curb_finished.jpg
How to build curved curbs

I make curved curbs out of 3 simple parts: Displacements, arches, and block brushes.
Ignore the IMG because it won't let me edit them out.
Start with a brush the size of the curb's body. I'll make a 128 x 512 brush
curb01.JPG

You'll make this a displacement later so don't worry about the height too much.
Change your Objects brush into an arch. The amount of sides you want will be multiplied by 2.
12 will be good enough.

Drag a 144 by 144 brush with your mouse over the top viewport (your mouse dictates where the arch will be oriented).

Hit enter.

You'll get a preview screen, match it to the picture shown if they don't match up. Wall width 8, 12 sides, circle 360.
You can click preview to see what we'll get.
Press OK.
curb03.JPG


We have built a fully circular arch. We're going to cut this in half with the clipping tool.

curb05.JPG


Drag it into place where the connecting edges are adjacent to our body.

curb06.JPG


We are now going to create two brushes lined to the arch on the grid, let's do one at a time.

curb07.JPG


Use the vertex tool (SHIFT + V) to drag the vertices above each arch. Decrease your grid size to 1 using the left bracket [.
The arch will have its points all on grid.

curb08.JPG

Switch back to the selection tool (SHIFT + S) to confirm your changes.
Repeat the process for the next brush.

We have come to leave a small triangle that should be filled with our brush.
Select the two brushes we made and draw a horizontal cut (SHIFT + X) make sure to keep both brushes.

curb10.JPG
We can now drag our top two vertices to the left, filling in the gap.


curb11.JPG


Now build two brushes across the body we've built the same size of our arches, 8 x 8.

curb12.JPG


Save yourself time by holding SHIFT and dragging your first completed brush to the other side.

I'm going to texture these a simple dirt and curb texture now.

curb13.JPG

Depending on what you use, you may have to justify the textures and wrap around the brush while holding ALT and right clicking on a face.
Play with the top and bottom justifications until it looks right.

Now select your dirt and create a power 2 displacement. Only select the visible faces with the face edit sheet.
curb14.JPG

We can adjust our displacement height to begin lower. I dragged the brushes to be of 4 HU height.


Using our displacement's default settings, click once on each vertice to draw a soft inclination onto the dirt.
We are gently tapping every vertice to form a small hill.
When we reach the arch body, do the same process.

Don't misjudge your effort if your arch body looks awful.
We can use the smooth tool's default settings to smooth out our rough shape into a nice hill.
curb15.JPG


Once you are happy with your work, select and sew everything together.
Because we have lined all vertices together, we are rewarded with this feature.


Now we can select our dirt arches and curb arches and SHIFT drag them to the other side.
Drag a box with the selection tool over our arches, hold down SHIFT, and then click/drag them to the other side.


Right click over our copied arches in the top viewport. Select all the way down to Flip Objects, Flip Horizontally.
Note the shortcut CTRL + L for future use.

Sew them together.
curb17.JPG


For good practice, make sure to replace our old dev textures with nodraw.
Bring up our texture sheet with SHIFT + A. Replace < Browse < dev_blendmeasure (or whatever else you used) < double click on the texture < same steps except with nodraw for replacing.

All invisible faces are now properly hidden.

*OPTIONAL*
Paint our body with grass to bring some color into the world.
Select our displacements. Head to the displacement tab on the texture sheet, and Paint Alpha.

curb20.JPG


I switched the texture to a grassy blend instead of the dirt to mud blend from before.
By gently mousing over a vertice with a value of 45, I painted a simple dirt transition.
With some extra details added, we have built a curved curb.

curb_finished.jpg
Link to VMF
 

Attachments

  • curb04.JPG
    curb04.JPG
    333.4 KB · Views: 312
  • curb09.JPG
    curb09.JPG
    222.7 KB · Views: 301
Last edited:

Heili

L3: Member
Jul 21, 2016
114
59
destroyed_bridge_final.jpg

How to build destroyed bridges

I create destroyed bridges using BSP brushes and seperate the structure into two parts:
The main body and the extended detail bits.
Begin with a simple floor, I start with a 144x144x8 brush
destroyed_bridge01.JPG


I went ahead and created an orthogonal room to better visualize what our end goal is.
If this confuses you, just focus on the upper floor. We're going create what I call Kirby hands to attach to them.

kirby_hands.png


I call these Kirby hands or Kirbies because they remind me of Nintendo's Kirby character.
Kirby hands extend from the main body and can be a variety of widths, lengths, and points.

We're going to create a couple different varieties of Kirbies beginning with a simple rectangle.
Duplicate this rectangle enough to make each hand look unique in some way.
Each hand base will form a straight line from one to another.

We're going to drag the vertices of each Kirby to come off at an angle.
Start from scratch, let's make one simple change and build upon the idea.
Use the vertice tool to drag a vertice down like in the picture.

destroyed_bridge03.JPG


By slanting the top vertice, we have made a Kirby. No hand will be perfectly flat.
We can experiment with our hands to be different sizes and shapes, for now if you're following along you can just copy my designs.
Triangles are made by merging vertices and centering the result.
Make sure these are func detailed.

destroyed_bridge04.JPG


These guys will serve as our library of modular hands. I drag copies of them artistically (randomly) right next to our body to where it creates a transition area.
However, if you'd like be less random, you can match the hands to form a wave with two ends high and the middle low.

destroyed_bridge05.JPG


Here's our result by artistically placing every kirby hand into place. I'm going to texture everything now.

destroyed_bridge06.JPG


I've textured this to be a simple break in a wooden floor. Replace your dev textures with nodraw and align the kirbies to your body texture for a seamless transition.

*OPTIONAL*
For bot support, an NPC clip will simplify the area for better navigation.
NPC clips are only solid to AI (I don't believe Engineer buildings are effected)

destroyed_bridge07.JPG


This simple brush promotes bot support.

After some detailing, we have built a destroyed bridge.

destroyed_bridge_final.jpg


Thanks to the Kirby's Cake dudes for the Kirby image
Link to VMF
 
Last edited:

Heili

L3: Member
Jul 21, 2016
114
59
slant_roof_promo.JPG
How to build slanted roofs


I build slanted roofs with bsp brushes and the vertex tool.
Some mappers build their roofs by seperating the edges with the clipping tool.
Likewise, some mappers fight their own creation in order to preserve overhangs without the roof clipping into the wall.
In this tutorial, you will learn my method that erases both of these issues and gives you the most control over your roofs.
Begin with a standard block that will be underneath your roof.
They can be any size you want, for this example I placed 128 and 256 width blocks adjacent.

slant_roof01.JPG


Our first piece of the roof will be a triangle for our roof to rest on.
Stretch a standard block over your main piece and adjust the height to your desire (I chose 96).
It'll be a big rectangle when you're done.
Use the vertice tool (CTRL+V) and center the top two vertices to be merged.

slant_roof02.JPG


This builds the slant base for our actual roof to sit on.
Do the exact same thing, except this time build your second roof piece to be the overhang (I chose a height of 8)
I start the process with an estimated sized rectangle before nudging the vertices to line up to the triangle.

slant_roof03.JPG


Next, copy your top piece with SHIFT + DRAG and line it up to the tip of your overhang
This ensures that our overhang will be parallel to the triangle.
Sometimes you can nudge the vertices out and it will line up fine to the base it sits on.
I discourage this because it won't work in every situation and the brush will z-fight or simply not be parallel.

slant_roof04.JPG


Now select your original overhang, drag the bottom vertices to our copied overhang's end, and deselect.
We're going to cut through however long we want the overhang to extend out (I chose 8, again).
Clip 8 HU away from the building for a parallel roof and delete the copied brush.
For the rest of this build, I can paste this same brush everywhere else or use the same method on the lower building.
Also, drag out the piece to overhang on all other sides too.
Notice on the top-down grid how this roof overhangs the building below it.

slant_roof05.JPG


*Optional*
You can func_detail to your discretion if this building were in a live map.
You can detail only the slants and use a skip/hint brush to cover the top like a lid.
Sometimes it's less convenient to open a leak that was covered by an angled brush, to which you can contain with a hint box surrounding the base.
You can even func_detail the entire building at your discretion.
Displacements also are possible, bump up your roofs and be careful not to clip the walls too much.

This is more of a tutorial for constructing a shape, you can use this method for just about anything with a slant, but the most common example is a building.

After some detailing, we have built a slanted roof & my lazy effort at cyberpunk lighting.


slant_roof_example.jpg
Link to VMF
 
Last edited:

Heili

L3: Member
Jul 21, 2016
114
59
curved_corner_end.jpg
How to build curved corners

I curve corners with arches, cylinders, or block brushes.
Corners can be both aesthetic and gameplay changing, the latter to clear hiding spots.
Here are 3 different corners and how to build them.
Inside Corner -

Draw a 96 x 96 brush on the top down view with these arch settings
Clip to a quarter and fit the vertice edges to our wall

curved_corner1.JPG


To avoid errors, we are going to make the vertices perpendicular while on off grid (SHIFT + W)
Use the vertice tool to make the far left and right brushes into a triangle against the wall
curved_corner2.JPG


Now move the vertices of the other two to the corner

Outside Corner -

Draw a 96 x 96 brush on the top viewport.
Cylinder, I'll go with 24 sides.
Cut it into a quarter and fit like so.

curved_corner3.JPG


Diagonal Corner -

Have two walls that you want to connect and draw a brush in one direction only (this helps visualize the process)

curved_corner4.JPG


Nudge the vertice so that it connects to the other wall. Then, move the vertice below it to connect with that wall's vertice

curved_corner5.JPG


After some detailing, we have built 3 examples of corners and an impatient lighting pass.

curved_corner_end.jpg
Link to VMF
 

Heili

L3: Member
Jul 21, 2016
114
59
mountain_promo1.jpg
How to build mountain paths

Organic terrain from a mountain usually is built out of a displacement.
Some mappers build everything on one plane which aligns all vertices correctly.
Some mappers construct the general shape of terrain with block brushes before converting to displacements.
Regardless of the method, you need a clear visualization of what you're going to build.
Displacements are like pottery in that you sculpt the result by hand.
By increasing the capacity for creativity, you increase the difficulty of sculpting.
Choose the method that best suits your end goal.

I'm beginning with what I call the Devil Mountain Method.
This has you construct everything flat on the top down grid which makes sewing a breeze.
It takes planning, organization, and a childish amount of creativity.
I coined Devil Mountain Method after the L4D2 campaign, which I learned it from.
However, Valve has used this style before in their own maps (see the decompiled arena_lumberyard cliff).

Begin with a dimension size, good starting numbers are on the 256 grid like 512, 768, 1024, and 2048.
I'm choosing 768 with a power of 3 to begin with, and we're going to copy this over to make a big field.

mountain01.JPG


To reduce intimidation, we're going to build what I term a Nodraw Pool.
This serves as an underlying base that the engine will check visibility for.
Draw a nodraw brush below our displacements, visualize where you'll raise terrain above the nodraw pool and build accordingly.
I'm imaging a mountain path on the left here, so I'll rough out a shape I'll be sculpting terrain above it.
mountain02.JPG


We are going to sculpt our terrain now to climb above the nodraw pool, like a guide.
Every line you draw can represent something, and even the smallest curve can make a big difference.
If you draw IRL, you'll be familiar with the importance of a line and the same concept applies to displacements.
Even if you don't, a stickfigure still demonstrates this (diagonal line as an arm, circle as a head, a curve for a mouth, thick lines for hair)

Here are some healthy formulas to work around as we sculpt:
  • 12-64-128 for inclines
  • 128 per cliff vertice
Because a lot of this applies your sculpting ability and knowledge of terrain molding itself, the rest of this is a grind of adjustments (like drawing IRL)

Cliffs are drawn by using a high distance parameter with a low radius to select only one vertice at a time.
Vertices refer to each section seen while sculpting.
To draw our cliff, we raise each vertice by 128 to be equal height, and the next vertice to be raised above the previous.
To reduce texture stretching, make sure each vertice isn't too isolated from a neighbor vertice.

mountain04.JPG

Once that is done, we're adjusting each vertice for a more organic shape.
Raise and lower vertices to give the cliff this organic shape.
Extend the top path vertices outwards toward the cliff for a bolder shape.
Push in on the X or Y axis below the paths to accentuate this.

mountain05.JPG


After, not so much detailing rather an extraneous time repeating the above steps everywhere (like drawing IRL), we have sculpted a mountain path.

mountain_promo1.jpg
Link to VMF
 
Last edited:

Heili

L3: Member
Jul 21, 2016
114
59
cs2018_harvest.jpg cs2018_barnblitz.jpg
Practice Challenge: Map Replicas

After my own project on Hightower Caldera, I've learned more about how Valve builds their maps.
Normally, staring at somebody else's work feels daunting, like the mappers at Valve have infinite patience and instantly pieced together a success.
Once I began working on HC, I knew I'd feel overwhelmed to add anything more than a couple blocks to the level.
To make anything meaningful, I had to understand the level inside out.
Now when I open up the file in Hammer, I can visualize the entire level as my own.

For a Christmas special, I wanted to use this post as a hands-on practice assignment for our readers following along.
We're building a replica of a landmark from an official map.
Because I want to keep this as accessible as possible, I only chose decompiled maps available from the TF2maps decompiled thread.

During this project, we'll learn:

  • How it was built
  • How it was optimized
  • How it was detailed

All while building it ourselves.

Below are my step-by-step footnotes you can follow along for Harvest, but I took it upon myself to build 4 different landmarks raising in difficulty.
If you're up for a challenge, you can do the other 3 yourself.

Harvest: RED Farmhouse
Junction: Cap A Radio Tower
Standin: Spawn Room
Barnblitz: Cap C Barn

Harvest:
Open up the decompiled file and fly around roofs for each side.
Look at your visgroups, deselect Tool Brushes to hide them from view.
Now, under 'Word Detail', deselect Func Detail to do the same.
In 'World Geometry', deselect Displacements and deselect Entities.

The point of this first step was to show you how the engine is seeing the level.
When the engine checks for visibility, it will reference this bare bones world to build its portals.
The most complex shape here would be the slanted roofs

harvest01.JPG


Notice the nodraw pool filling the bottom of the level, and another block beneath each team's farmhouse touching the pool's bottom.
Players will never see this zone, as a mapper this pool will be the gate between what the player sees and what the engine sees.

Let's capture some basic dimensions now of the farmhouse.
  • Each wall is 176 HU tall.
  • Each doorway is 128 x 144
  • Detail trims are 8x16

Now that we've grasped the sense of how this was built, let's focus on one small bit at a time.
I'm going to renable everything except tool brushes, and keep func_details hidden.
To visualize the roof, I've used the vertex tool to see how significant it is to the architecture.

harvest02.JPG


Now that we've gathered enough data about Harvest, we can now open a new file (CTRL + N) and build a ground plane as a base.
I keep my grid on 32 and ignore the trim details for this foundation floor.
I'm only interested in the silouhette, and so I'm building with a bright reflectivity texture.
This is our foundation floor, a 384 x 960 brush 32 HU tall.

harvest04.JPG


Now we're building the walls, 16 HU thick around the perimeter and 224 HU tall, because the roof will go above this.
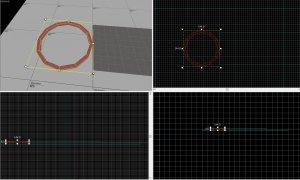
Build our slanted roof.
I'm going to mention that I had temporarily rotated the side wall to build the roof brush, because that was the process I did.

harvest05.JPG


Roofs commonly incline to 96 or 128, and Harvest has its roof set to 128, so we're building to this height.
We can now rotate the side back into place and properly fit it as a roof.
The Harvest ceiling begins at the same level as the walls, so we build accordingly.
Remembering our interior wall dimensions, all we have to do is drag the ceiling down so the difference between the floor matches 176.

harvest06.JPG


We now have our building coming along like this, I've hidden 3 parts to help see what we've accomplished so far.

harvest07.JPG


I've highlighted the next wall we're going to build.
Take note where the vertices line up.
The dimensions are 1280 in total, with the spawn side wall 336, and the other 576

harvest08.JPG


Here's the next building, each wall placed in relation to the previous.
I've also easily copied the foundation floor and fit it under the walls like a carpet.

harvest09.JPG


We're now building the second floor wall, in line with the roof already built.
For the ceiling, we're copying our foundation floor and dragging it atop the walls like a lid, just bumped down to 8 HU height.

harvest10.JPG


Notice the pattern of building a foundation, walls, ceiling, and roof.
Once we break each step into cookie bites, it becomes easier to manage each one.

harvest11.JPG


We've built a replica of the building's foundation, but we're not done yet.
Now comes the detail brushes.
Our roof goes above the ceiling. Because our ceiling is flat, this makes detailing more about sticking details on top of this base foundation.

harvest12.JPG


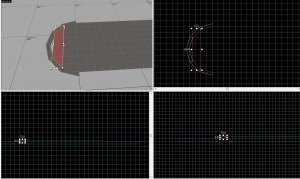
For the broken roof, we're going to cut sections of our existing brush in the right spots.
Just cut some holes into the roof, take the dimensions of the kirbies surrounding the roof hole and cut to match them.
You'll even notice the shortcut done by retaining the same dimension clips to each side.
Note that you do not copy brushes over, as our roof is off grid, you simply replicate the process.

harvest14.JPG harvest15.JPGharvest16.JPG

Notice how the wooden trims are parallel to our roof base, the process is exactly the same.

harvest17.JPG


The rest of this process covers the same concepts used in the rest of this construction.
Look back on your creation, maybe ask yourself questions about how the author went about making this building.
Because this design was already made by the author, building a replica is a lot less challenging than building a design for it.
But it's still a proud moment to build something this cool looking.

cs2018_harvest.jpg

Addendum:
I began writing down my process for the next maps, but very quickly I realized the crushing concentration needed (especially for Barnblitz) to rebuild these areas.
So I could not provide more detailed instructions as I'd hope for the 3 other maps planned.
Harvest should be a healthy exercise to warm up with, and the other maps a bonus.
I've included 3 other VMF replicas from official maps, 1 Valve made.

If you are looking to challenge yourself, build a replica of your own favorite landmarks from TF2.
No models, no lighting, only developer textures.
Follow the guideline as best as you can, you can post your own results here on the thread if you want.

Merry Smissmas.

cs2018_junction.jpg


cs2018_standin.jpg


cs2018_barnblitz.jpg
Link to Christmas Special 2018 VMF Collection.
 

Heili

L3: Member
Jul 21, 2016
114
59
atrium_window_promo.jpg
How to build the Mercenary Park atrium window

The BLU spawn atrium window is built from an arch, column, and hero asset from CP_MercenaryPark.
This final tutorial will teach you how to build the front window as seen in the BLU spawn.
I enjoyed making these tutorials hoping that someone benefited from my step by step picture guide.
I taught the topics I wish I had when I was learning Hammer, and I think this is it.
Begin with an arch with 12 sides. Draw a 212 x 304 brush on the top-down view.
28 wall width. We almost always double dimensions to avoid buggy arches. Cleave the upper half when you're done.
atrium_window1.JPG


Find the hero asset in the model library by searching for 'blue_spawn_atrium_front_window'
Disable Shadows, Vertex lighting, Self-Shadowing, and Surface normal in the properties.
This prevents the model from being strangely lit by itself.
We will align this model to be more or less centered above our arch.
atrium_window2.JPG


To block LOS, we need a thin brush inside the window.
Repeat the arch step except this time draw the brush so that it matches the window.
It doesn't have to be perfect, just nudge the peaking vertices so that it looks like a good enough slope ratio.

atrium_window3.JPG

Also, draw a simple 20x38 brush in the center to close the gap in the window.
On the thin strip, paint it with Nodraw, this brush only closes LOS for the compiler.
Adjust the brush vertices so that it hides within the window.

atrium_window4.JPG


For the top, we will copy the bottom arch and place it atop our column.
Make sure the arch is slightly inside the window to prevent a gap.
Then, for our flat roof, we can build another arch with a high width.

atrium_window5.JPG


*OPTIONAL*

Draw a hint brush around the arch to contain its messy portals.
This still has to function as a wall despite its complex shape. If you use this in a gameplay space, this contains portals.

After a little detailing, we have recreated the atrium window.
Thank you for following along.

atrium_window_promo.jpg
Link to VMF