For summer 2022 72hr jam, I want to talk about recommended placement of pickups because the old thread has broken image links and I want to expand on it as well. I intend that this guide be for beginners however I also introduce an advanced use of pickup.
Small Pickups
In most cases these will not affect the balance of the overall layout too much. However in some specific situations, it can change how an area gets played.
Small Health
Small health pack is used when you need a health pack but actions happen closely to the pickup. Good for quick resupply without affecting the balance of the area.
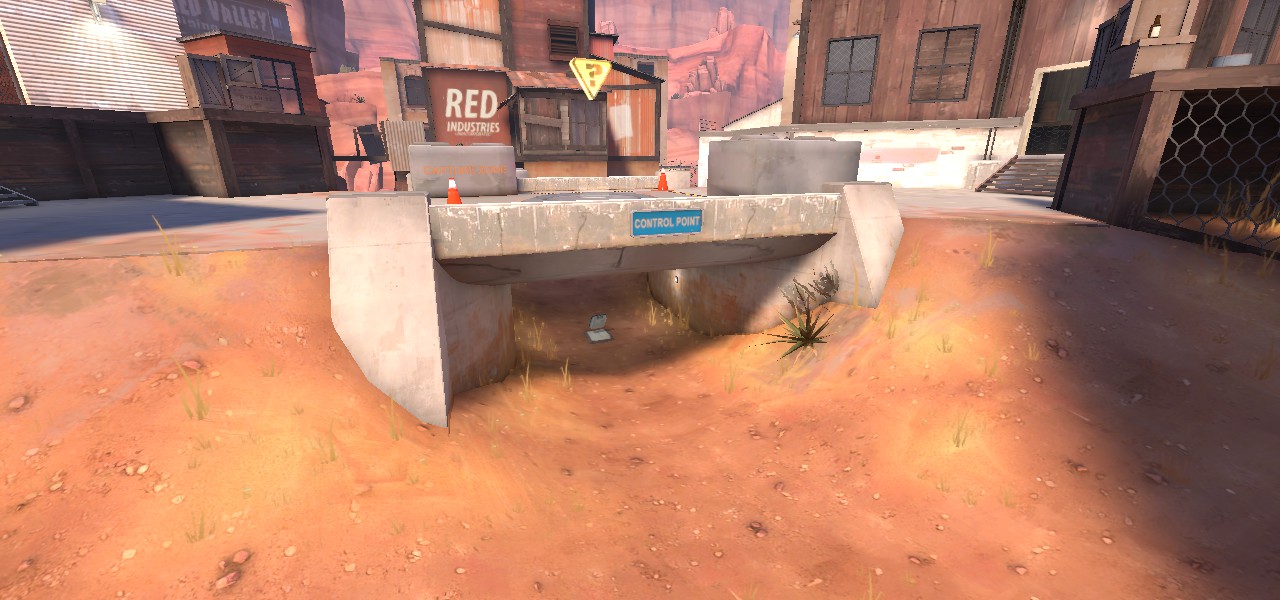
If you place this in the middle of the combat area, you can make a small point of contention where players will fight to get this health pack. This can sometimes create interesting gameplay dynamics where the healthpack becomes a temporary objective. Sometimes, players will fight to death to get this health pack which is insane if you think about it but it just happens. So this can be used to encourage some fighting.
A good example of a small health kit that encourages fighting is this kit in koth_highpass next to the control point. Because it is too close to the objective, a medium health kit might harm the gameplay as it gives too much advantage to the owner of the center control point. However a small health kit is perfect to make the combat in this area more important while being a useful retreat for the defending team.

Small Ammo
Small ammo pack is used when you want to sustain the battles around the area but not allow stupid sentry placements. However even the smallest ammo kit can generate a sentry nest. When placed in an enclosed area that gets low traffic, you can allow some crafty engineers to build a sentry nest or at least some helpful buildings for some ‘big-brain’ plays.
These do not give enough ammo for players who are actually out of ammo so if there is a noticeable lack of ammo in an area, try using a medium ammo kit instead. Good for quick and tiny resupply without affecting the balance of the area just like small health packs.
14bIt’s pass_gigantic_a7b used to have small ammo kits on top of the high ground at the mid area. However, 14biT quickly noticed that some engineers were able to set up an entire sentry nest in the middle of the map overlooking the opposing team’s main exit. This was possible because passtime is a gamemode where the mid gets low traffic when the ball goes past a certain line. This ammo kit was promptly removed.

This small ammo kit in plr_hightower allows engineers to build a weak sentry nest because it's in an enclosed, relatively safe area. However, this sentry nest should not be too strong so a small ammo kit was used instead of medium ones.

Medium Pickups
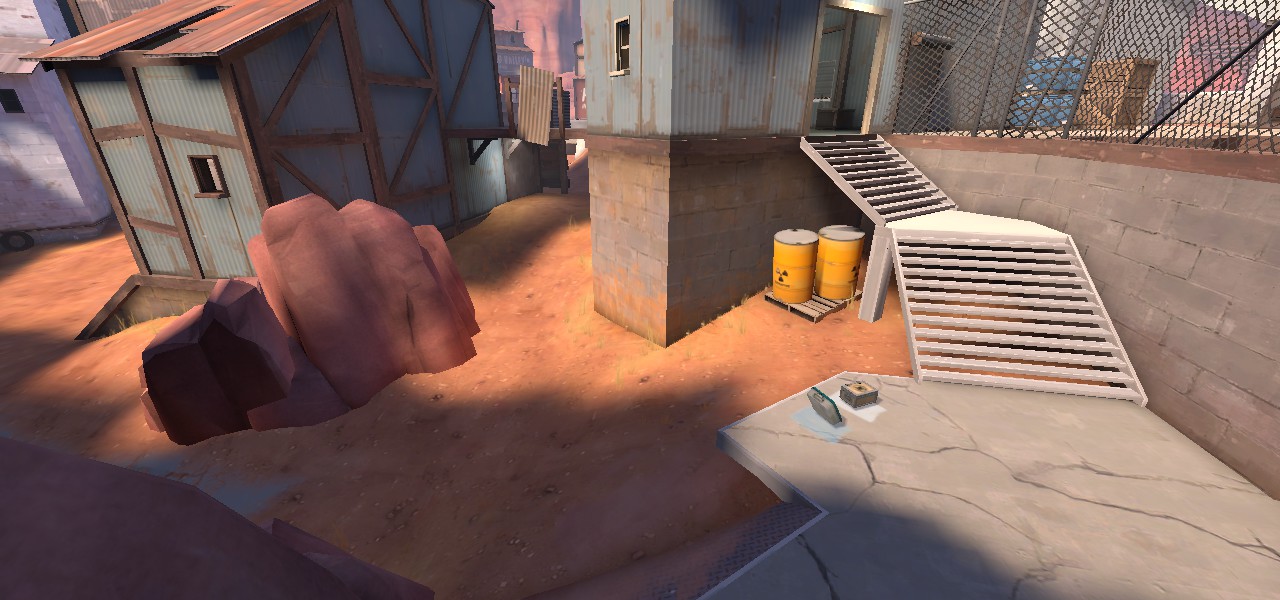
Medium packs are generally used as a ‘proper’ pickup, meaning that it will be enough to satisfy the player's needs. After picking up this pack, players will be able to go right back into combat feeling confident. So they can be used before choke points or other highly contested areas. These are few of many common examples of medium pickups that are placed before a choke point.

A set of medium pickups before going through the choke that leads to mid in koth_highpass.
Medium Health
Players can still suffer the consequence of bad positioning unlike the full health kit. This makes the decision to take the health kit an interesting one if the kit itself is placed in a risky area. Similarly to small health kits, it will invite competition around the kit. Unlike small health kits, this alone can be a reason for players to visit some of the least used areas in the map.
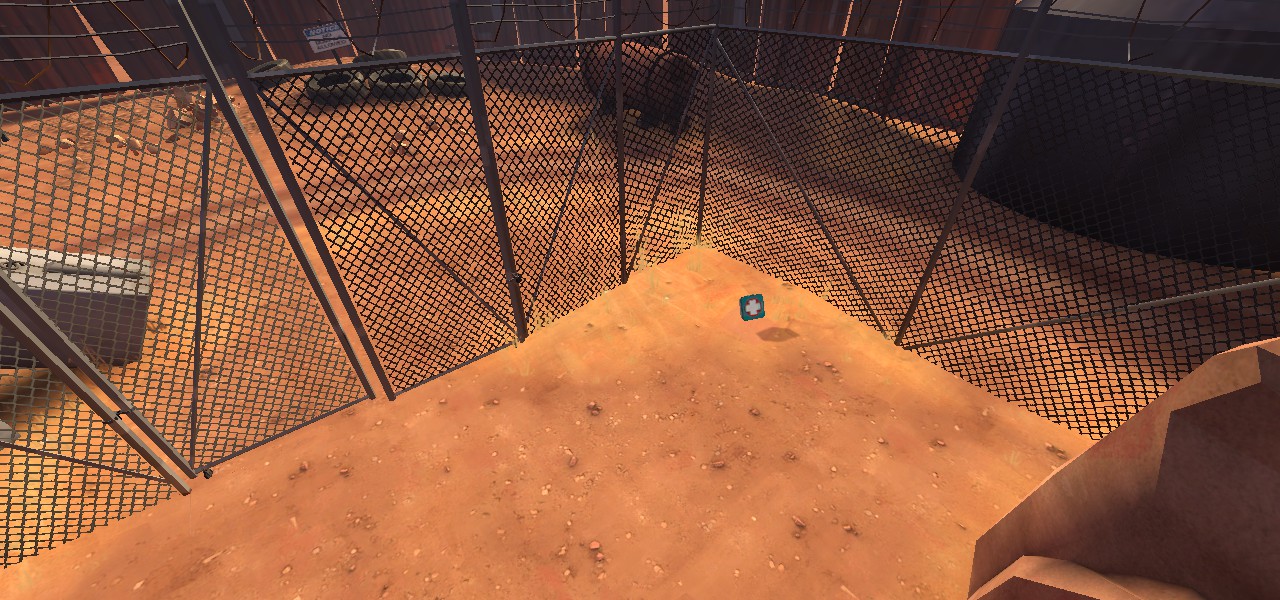
In heavily contested areas, medium health packs generally demand some investment from the players. In other words, the players will need to consider the risk and reward for attempting to pick up a medium health pack. Most commonly, they are placed next to a wall or in corners where players are at risk of getting hit by splash damage.
This badwater example also shows how an uninteresting corner of the map can become a prominent battlefield just by the placement of this healthpack.
We also see medium health packs in lowgrounds for the same reason.
In some rare cases, you will see medium health packs in highgrounds. However, these health packs demand risky maneuvers from the players. To reach this health pack, the player has to walk up ramps in the middle of the map, exposed to everyone, and also go through a tight, ramped corridor with no place to escape. Soldier and Demo need to rocket jump to get here which uses health. Note that this highground has an advantage over a limited part of the map and most of the map is not affected by the person who is on top of this tower (unless they are a sniper.)

As established above, when used in Attack/Defend maps, medium health packs can enable setup for one team before they engage in a large-scale battle. For example, they can replenish before they jump into a chokepoint or use it to hold the ground as defense.
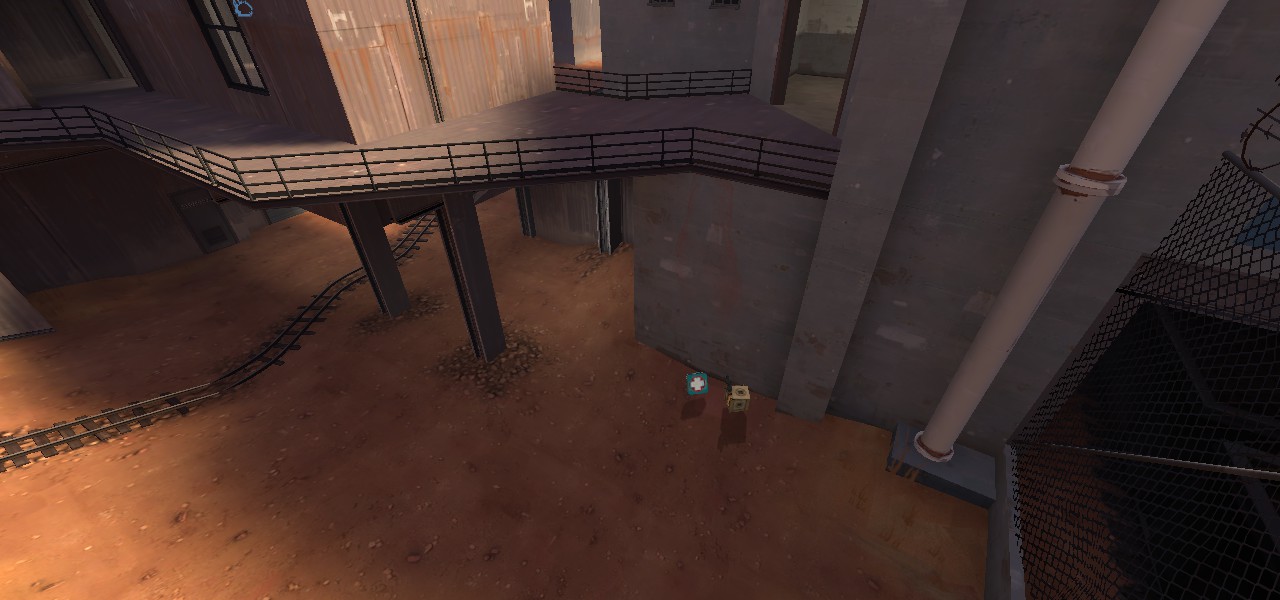
Interestingly, Barnblitz’s medium healthpack here meets all the mentioned purposes. Before blue pushes the cart to this ramp, this healthpack is used by red as a safe retreat. They can easily get this health and ammo and start defending with relatively easy access to the highground right next to the track.
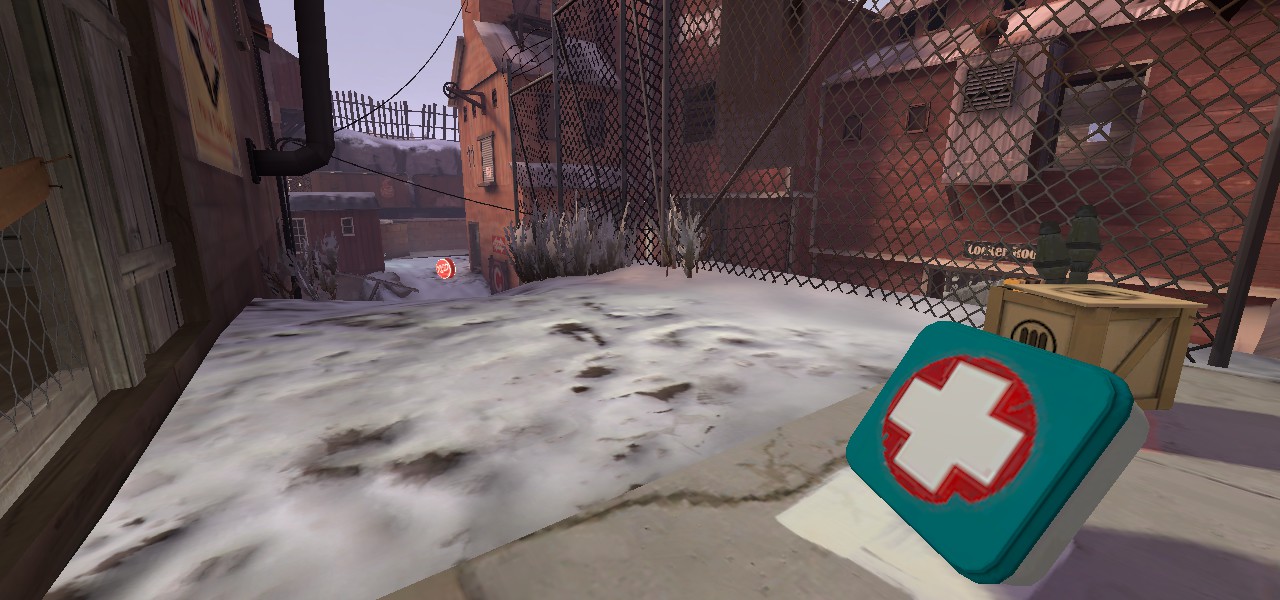
When both teams are actively fighting for C, this pack placement makes it so that whoever wants to get this pack has to walk into a deadend that is very open for everyone to see since it is so high up and it is open to sniper sightline from the opposite building.
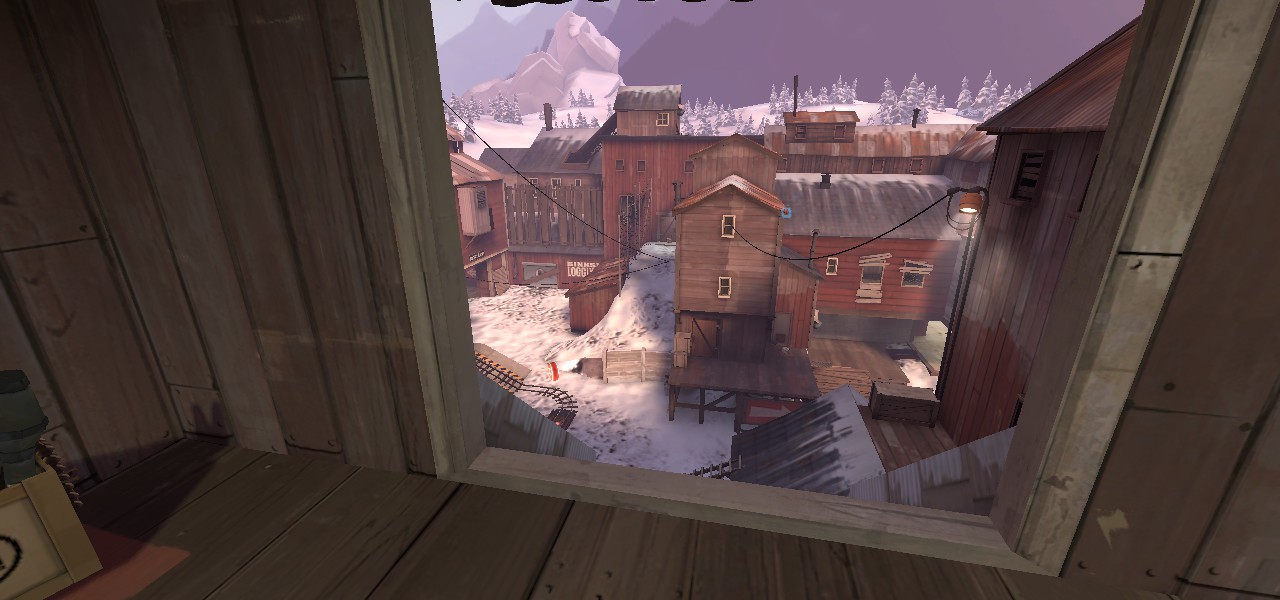
The health pack becomes safe again after the cart is pushed into the building. Some engineers may choose to use this as a sentry nest because of the limited access to this area as well as its height. Also the presence of a full ammo kit helps with this.

Medium Ammo
Medium ammo packs hint engineers to set up a sentry nest. However, by placing these in open areas you can limit its use to just refill player ammos. The use of this ammo pack is varied and is heavily dependent on the layout so it is important to understand and identify features that can define how a medium ammo pack can be used. They can be very useful for spies to refill its cloak while infiltrating since it is sometimes placed in hidden low traffic areas.
For instance, this pack in cp_granary can be used to build sentries if the attacking team takes time to reach this area because it can place a sentry nest to guard one of the entrances to the final point. However because of how close the second point is from this area as well as being a pretty open area, it is not often used that way. The doorway right on top of the health kit also makes this kit hard to be used to set up a sentry nest. Therefore this kit is simply used as extra ammo for defenders when they are pushing out of the final point.

Full Pickups
Full packs are generally used to grab the attention of the players. Always be careful when placing one of these as it can sway the balance of the map very easily.
Full Health
Often seen in older maps, full health kits is a get-out-of-jail-free card for players who have miraculously survived after making a bad decision to go head first into the combat. It can be fun to place them in very disadvantaged areas however in most cases, the reward for picking up this pack outweighs the risk.
Here is a small shed that is very dangerous to walk through since it does not have a good escape route.

Because of its power, you do not want to place them around objectives. It is also very annoying to fight next to these because just imagine you almost kill a heavy and he just refills to max health by picking up a full health kit.
This full health pack near point A in barnblitz is a very interesting counter argument. It is in an area right next to the objective, right in the center of the action.
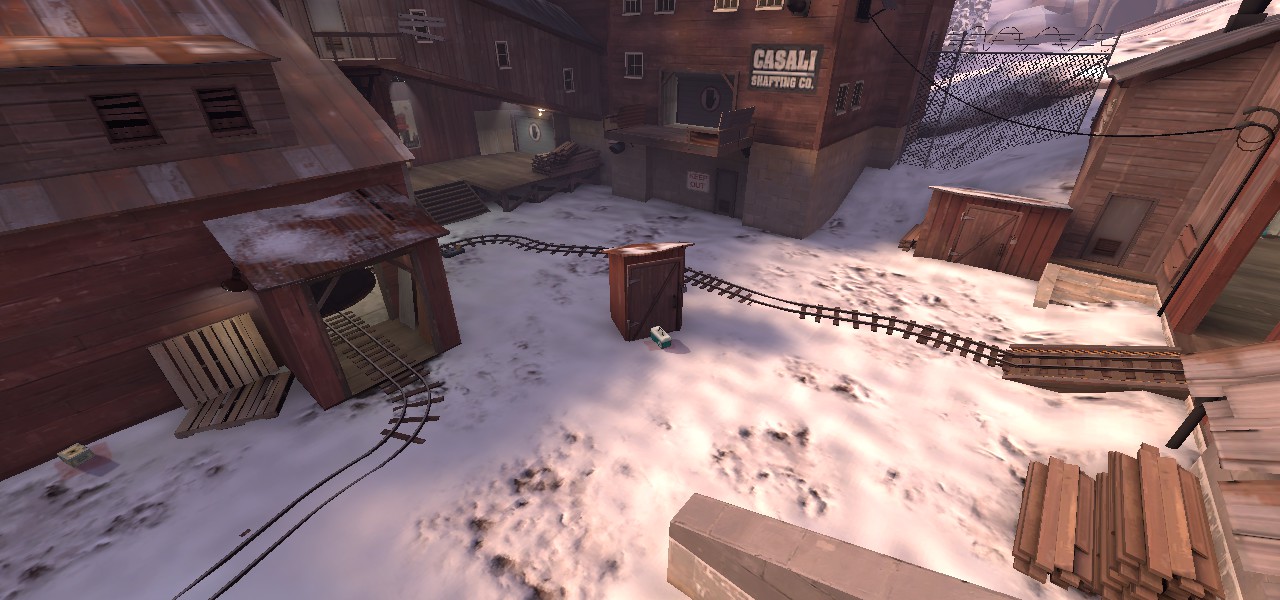
Point A being captured often results in the red team being wiped as they do not have any retreat path out of the A point building. (Purposefully so since the developer probably didn't want blue to use this hypothetical retreat path as a way to compromise red's defenses before point A is capped or to forward hold while they push the payload towards B.) The full health pack here allows red to retake this area after A is captured as it's the red players who will first be able to use this pack in a combat. (This idea of retake is supported by the track that temporarily stops blue from advancing. The developer clearly wanted fights in this area to happen for an extended amount of time.) This shows that a full health kit used to its full potential demonstrates deliberate design and thought out decision making from the developer. Emphasis on the words ‘deliberate and thought out.’ You need to be able to explain exactly why you put a full health kit on if you use it in an unconventional way like this.
Full Ammo
It forces engineers to scream at whoever steals this pack from them. Also, engineers feel the irresistible urge to build their sentry nest very close to this pack. This pickup can bolster defensive positions without creating convoluted layout changes. Be careful when placing this pickup since it can create nearly unbeatable sentry nests.
Breaking a sentry nest that is powered by this pickup usually forces the enemy team to be very coordinated since even after a good uber push, without a strong followup play from the rest of the team, the sentry nest will be back up in no time. This will slow the pace of the game significantly. Pubs with uncoordinated teams generally have a hard time winning this final point because of this full ammo despite the final point being a lowground.

Note that in tf2maps servers where players are more coordinated than in the average pub, full ammo packs are weaker.
Its ability to just spawn a sentry nest out of thin air is the reason why these are not often seen in small symmetrical maps where a full sentry nest is generally game-breaking. Not only that in symmetrical maps, teams switch should switch roles often which the sentry nests prevents, some symmetrical objectives are more easily defensible because of how they encourage solo-plays. Examples of the gamemodes where strong sentry nests can be game-breaking are passtime and ctf. Like we saw on ctf_gigantic above, sentry nests can be built to shut down or slow down parts of the map that should be changing hands often. Also because of how these gamemodes encourage solo plays, there are less coordinated pushes towards a sentry nest. While this applies to ammo packs of all sizes, developers need to put extra care and thought when placing a full ammo pack.
Extra
If you are new to tf2 mapping, never forget to put patch signages or indicators under pickups to indicate that it's there. While you can use indicators of any color and size, make sure that you apply the same rule across all pickups in your map. It can be frustrating to have to guess which indicator means which pickups.
These are pickups of all sizes and kinds and how they can be used in layouts to improve gameplay. If you have any suggestions feel free to leave them below so that I can improve the guide even after the 72hr period.
A clean PDF version of this guide can be found here.
Small Pickups
In most cases these will not affect the balance of the overall layout too much. However in some specific situations, it can change how an area gets played.
Small Health
Small health pack is used when you need a health pack but actions happen closely to the pickup. Good for quick resupply without affecting the balance of the area.
If you place this in the middle of the combat area, you can make a small point of contention where players will fight to get this health pack. This can sometimes create interesting gameplay dynamics where the healthpack becomes a temporary objective. Sometimes, players will fight to death to get this health pack which is insane if you think about it but it just happens. So this can be used to encourage some fighting.
A good example of a small health kit that encourages fighting is this kit in koth_highpass next to the control point. Because it is too close to the objective, a medium health kit might harm the gameplay as it gives too much advantage to the owner of the center control point. However a small health kit is perfect to make the combat in this area more important while being a useful retreat for the defending team.
Small Ammo
Small ammo pack is used when you want to sustain the battles around the area but not allow stupid sentry placements. However even the smallest ammo kit can generate a sentry nest. When placed in an enclosed area that gets low traffic, you can allow some crafty engineers to build a sentry nest or at least some helpful buildings for some ‘big-brain’ plays.
These do not give enough ammo for players who are actually out of ammo so if there is a noticeable lack of ammo in an area, try using a medium ammo kit instead. Good for quick and tiny resupply without affecting the balance of the area just like small health packs.
14bIt’s pass_gigantic_a7b used to have small ammo kits on top of the high ground at the mid area. However, 14biT quickly noticed that some engineers were able to set up an entire sentry nest in the middle of the map overlooking the opposing team’s main exit. This was possible because passtime is a gamemode where the mid gets low traffic when the ball goes past a certain line. This ammo kit was promptly removed.
This small ammo kit in plr_hightower allows engineers to build a weak sentry nest because it's in an enclosed, relatively safe area. However, this sentry nest should not be too strong so a small ammo kit was used instead of medium ones.
Medium Pickups
Medium packs are generally used as a ‘proper’ pickup, meaning that it will be enough to satisfy the player's needs. After picking up this pack, players will be able to go right back into combat feeling confident. So they can be used before choke points or other highly contested areas. These are few of many common examples of medium pickups that are placed before a choke point.
A set of medium pickups before going through the choke that leads to mid in koth_highpass.
Medium Health
Players can still suffer the consequence of bad positioning unlike the full health kit. This makes the decision to take the health kit an interesting one if the kit itself is placed in a risky area. Similarly to small health kits, it will invite competition around the kit. Unlike small health kits, this alone can be a reason for players to visit some of the least used areas in the map.
In heavily contested areas, medium health packs generally demand some investment from the players. In other words, the players will need to consider the risk and reward for attempting to pick up a medium health pack. Most commonly, they are placed next to a wall or in corners where players are at risk of getting hit by splash damage.
This badwater example also shows how an uninteresting corner of the map can become a prominent battlefield just by the placement of this healthpack.
We also see medium health packs in lowgrounds for the same reason.
In some rare cases, you will see medium health packs in highgrounds. However, these health packs demand risky maneuvers from the players. To reach this health pack, the player has to walk up ramps in the middle of the map, exposed to everyone, and also go through a tight, ramped corridor with no place to escape. Soldier and Demo need to rocket jump to get here which uses health. Note that this highground has an advantage over a limited part of the map and most of the map is not affected by the person who is on top of this tower (unless they are a sniper.)
As established above, when used in Attack/Defend maps, medium health packs can enable setup for one team before they engage in a large-scale battle. For example, they can replenish before they jump into a chokepoint or use it to hold the ground as defense.
Interestingly, Barnblitz’s medium healthpack here meets all the mentioned purposes. Before blue pushes the cart to this ramp, this healthpack is used by red as a safe retreat. They can easily get this health and ammo and start defending with relatively easy access to the highground right next to the track.
When both teams are actively fighting for C, this pack placement makes it so that whoever wants to get this pack has to walk into a deadend that is very open for everyone to see since it is so high up and it is open to sniper sightline from the opposite building.
The health pack becomes safe again after the cart is pushed into the building. Some engineers may choose to use this as a sentry nest because of the limited access to this area as well as its height. Also the presence of a full ammo kit helps with this.
Medium Ammo
Medium ammo packs hint engineers to set up a sentry nest. However, by placing these in open areas you can limit its use to just refill player ammos. The use of this ammo pack is varied and is heavily dependent on the layout so it is important to understand and identify features that can define how a medium ammo pack can be used. They can be very useful for spies to refill its cloak while infiltrating since it is sometimes placed in hidden low traffic areas.
For instance, this pack in cp_granary can be used to build sentries if the attacking team takes time to reach this area because it can place a sentry nest to guard one of the entrances to the final point. However because of how close the second point is from this area as well as being a pretty open area, it is not often used that way. The doorway right on top of the health kit also makes this kit hard to be used to set up a sentry nest. Therefore this kit is simply used as extra ammo for defenders when they are pushing out of the final point.
Full Pickups
Full packs are generally used to grab the attention of the players. Always be careful when placing one of these as it can sway the balance of the map very easily.
Full Health
Often seen in older maps, full health kits is a get-out-of-jail-free card for players who have miraculously survived after making a bad decision to go head first into the combat. It can be fun to place them in very disadvantaged areas however in most cases, the reward for picking up this pack outweighs the risk.
Here is a small shed that is very dangerous to walk through since it does not have a good escape route.
Because of its power, you do not want to place them around objectives. It is also very annoying to fight next to these because just imagine you almost kill a heavy and he just refills to max health by picking up a full health kit.
This full health pack near point A in barnblitz is a very interesting counter argument. It is in an area right next to the objective, right in the center of the action.
Point A being captured often results in the red team being wiped as they do not have any retreat path out of the A point building. (Purposefully so since the developer probably didn't want blue to use this hypothetical retreat path as a way to compromise red's defenses before point A is capped or to forward hold while they push the payload towards B.) The full health pack here allows red to retake this area after A is captured as it's the red players who will first be able to use this pack in a combat. (This idea of retake is supported by the track that temporarily stops blue from advancing. The developer clearly wanted fights in this area to happen for an extended amount of time.) This shows that a full health kit used to its full potential demonstrates deliberate design and thought out decision making from the developer. Emphasis on the words ‘deliberate and thought out.’ You need to be able to explain exactly why you put a full health kit on if you use it in an unconventional way like this.
Full Ammo
It forces engineers to scream at whoever steals this pack from them. Also, engineers feel the irresistible urge to build their sentry nest very close to this pack. This pickup can bolster defensive positions without creating convoluted layout changes. Be careful when placing this pickup since it can create nearly unbeatable sentry nests.
Breaking a sentry nest that is powered by this pickup usually forces the enemy team to be very coordinated since even after a good uber push, without a strong followup play from the rest of the team, the sentry nest will be back up in no time. This will slow the pace of the game significantly. Pubs with uncoordinated teams generally have a hard time winning this final point because of this full ammo despite the final point being a lowground.
Note that in tf2maps servers where players are more coordinated than in the average pub, full ammo packs are weaker.
Its ability to just spawn a sentry nest out of thin air is the reason why these are not often seen in small symmetrical maps where a full sentry nest is generally game-breaking. Not only that in symmetrical maps, teams switch should switch roles often which the sentry nests prevents, some symmetrical objectives are more easily defensible because of how they encourage solo-plays. Examples of the gamemodes where strong sentry nests can be game-breaking are passtime and ctf. Like we saw on ctf_gigantic above, sentry nests can be built to shut down or slow down parts of the map that should be changing hands often. Also because of how these gamemodes encourage solo plays, there are less coordinated pushes towards a sentry nest. While this applies to ammo packs of all sizes, developers need to put extra care and thought when placing a full ammo pack.
Extra
If you are new to tf2 mapping, never forget to put patch signages or indicators under pickups to indicate that it's there. While you can use indicators of any color and size, make sure that you apply the same rule across all pickups in your map. It can be frustrating to have to guess which indicator means which pickups.
These are pickups of all sizes and kinds and how they can be used in layouts to improve gameplay. If you have any suggestions feel free to leave them below so that I can improve the guide even after the 72hr period.
A clean PDF version of this guide can be found here.
Last edited:


