- Dec 1, 2008
- 13
- 0
UPDATED - December 30th, 2008
Work In Progress:
CP_Jail
Alrighty all, I've updated the screenshots and explanations below, and taken in to account a lot of the feedback people were giving me. I've almost completely retextured the interiors with proper TF2 textures, have added cover, fleshed out certain areas, and done my best to eliminate some of the plain blockiness of it (though I'm certain some of that is still there). After finishing another couple door frames, and adding some overlays and direction arrows, I believe I'll have it ready for its first playability-tests. I've been checking sightlines and ranges using my second account, mostly as an Engineer, but that hardly equivalent.
Here's the story behind this map:
Blu has been serving hard time in the high security lockdown of the local Red jail. Tensions have been reaching a boiling point between prisoners and guards, and Blu finally decided to escape. With their underworld contacts, they arranged for allies to come rescure them, and are intent on blasting their way out of the whole place. The Reds caught wind of this however, and have rolled out their big guns to stop the attempt. Blu must first seize the cellblock, and then the administrative areas of the prison, in order to be free.
The size of this map is roughly on par with a single stage of a three-stage map. Once I'm confidant this portion is on it's way, I'll most likely be adding additional stages to it, involving the rescue itself, and staging the escape afterwards to freedom.
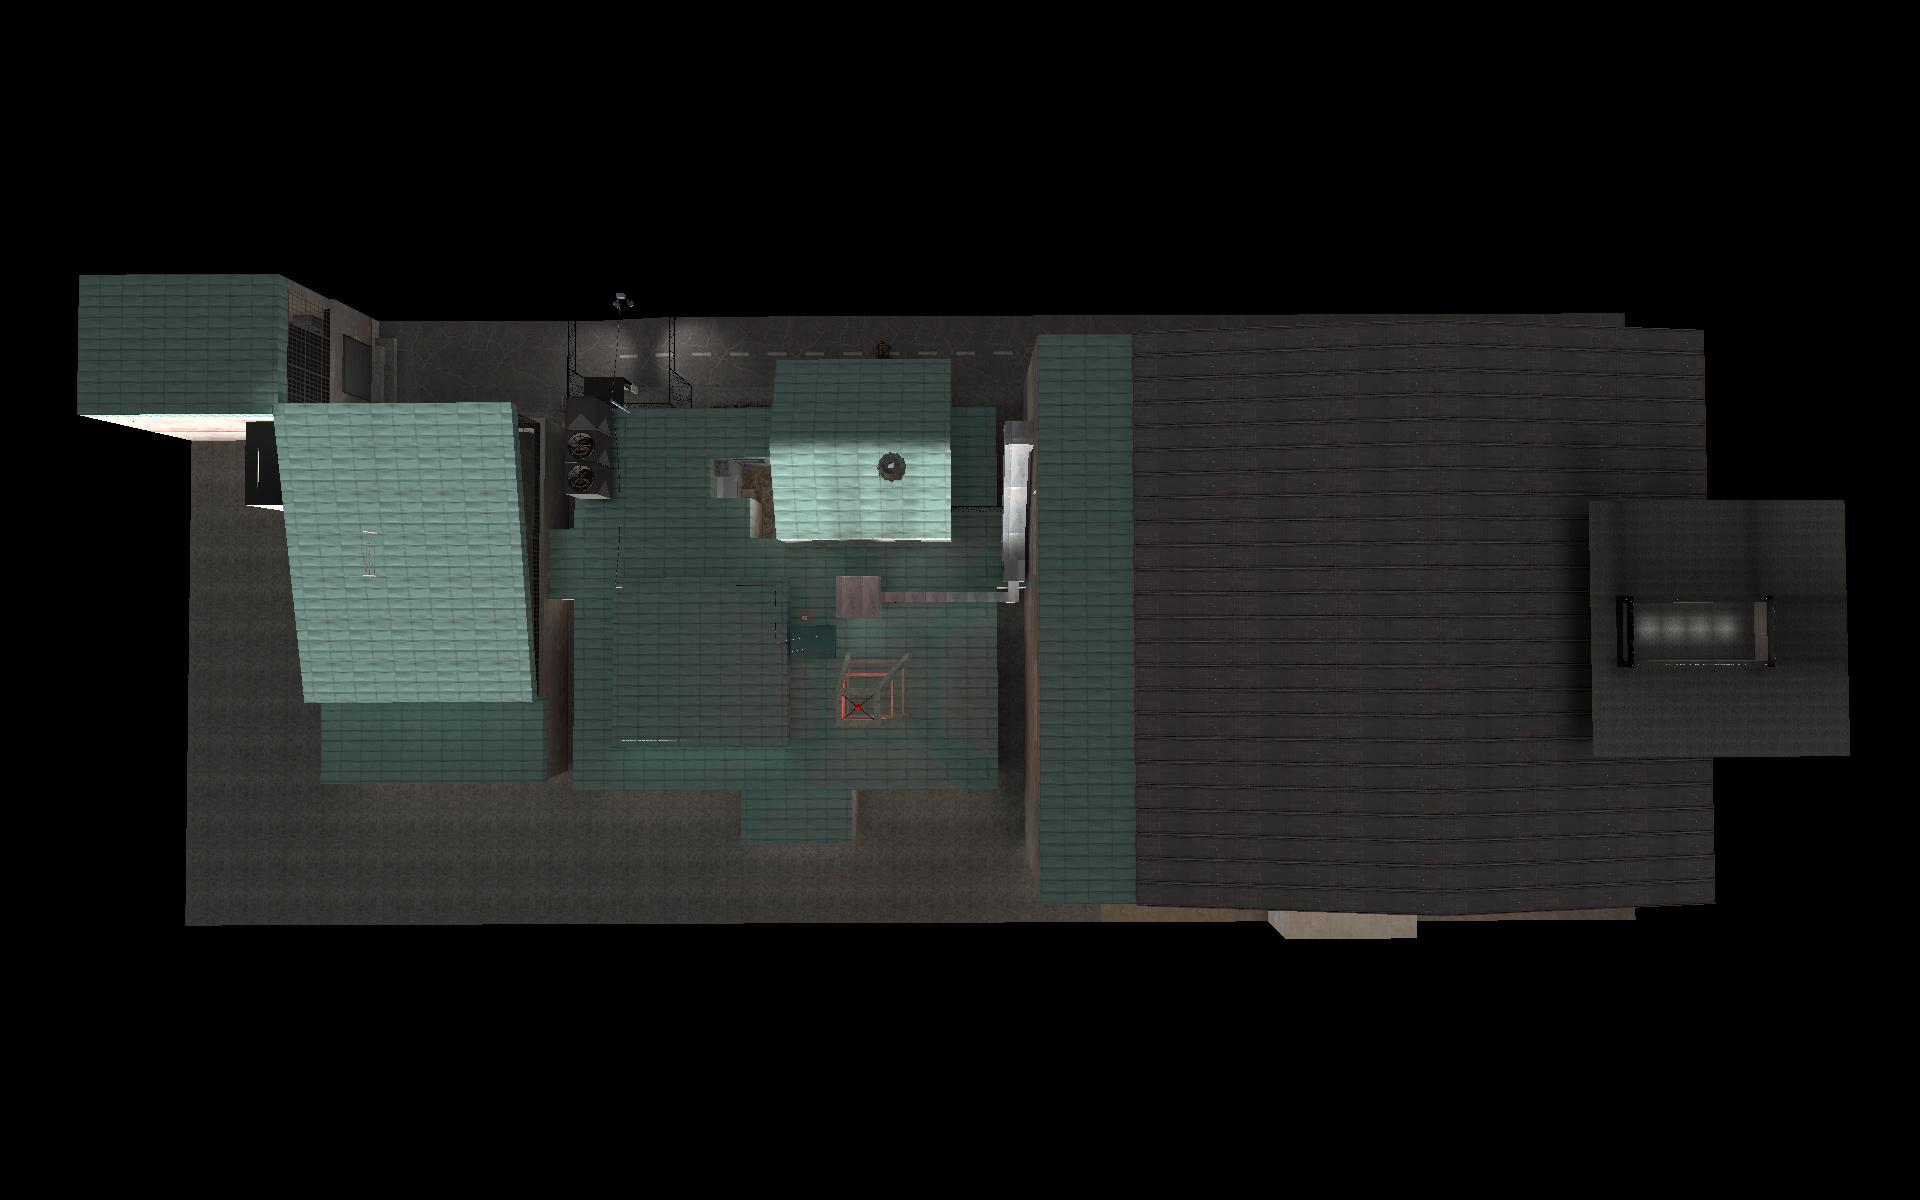
This is the overhead view. Action starts in the large metal-roofed structure on the right, moves through or across the low center building, and ends in the peak-roofed facility on the left.
This is the Blu spawnroom. After being sprung from their cells by their Blu allies, who brought crates of supplies with them, the escapees must first fight their way through...
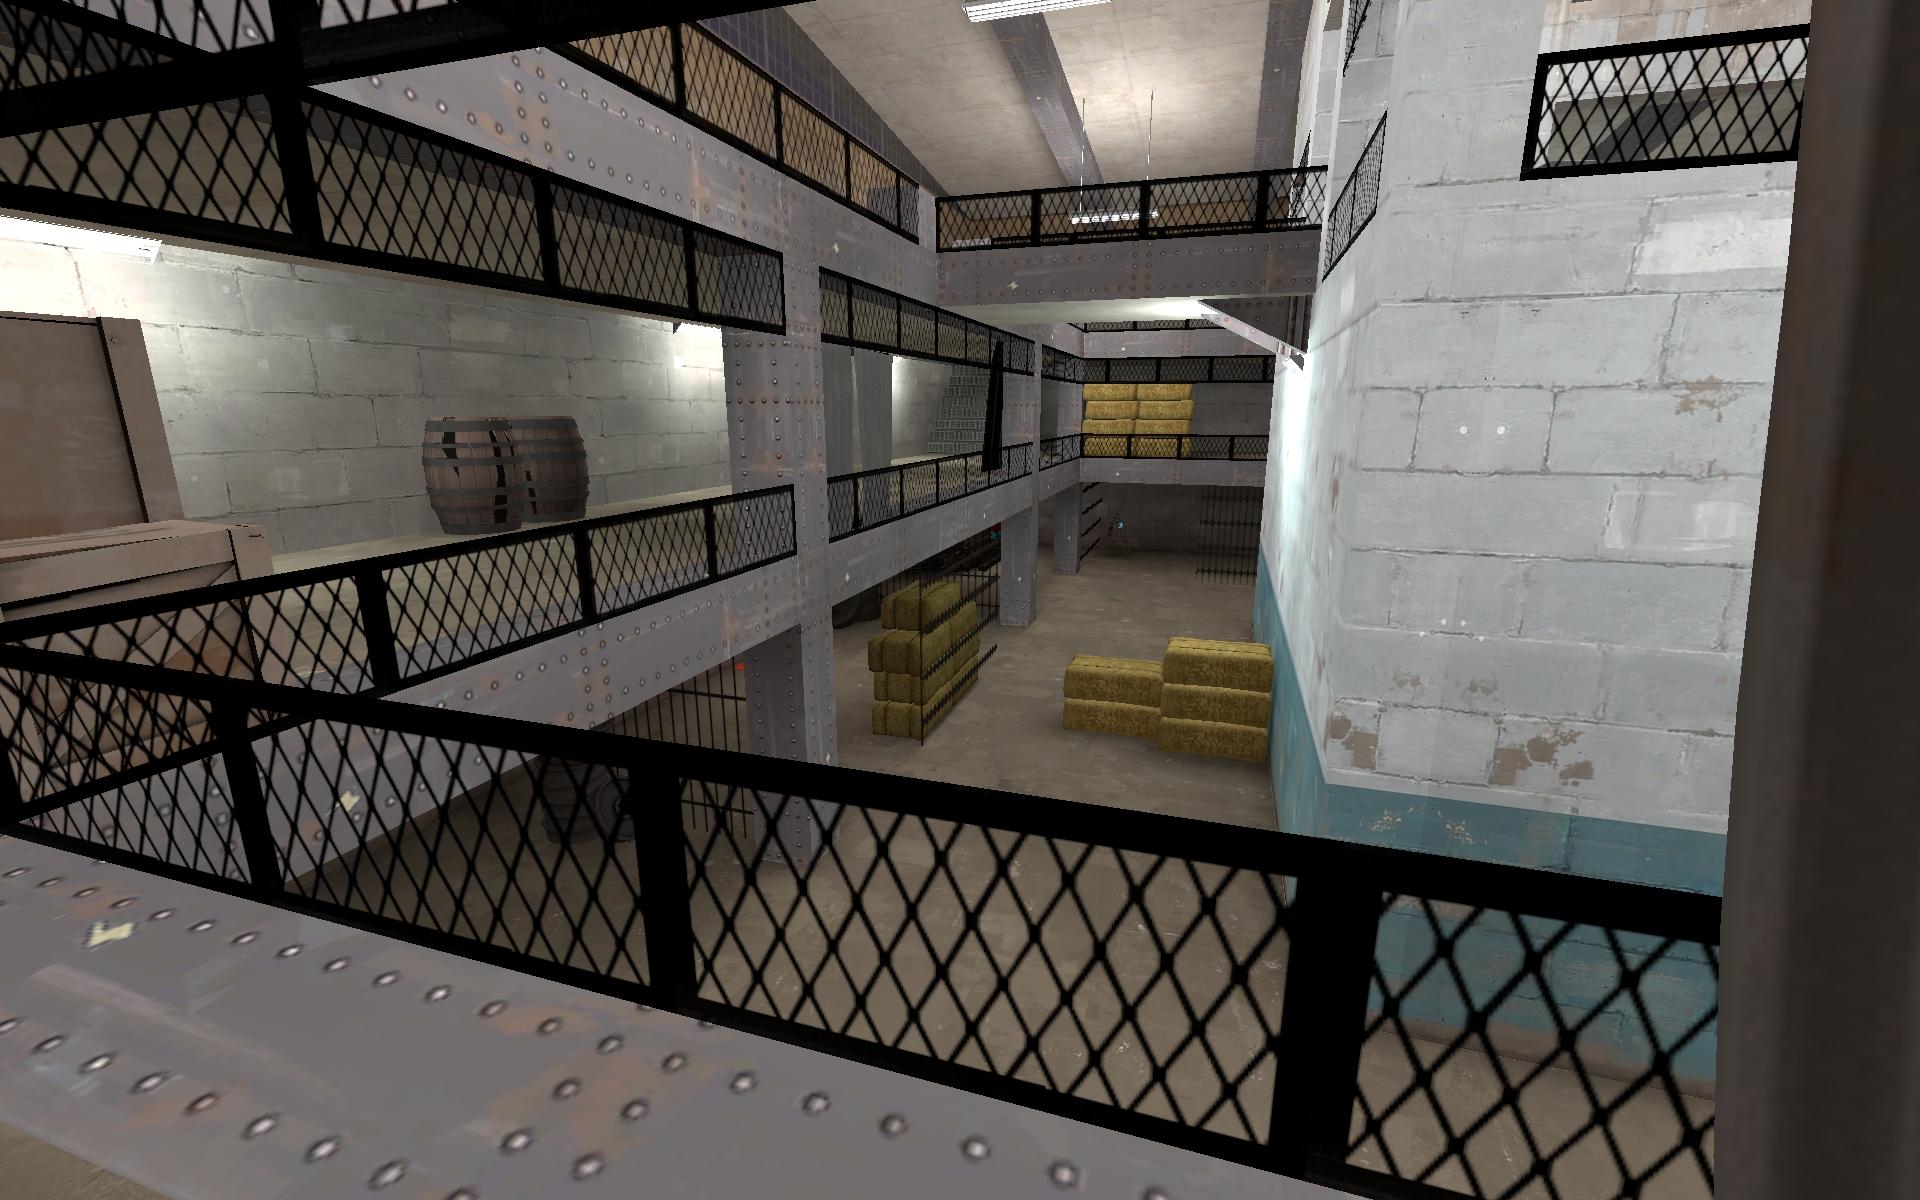
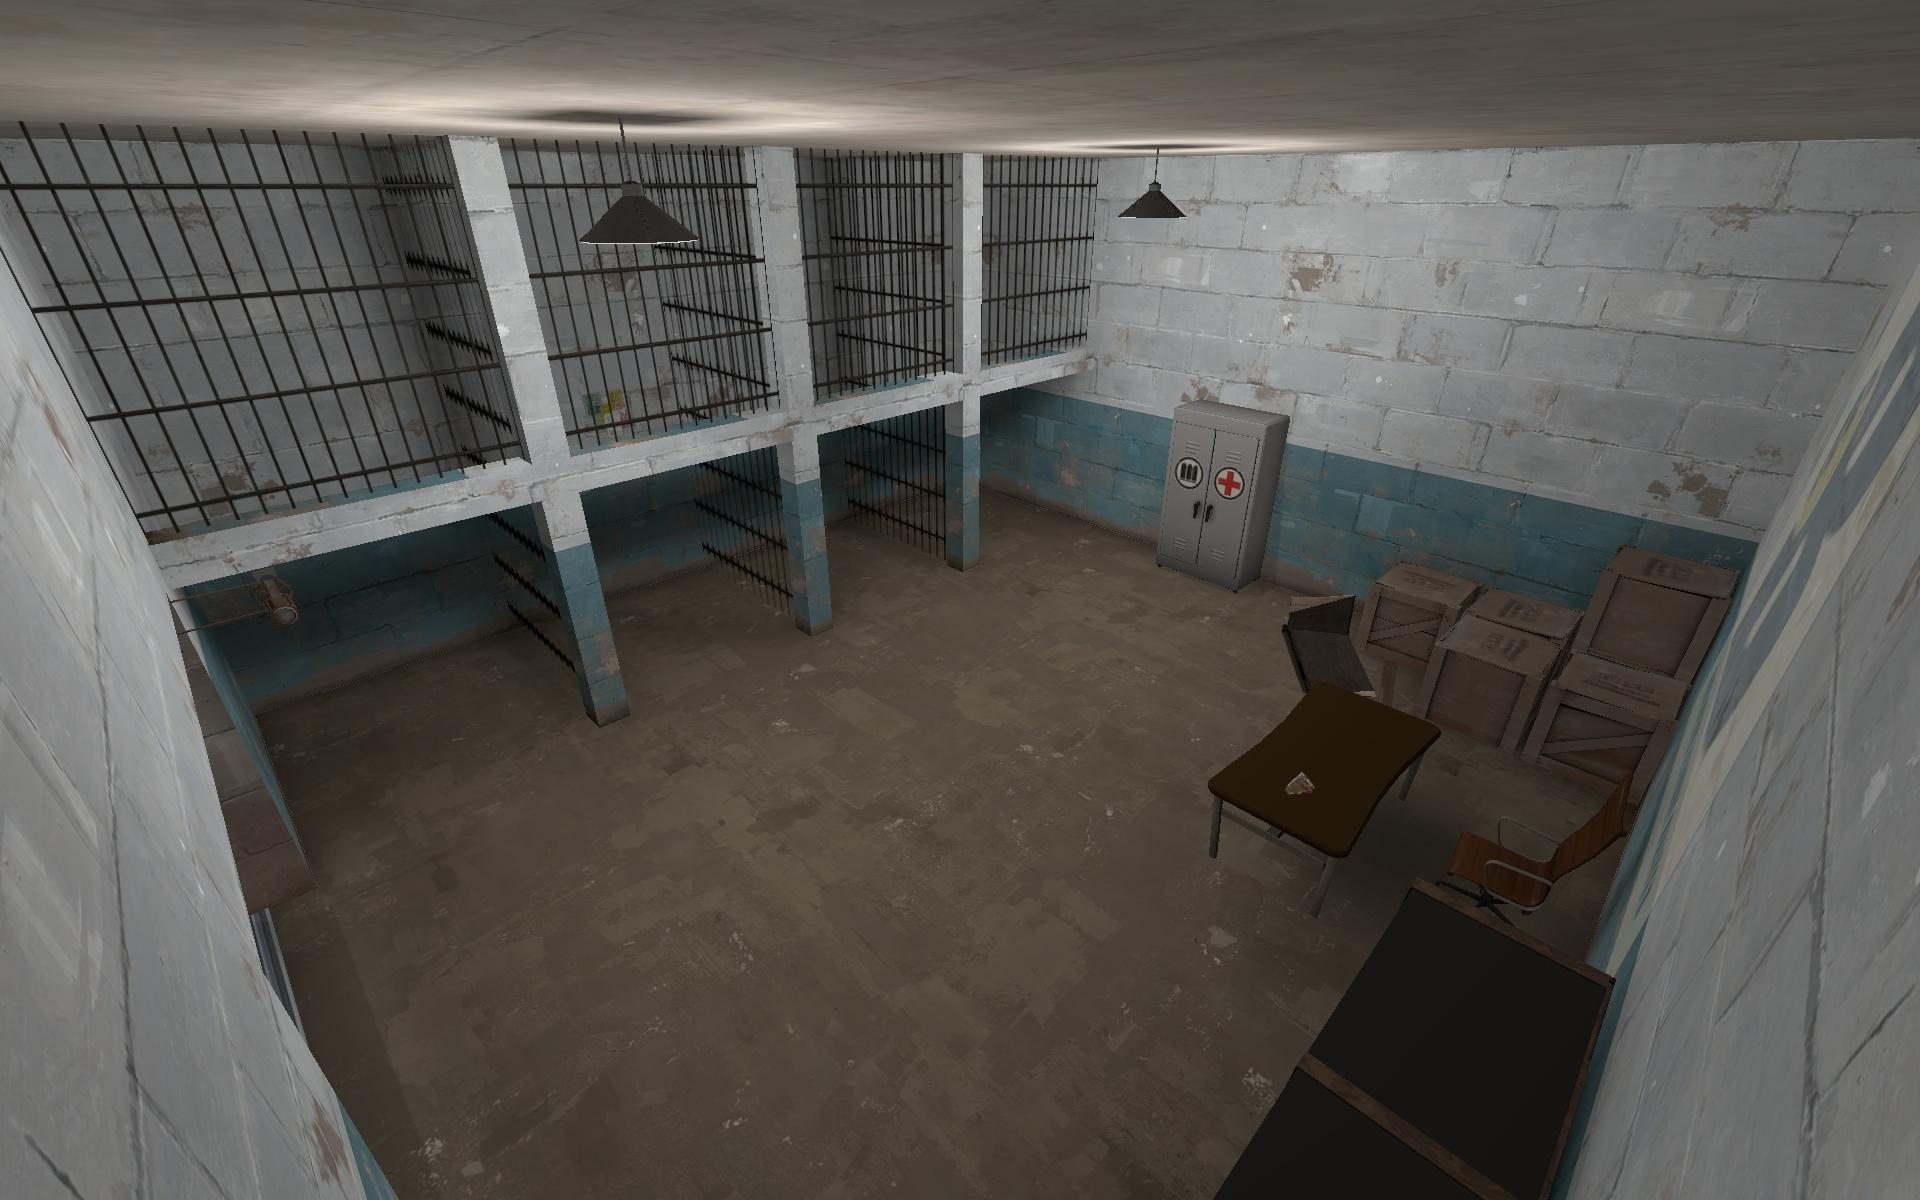
The Gun Gallery. Three tiers of combat awaits. Cover can be sought in the cells on the lower level, or behind the various objects the Reds left lying around, confident they were secure. Dodging in and out along the middle level, Blu can progress up to the third level, where they find...
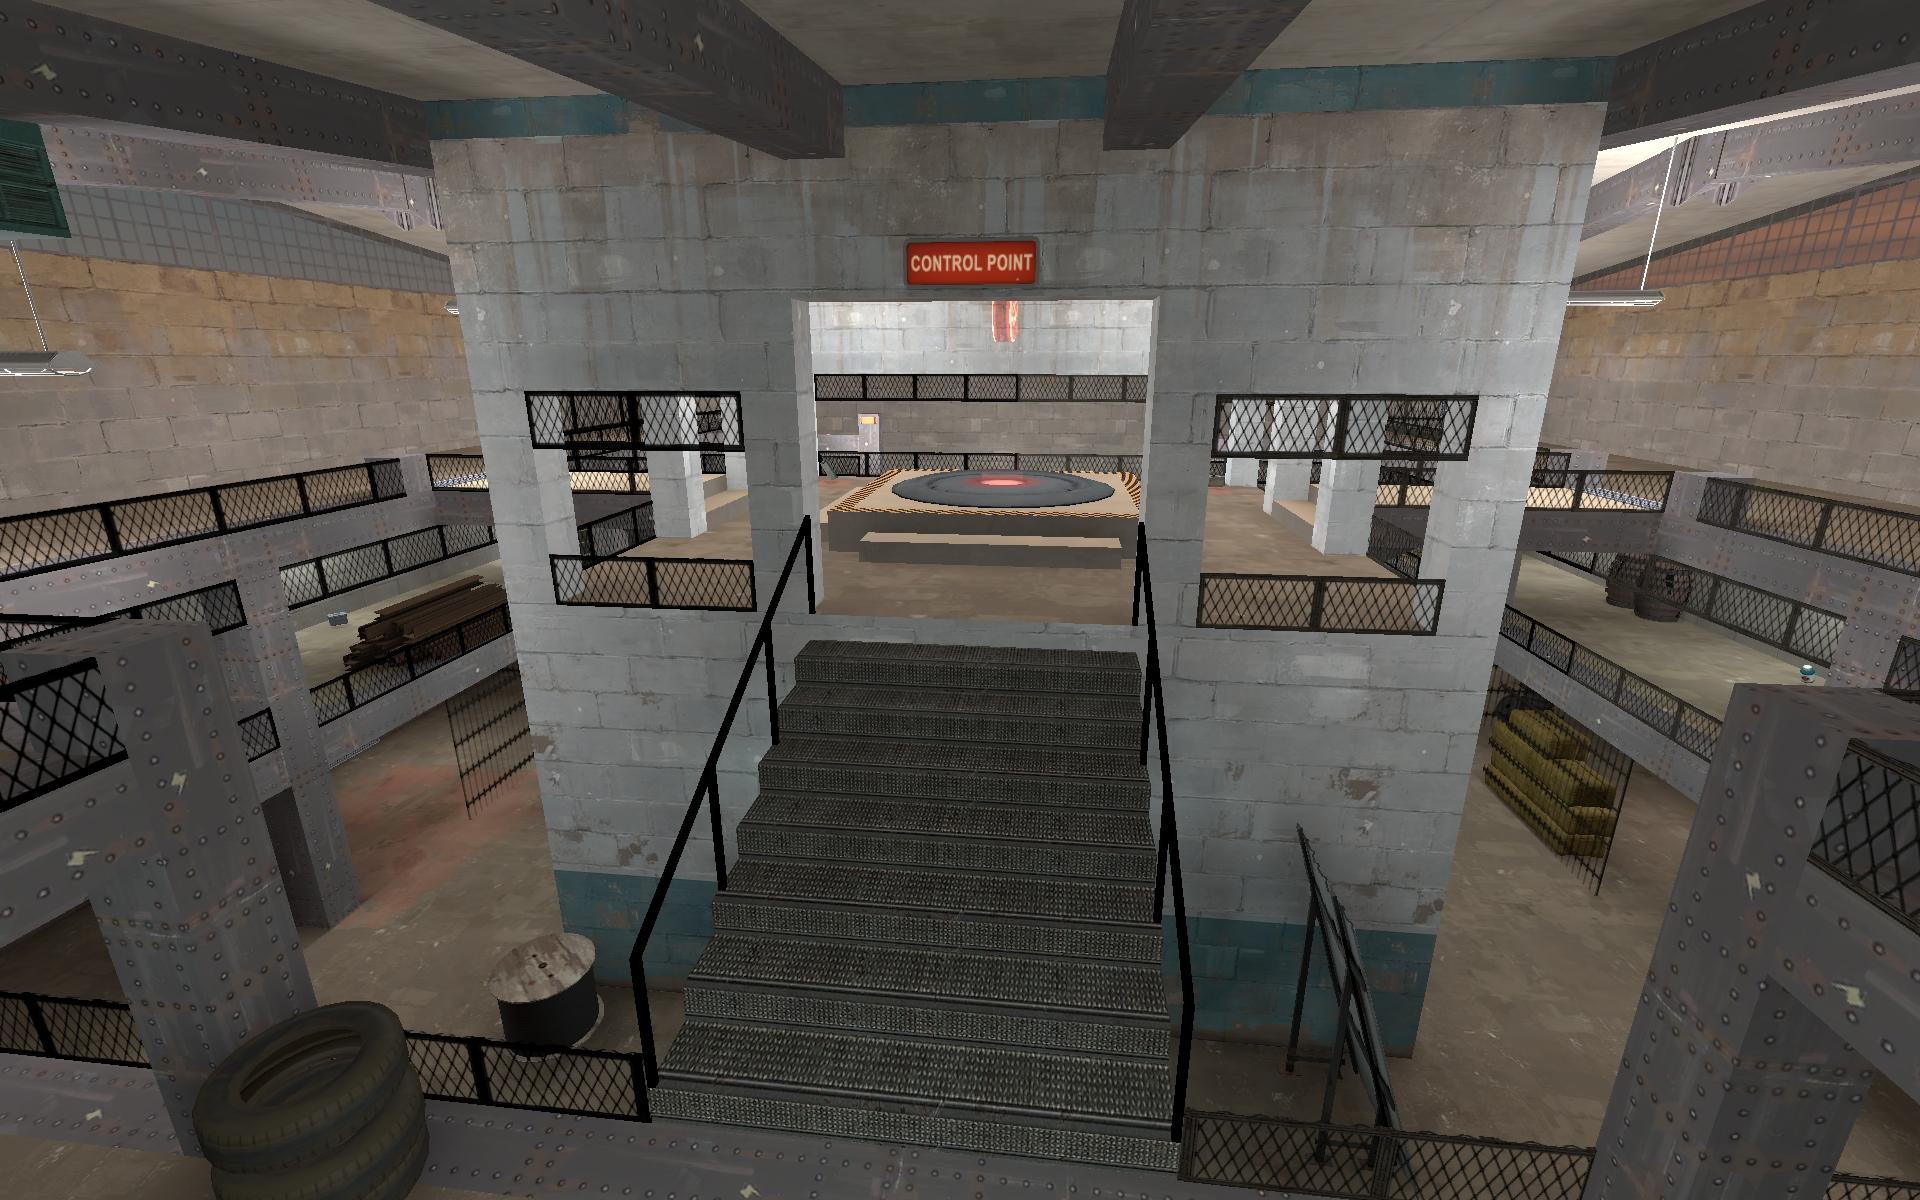
The capture point. Accessed directly by stairs from the second level, or via bridges from the third, it is a great weapons platform, but is terribly exposed if the enemy can pull off a pincer movement. Seizing control of this position will open the previously Red-Only cellblock gates, allowing access to the next area.
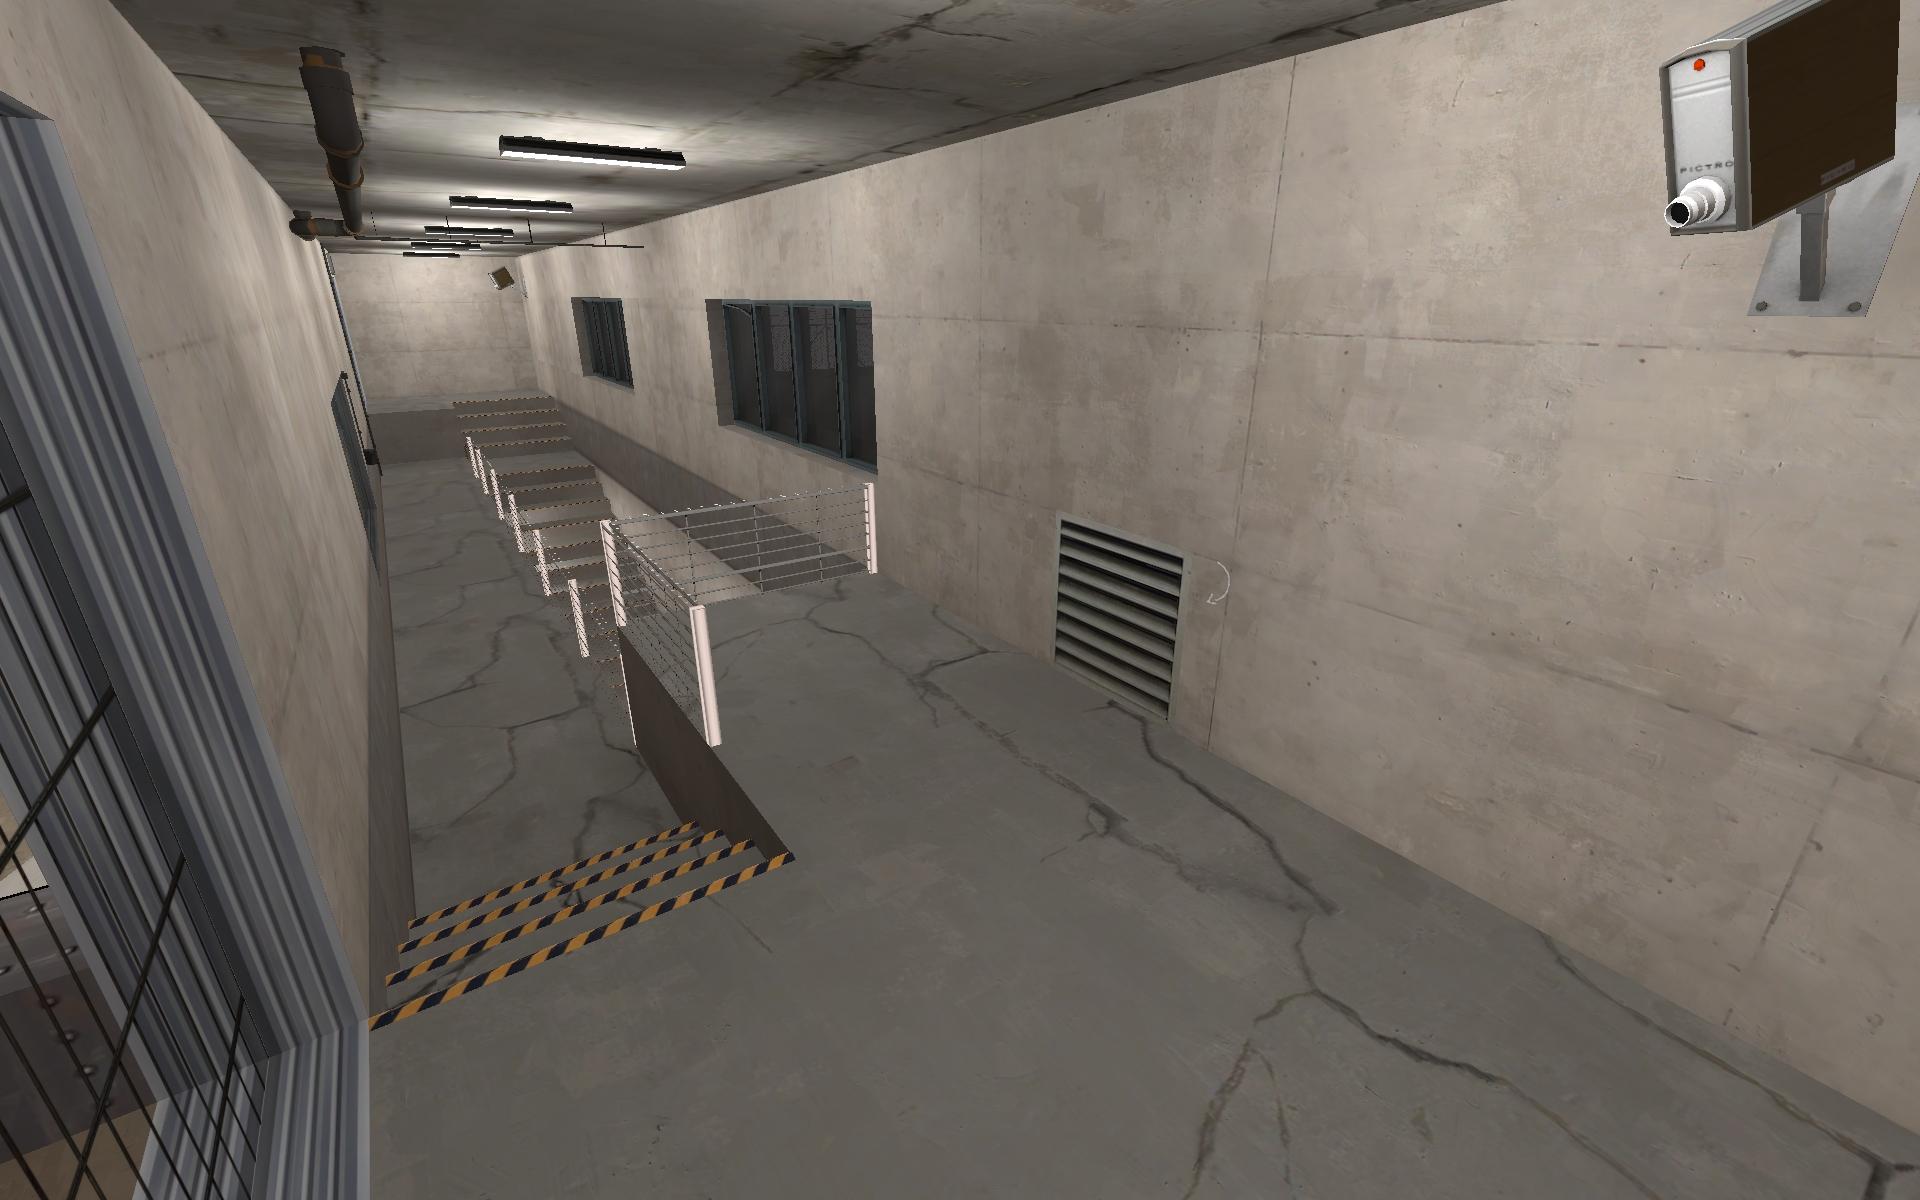
This is the upper hallway between the first and middle areas. You can either go down the steps to the lower hallway, or break open the vent and crawl through, where an airduct will lead you to the roof. Also, though they're made of bullet-proof glass, and can take a beating, those windows are destructible. They'll also let you out to the roof, or provide a position for snipers.
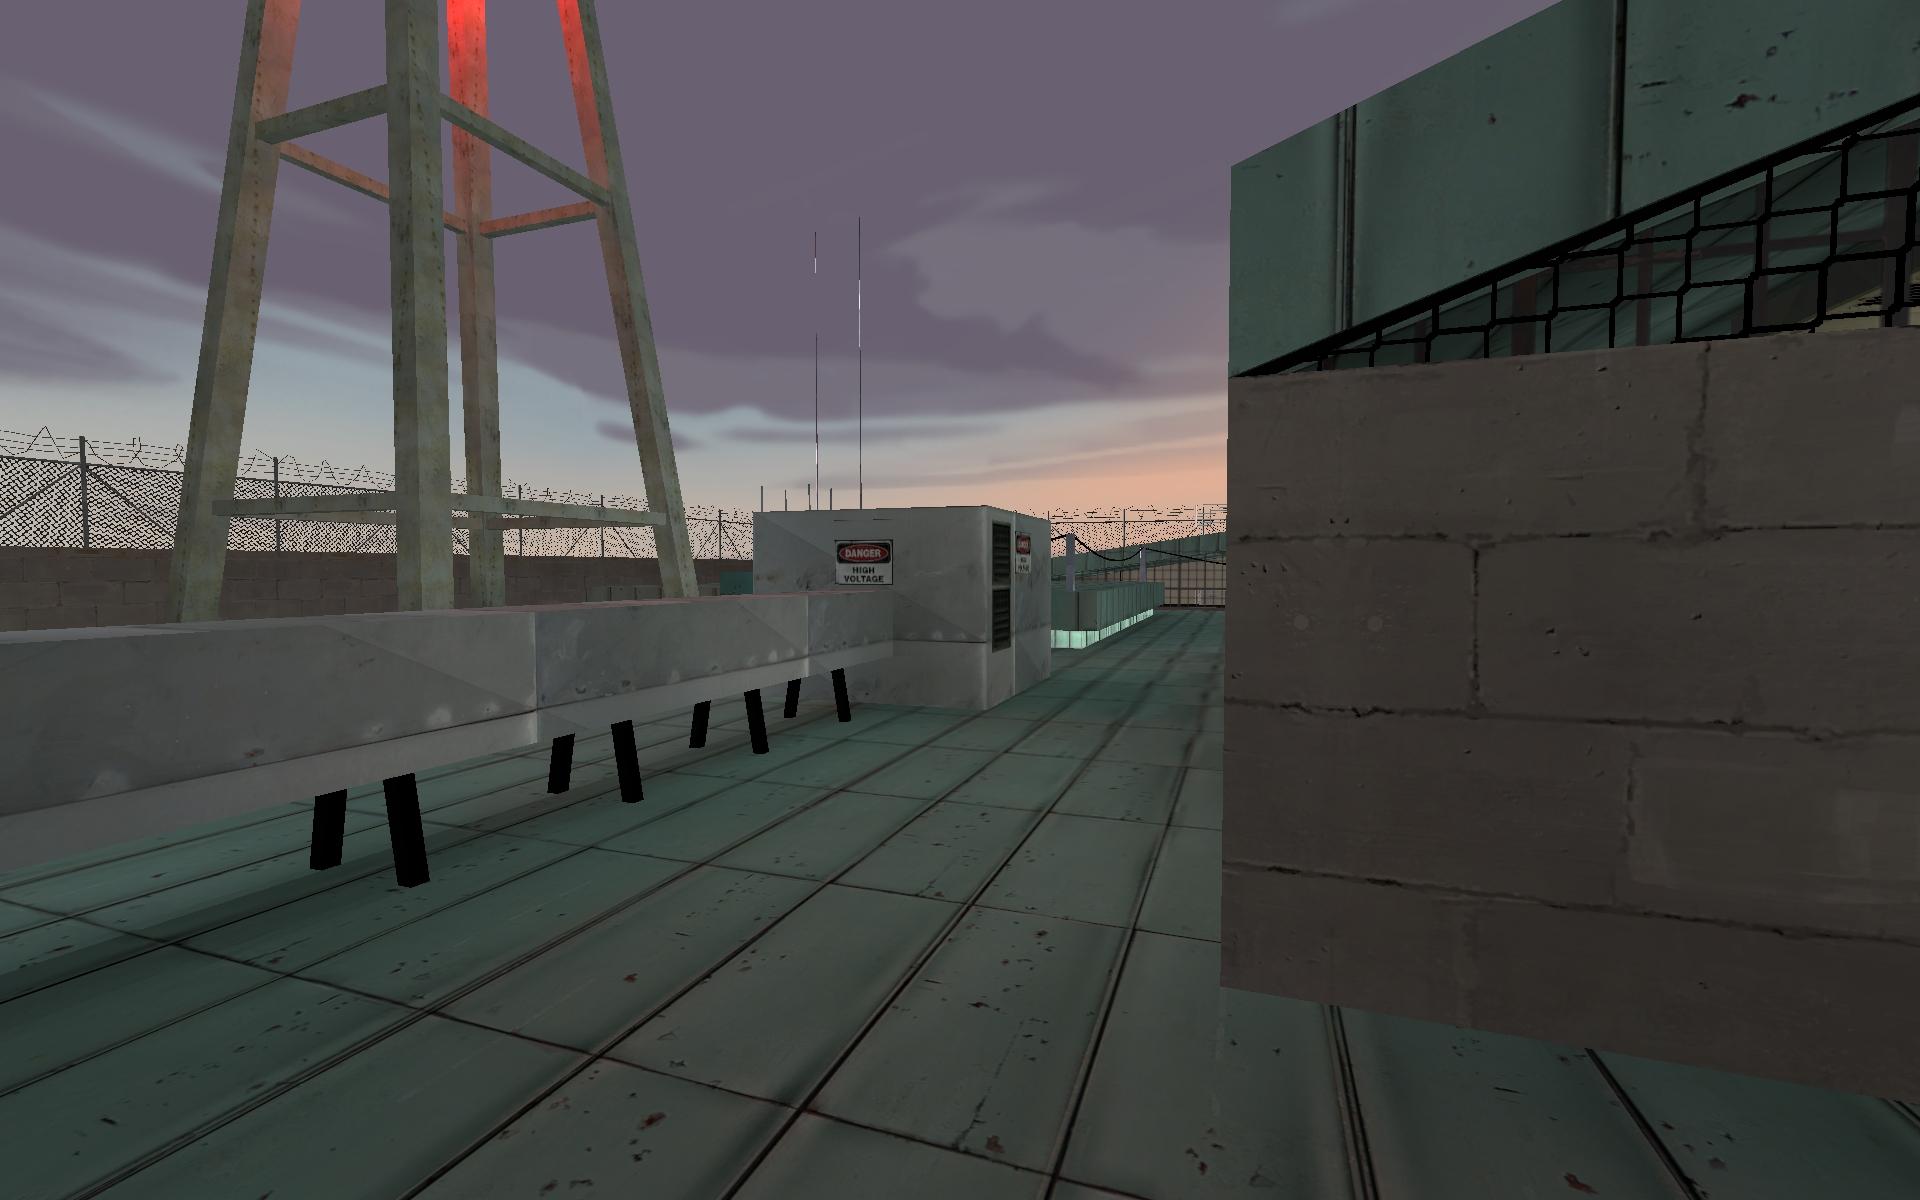
The roof. This is an alternate path that allows numerous different entry points in to the lower area. If followed the whole length, it leads nearly to the Red spawn, but taking that approach will be visible to observers on the 2nd CP's balcony. You can break in through the upper windows of the infirmary, or can hop down in an enclosed courtyard as well.
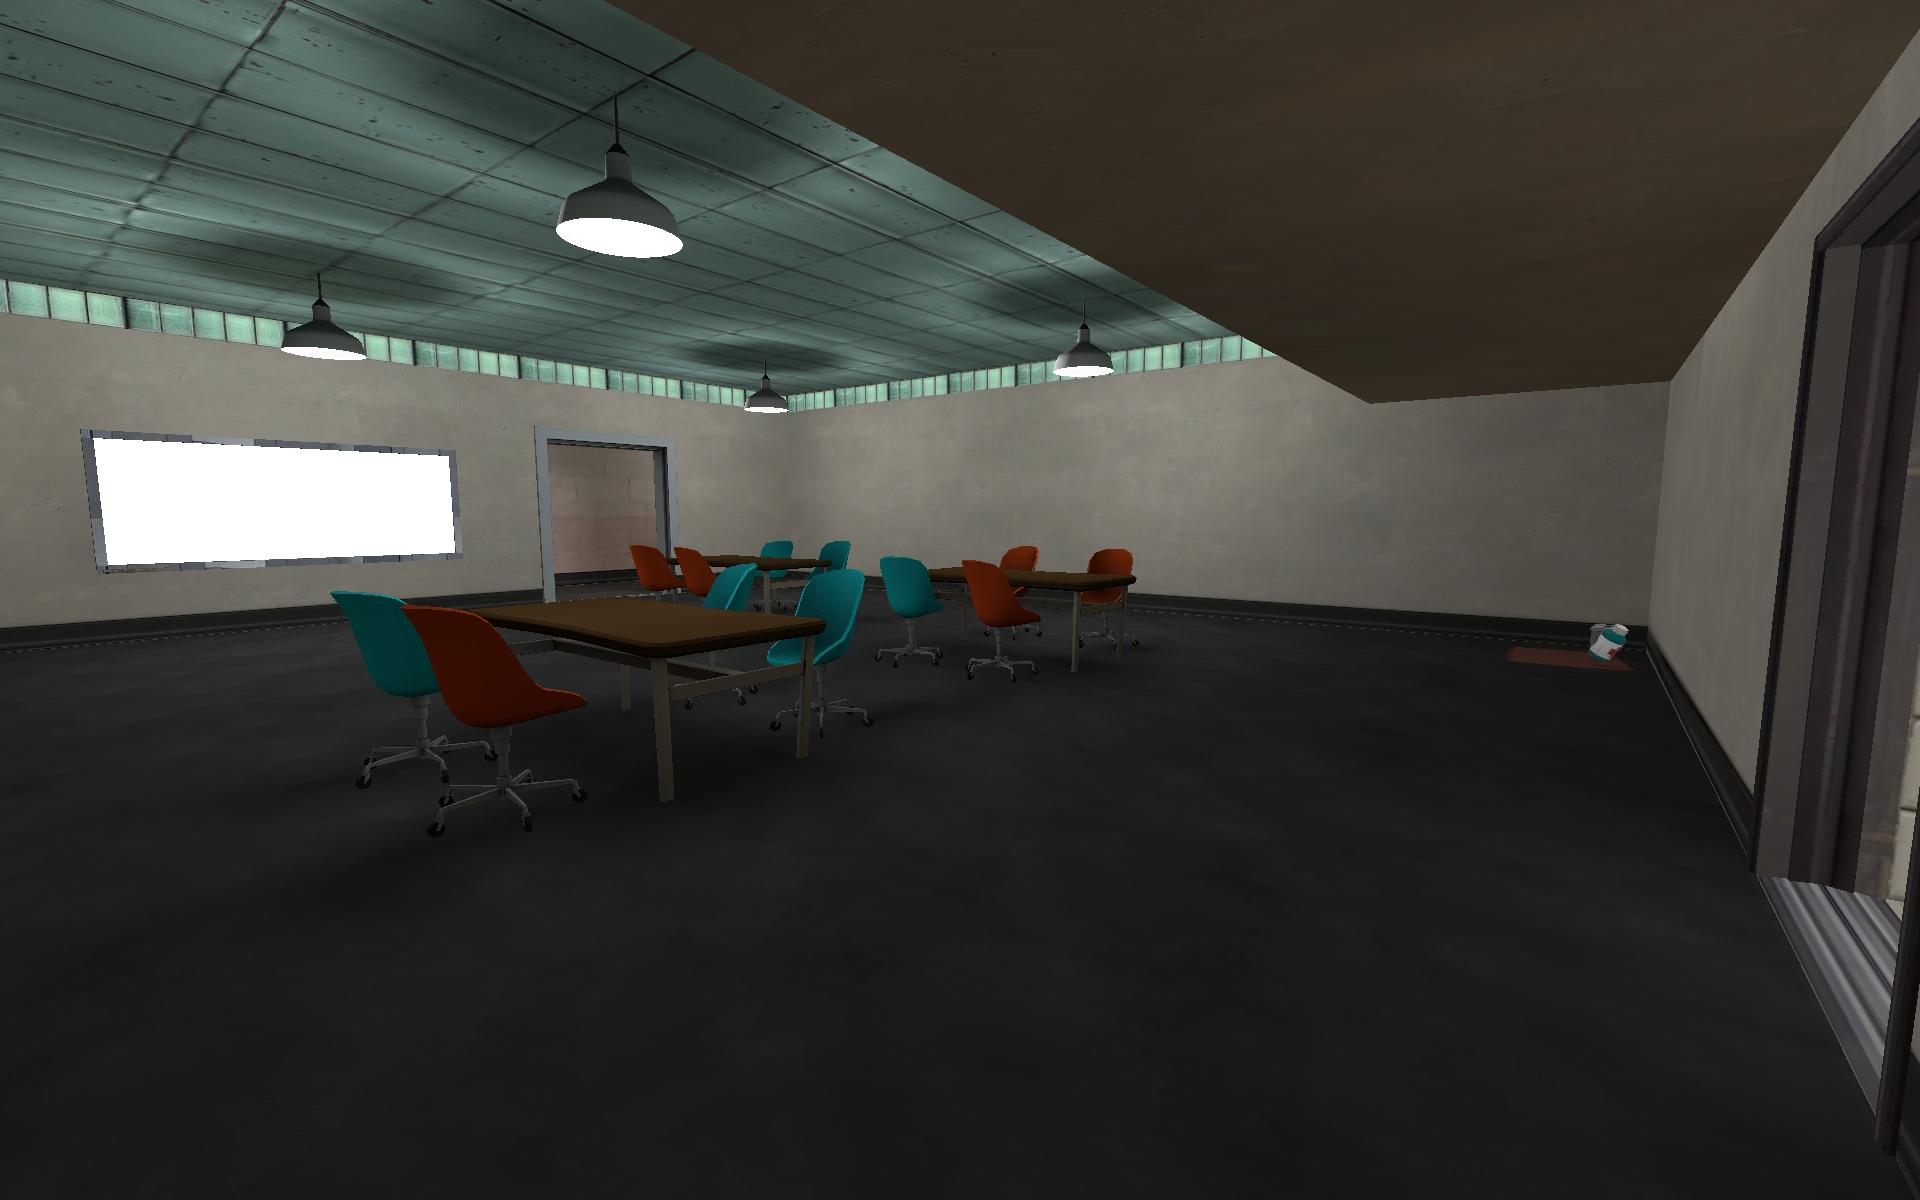
Going down the steps to the lower hall previously mentioned leads to an outer ring of hallways surrounding inner police workspaces. This is the police briefing room (sorry for the bright white thing - I'm working on a whiteboard for that spot). To the right, with the tiles, is a bathroom that passes through to the right hallway. Across the room we see the left hallway. This picture is taken from a doorway that leads to dispatch facilities, a locker/break area, and the front hallway.
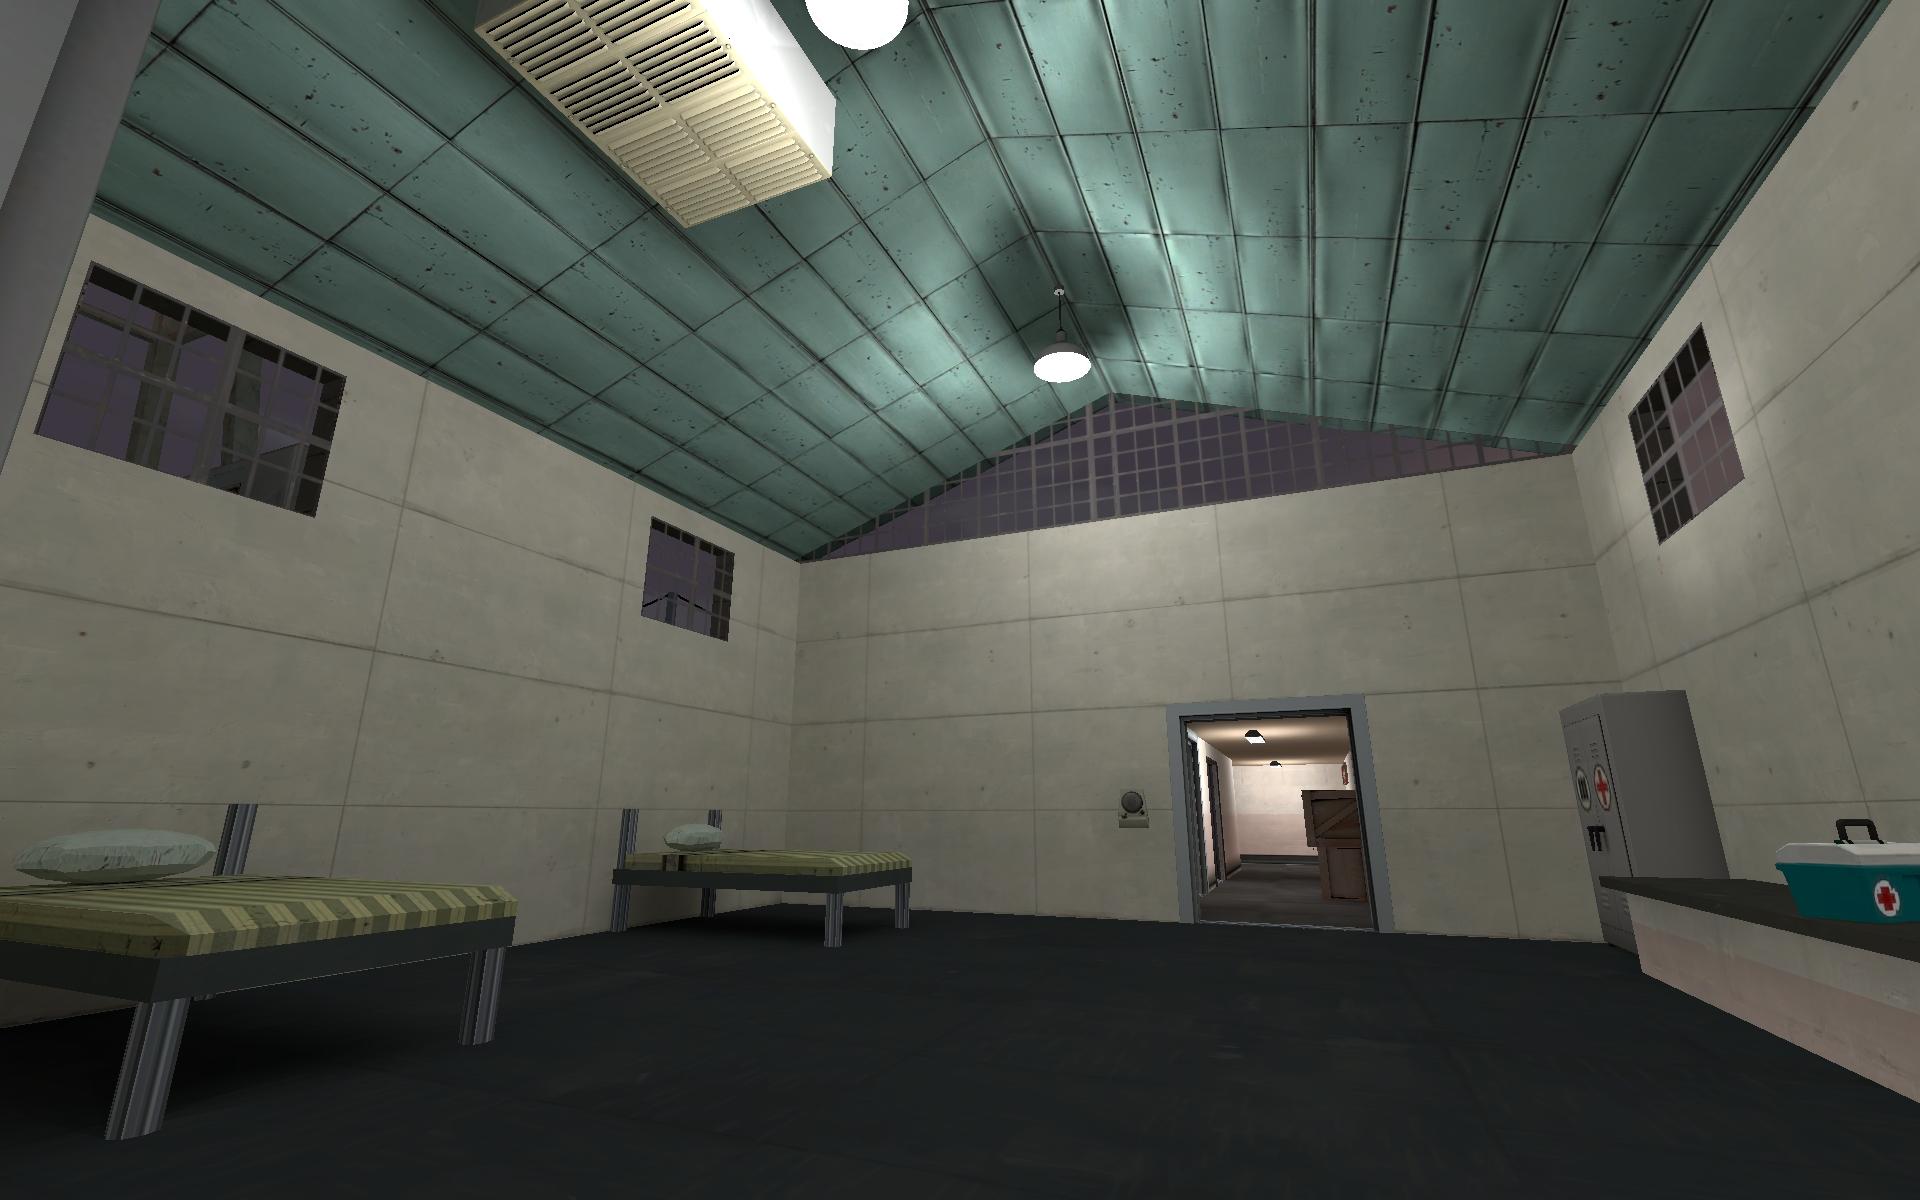
The right hallway leads to the prison infirmary. The beds shown here are primitive placeholders for now, I'll work on building nicer ones. Looking down the passage ahead, the first door is an outdoor area with roof access, and the next is the other opening of the bathroom mentioned above. The windows above the beds can be broken, allowing those on the roof to jump down in to this room, or those in the room to fire upon people trying to sneak past above.
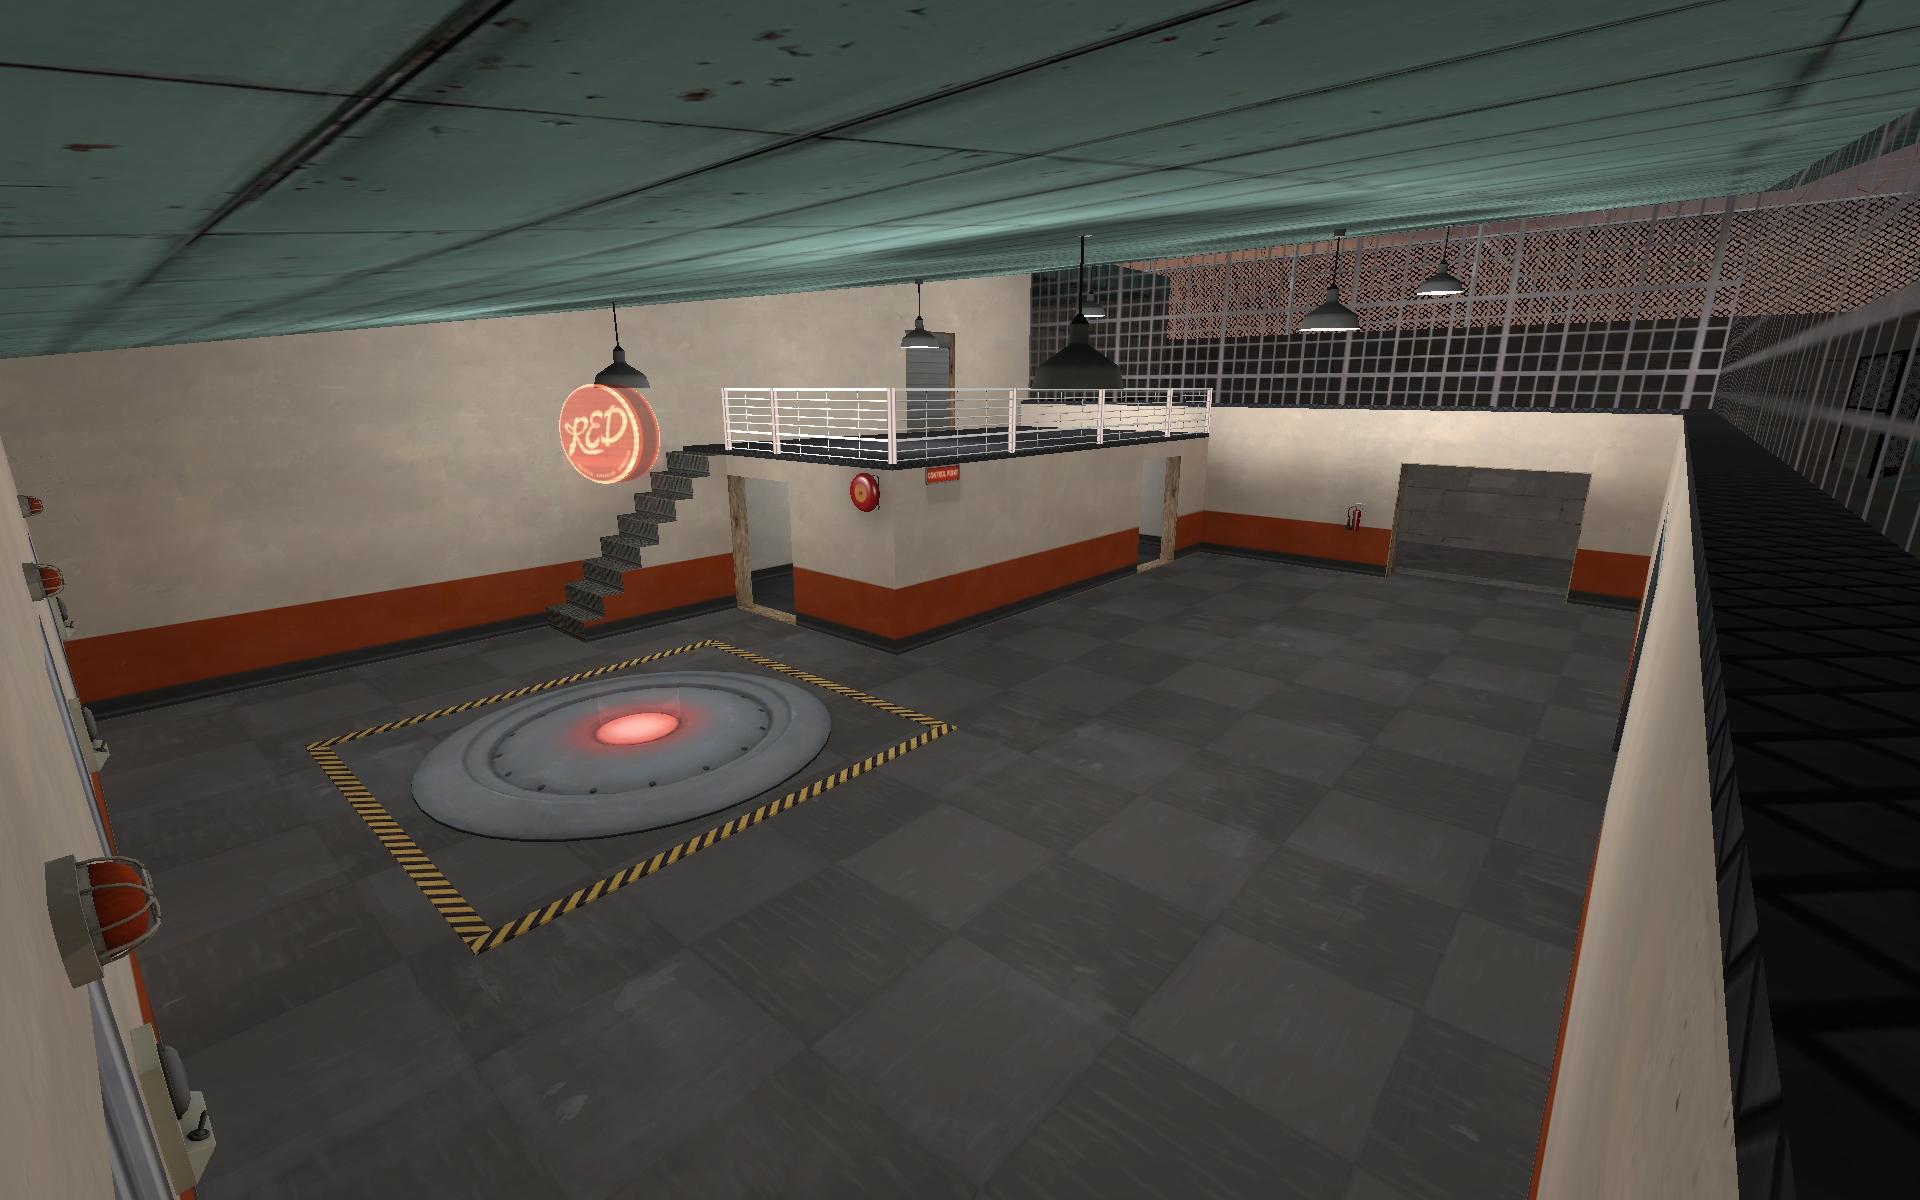
Howsoever you get here, this is the second cap point, which I tenatively call The Processing Room. Most attackers would be coming from the opening just barely visible along the right wall, though those who follow the complete roof path option can come from the main door to outside. Red can exit their spawn in to that outside area and use the main door, or can come out from the small door on the balcony. The balcony is over a pair of offices that connect internally. The three small rooms under the red lights on the left are the drunk tanks. The thin ledge along the window is clipped to prevent roof campers.
A view from outside that main door looking in, showing the capture point on the left, and the main spawndoor of Red on the right. I like big windows, but realize they can create visibility/optimization issues. Most of the area on this side of these windows isn't going to be an action hotspot, so hopefully with some good hinting, they won't cause problems. I've shrunk them slightly from the previous iteration.
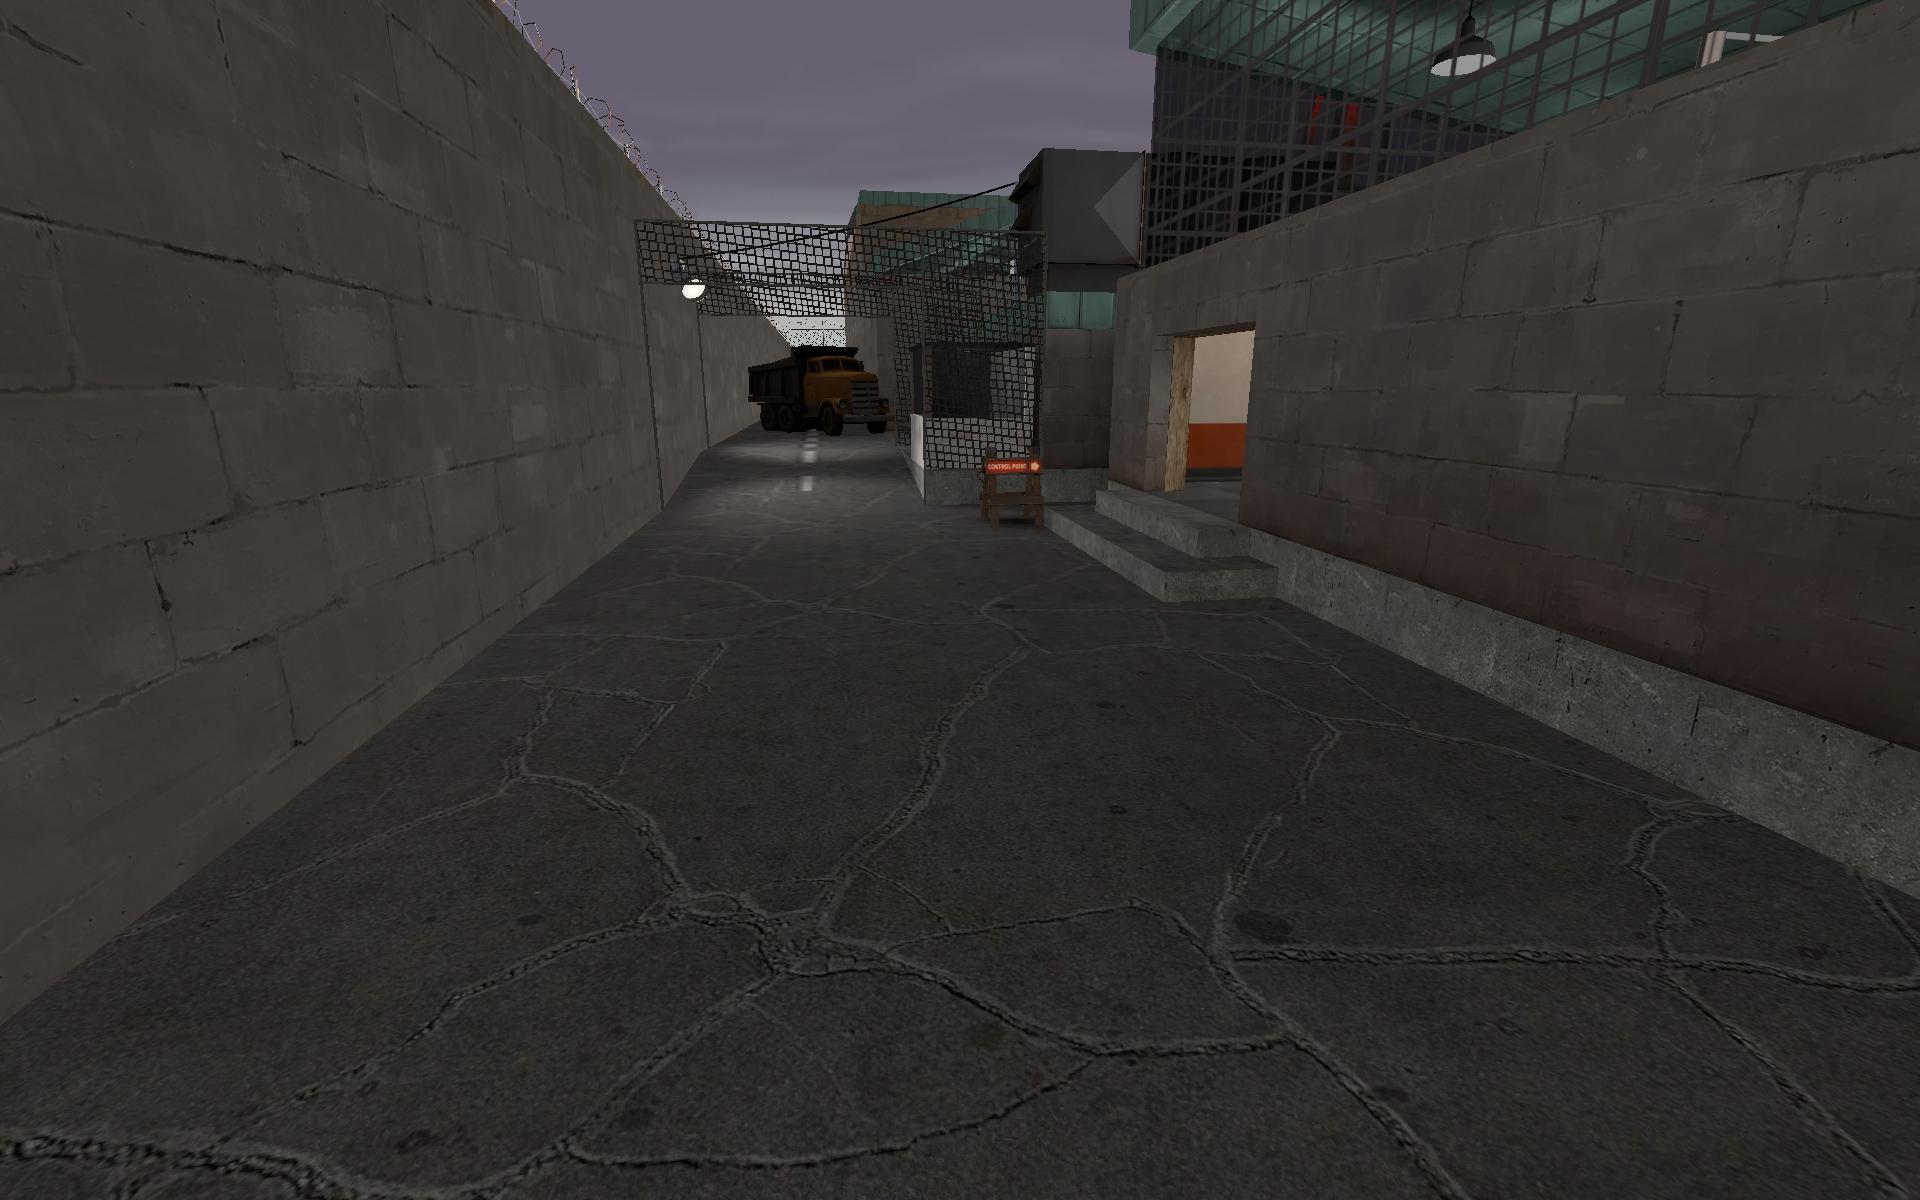
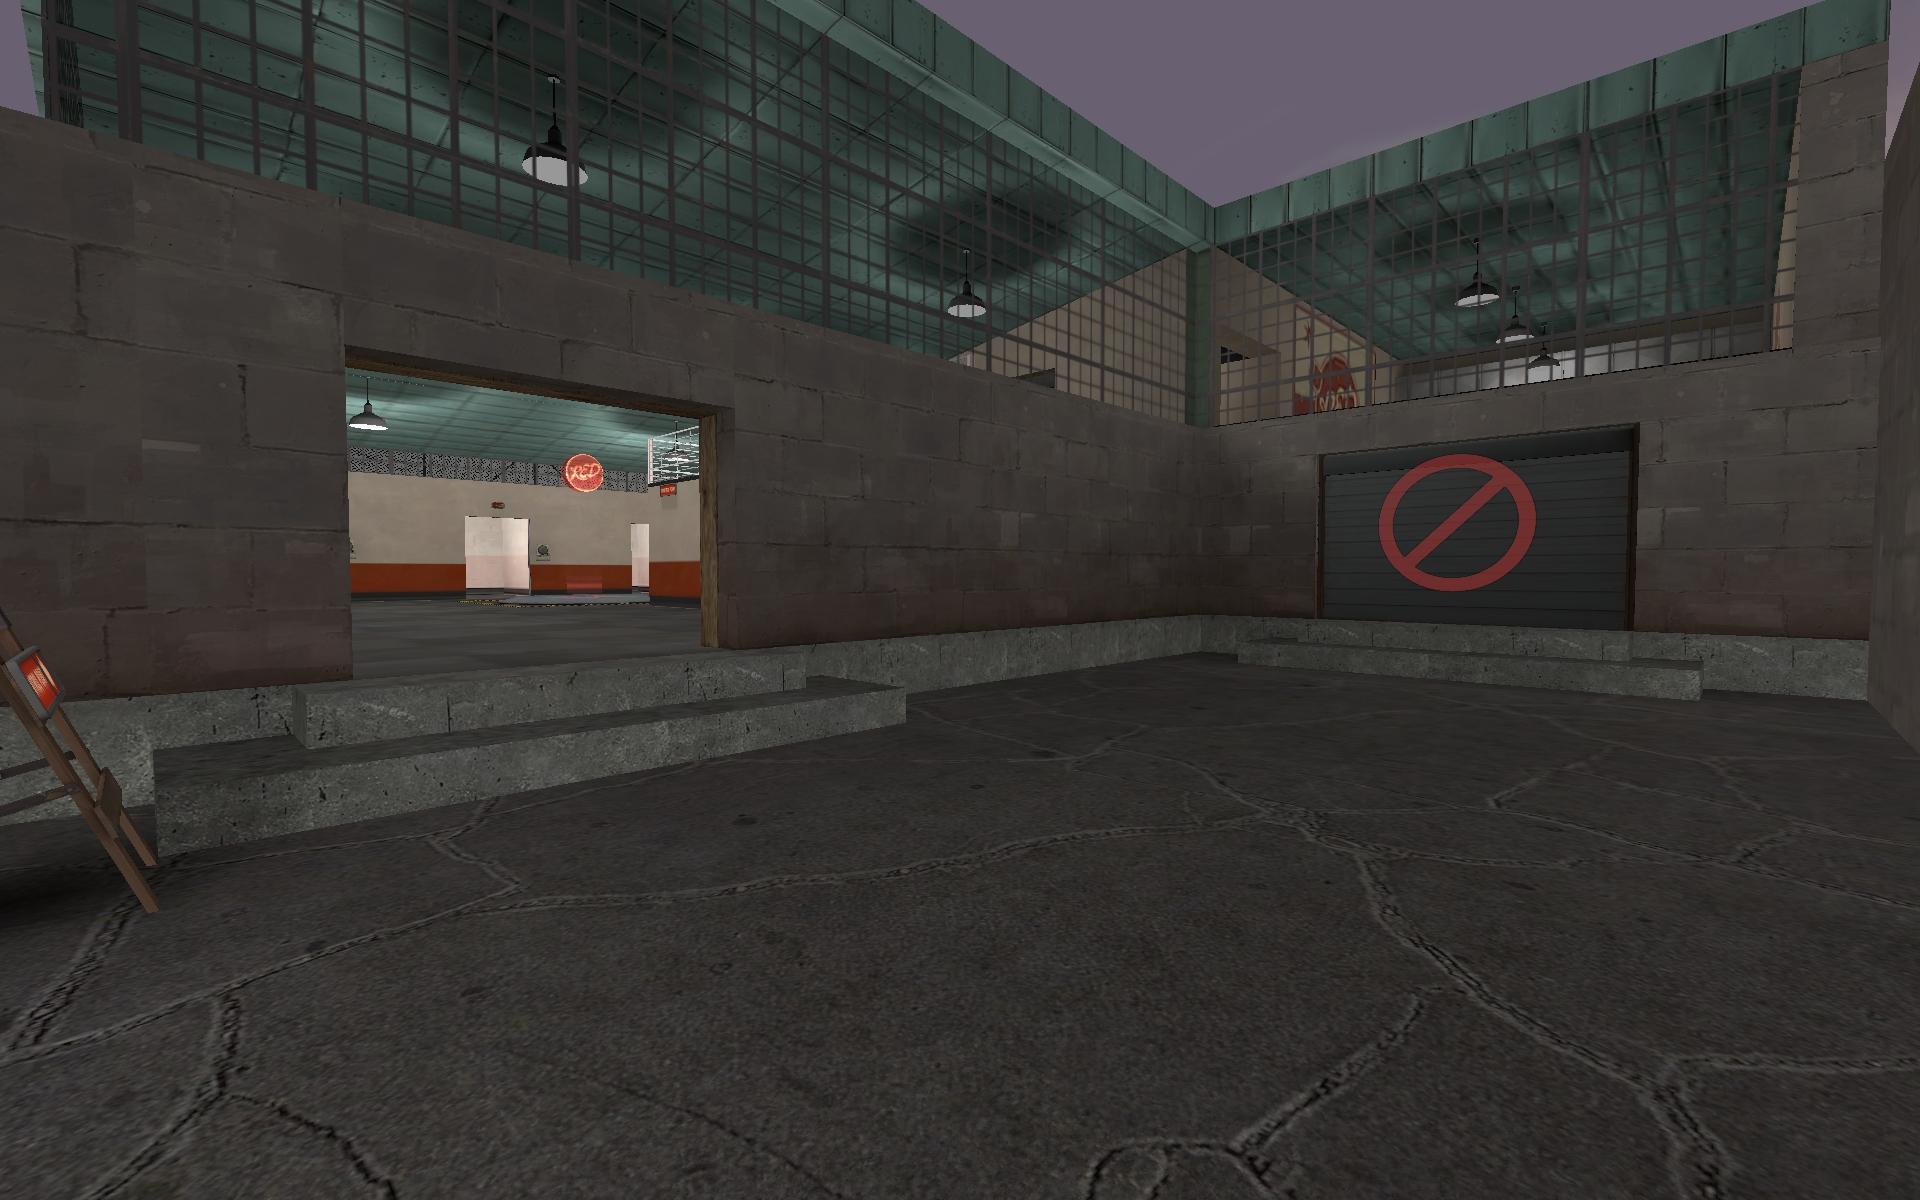
From the main Red spawndoor looking outward. On the right is the entrance to the second cap (it's one of the doorways I have to finish). Ahead, through the sally port, the dumptruck simultaneously blocks a clipped-off area, while providing a way for Red to access the roof directly by jumping up from the hood. Blu can also come down this way, however, and gain rear access to the point. I may put something in the open area here to prevent excessive ranged fire against the spawn door, but the AC unit on the roof already blocks all direct fire from there, and the balcony spawn door allows Red to exit even if under fire here.
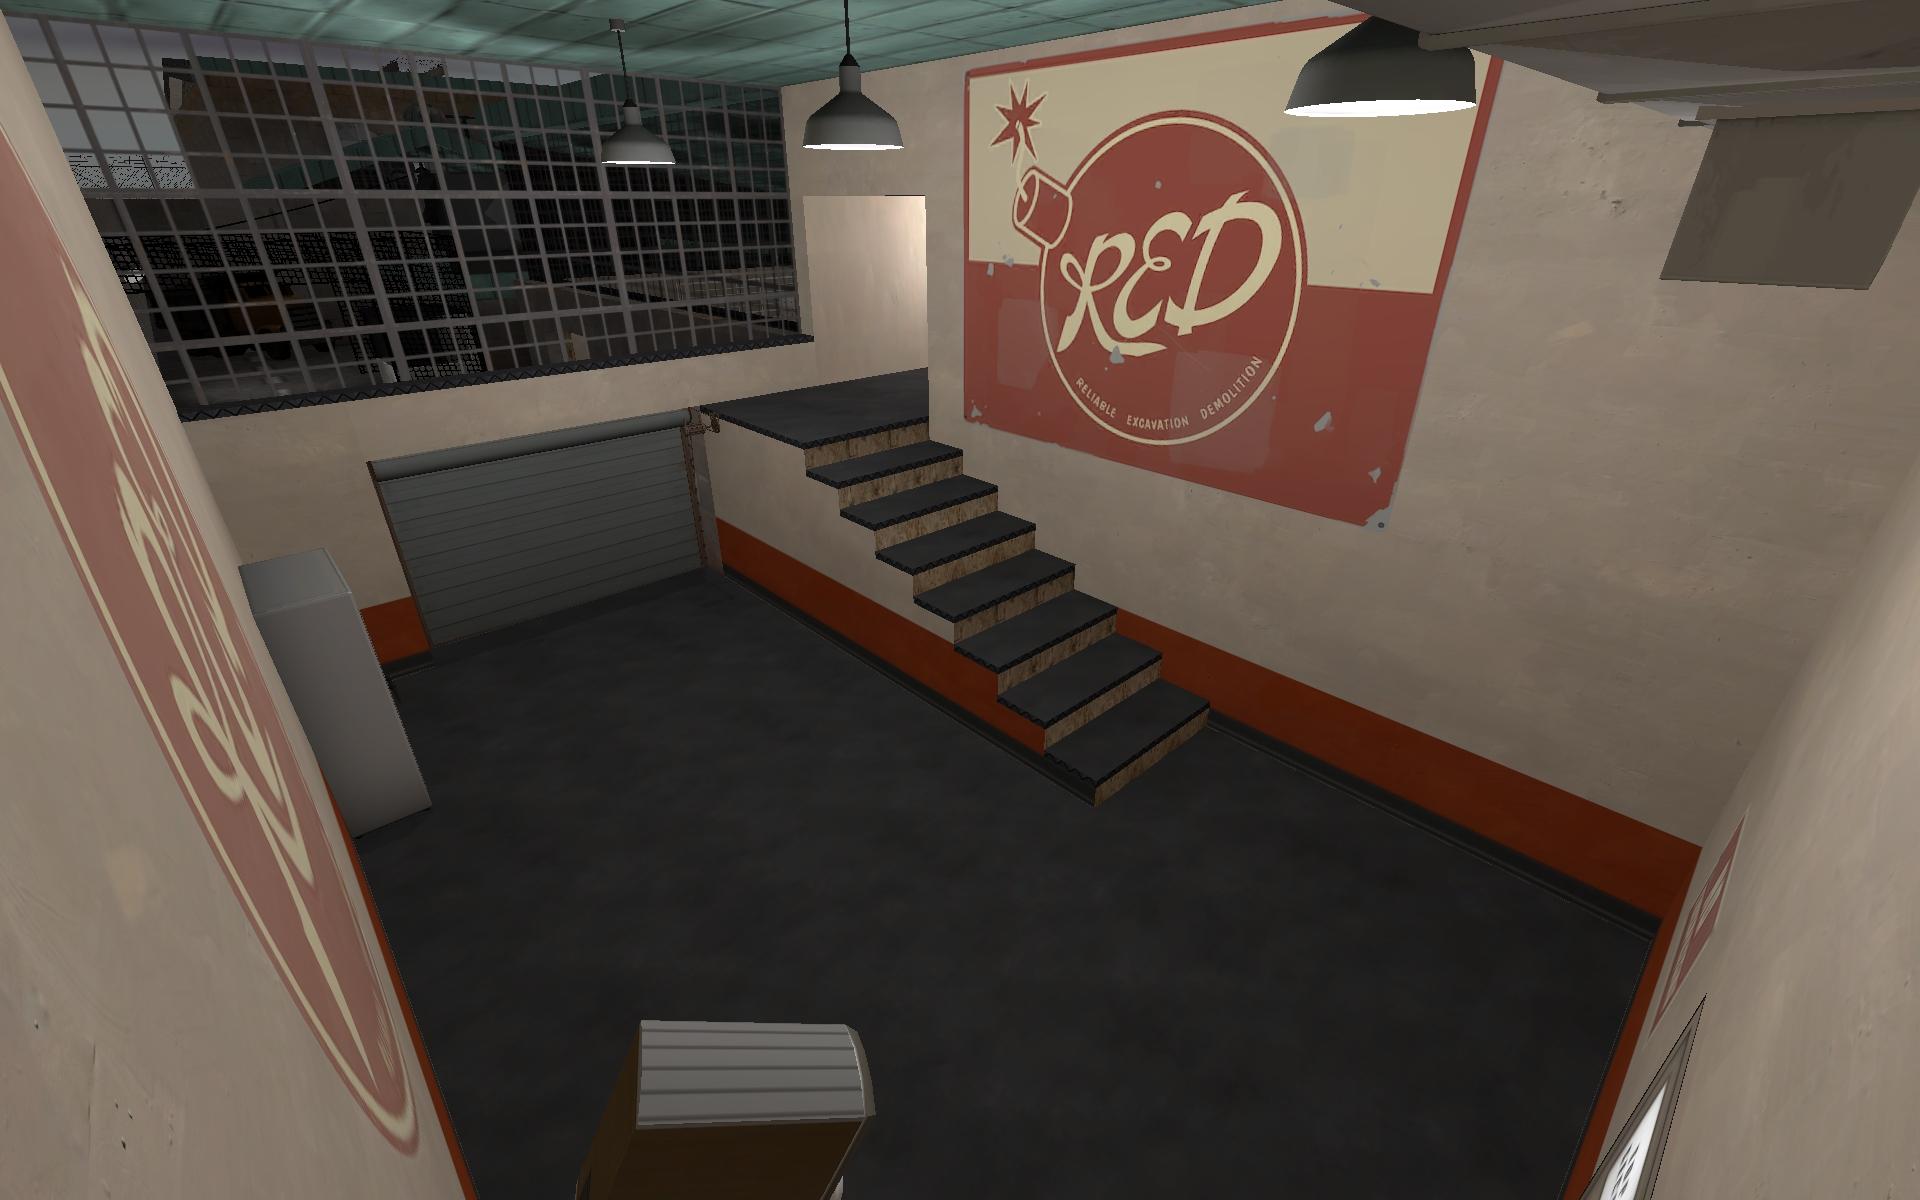
Red's Spawn Room. It needs some detail work on the walls, I think, but it's getting there.
I welcome any and all comments, criticisms, and questions!
Thanks")
<eVa> Alizée Fan
Work In Progress:
CP_Jail
Alrighty all, I've updated the screenshots and explanations below, and taken in to account a lot of the feedback people were giving me. I've almost completely retextured the interiors with proper TF2 textures, have added cover, fleshed out certain areas, and done my best to eliminate some of the plain blockiness of it (though I'm certain some of that is still there). After finishing another couple door frames, and adding some overlays and direction arrows, I believe I'll have it ready for its first playability-tests. I've been checking sightlines and ranges using my second account, mostly as an Engineer, but that hardly equivalent.
Here's the story behind this map:
Blu has been serving hard time in the high security lockdown of the local Red jail. Tensions have been reaching a boiling point between prisoners and guards, and Blu finally decided to escape. With their underworld contacts, they arranged for allies to come rescure them, and are intent on blasting their way out of the whole place. The Reds caught wind of this however, and have rolled out their big guns to stop the attempt. Blu must first seize the cellblock, and then the administrative areas of the prison, in order to be free.
The size of this map is roughly on par with a single stage of a three-stage map. Once I'm confidant this portion is on it's way, I'll most likely be adding additional stages to it, involving the rescue itself, and staging the escape afterwards to freedom.
This is the overhead view. Action starts in the large metal-roofed structure on the right, moves through or across the low center building, and ends in the peak-roofed facility on the left.
This is the Blu spawnroom. After being sprung from their cells by their Blu allies, who brought crates of supplies with them, the escapees must first fight their way through...
The Gun Gallery. Three tiers of combat awaits. Cover can be sought in the cells on the lower level, or behind the various objects the Reds left lying around, confident they were secure. Dodging in and out along the middle level, Blu can progress up to the third level, where they find...
The capture point. Accessed directly by stairs from the second level, or via bridges from the third, it is a great weapons platform, but is terribly exposed if the enemy can pull off a pincer movement. Seizing control of this position will open the previously Red-Only cellblock gates, allowing access to the next area.
This is the upper hallway between the first and middle areas. You can either go down the steps to the lower hallway, or break open the vent and crawl through, where an airduct will lead you to the roof. Also, though they're made of bullet-proof glass, and can take a beating, those windows are destructible. They'll also let you out to the roof, or provide a position for snipers.
The roof. This is an alternate path that allows numerous different entry points in to the lower area. If followed the whole length, it leads nearly to the Red spawn, but taking that approach will be visible to observers on the 2nd CP's balcony. You can break in through the upper windows of the infirmary, or can hop down in an enclosed courtyard as well.
Going down the steps to the lower hall previously mentioned leads to an outer ring of hallways surrounding inner police workspaces. This is the police briefing room (sorry for the bright white thing - I'm working on a whiteboard for that spot). To the right, with the tiles, is a bathroom that passes through to the right hallway. Across the room we see the left hallway. This picture is taken from a doorway that leads to dispatch facilities, a locker/break area, and the front hallway.
The right hallway leads to the prison infirmary. The beds shown here are primitive placeholders for now, I'll work on building nicer ones. Looking down the passage ahead, the first door is an outdoor area with roof access, and the next is the other opening of the bathroom mentioned above. The windows above the beds can be broken, allowing those on the roof to jump down in to this room, or those in the room to fire upon people trying to sneak past above.
Howsoever you get here, this is the second cap point, which I tenatively call The Processing Room. Most attackers would be coming from the opening just barely visible along the right wall, though those who follow the complete roof path option can come from the main door to outside. Red can exit their spawn in to that outside area and use the main door, or can come out from the small door on the balcony. The balcony is over a pair of offices that connect internally. The three small rooms under the red lights on the left are the drunk tanks. The thin ledge along the window is clipped to prevent roof campers.
A view from outside that main door looking in, showing the capture point on the left, and the main spawndoor of Red on the right. I like big windows, but realize they can create visibility/optimization issues. Most of the area on this side of these windows isn't going to be an action hotspot, so hopefully with some good hinting, they won't cause problems. I've shrunk them slightly from the previous iteration.
From the main Red spawndoor looking outward. On the right is the entrance to the second cap (it's one of the doorways I have to finish). Ahead, through the sally port, the dumptruck simultaneously blocks a clipped-off area, while providing a way for Red to access the roof directly by jumping up from the hood. Blu can also come down this way, however, and gain rear access to the point. I may put something in the open area here to prevent excessive ranged fire against the spawn door, but the AC unit on the roof already blocks all direct fire from there, and the balcony spawn door allows Red to exit even if under fire here.
Red's Spawn Room. It needs some detail work on the walls, I think, but it's getting there.
I welcome any and all comments, criticisms, and questions!
Thanks
<eVa> Alizée Fan
Last edited:
