S
Swift
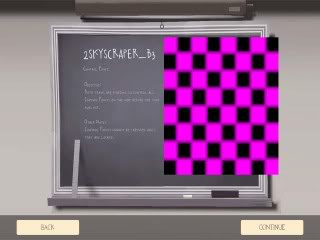
How to create the Menu Photo's seen displayed on the right side of the Map Objective screen on Map Start.
END RESULT ctf_example Menu Photo's:

For this tutorial you will need to have some basic knowledge of Photoshop. And I made a ctf_example you can download at the bottom of this Tutorial.
In order for your custom map to have 2 working Menu Photo'sit needs 2 files in following directory:
C:\Program Files\Steam\steamapps\<player_name>\team fortress 2\tf\materials\vgui\maps
These 2 files are:
menu_photos_mapname.vtf
menu_photos_mapname.vmt
--------------------------------------------------------------
-- How to create the .vtf
--------------------------------------------------------------
I. Making a .tga image
II. Vtex Preparation
III. Transforming the .tga image to a .vtf
I. Making a .tga image
Step 1:
Take 1, 2 or 3 screenshots of your map depending on how many you want to show.
Just make sure they will still look good on a 512x512 tga. (Step 2)
Step 2:
Photoshop: create tga:
* create a 512x512 pixels TGA.
* give it a black background
* resize your 2 screenshots and paste them in to make something nice.
(You can use one of the Menu Photo Template PSD's I made to make Menu Photo's like VALVe's maps have. Download at the bottom of this Tutorial.)
* edit the Alpha channel to make it hide the black background and show the pictures only
* Save As... menu_photos_mapname.tga (32 bit, uncompressed)
Step 3:
Copy and paste your "menu_photos_mapname.tga" in following directory:
C:\Program Files\Steam\steamapps\<player_name>\team fortress 2\tf\materialsrc
II. Vtex Preparation
We will create a vtf from the tga using vtex.exe. Let's setup the vtex.exe!
Step 4:
Browse to the following directory and make a desktop shortcut of the vtex.exe:
C:\Program Files\Steam\steamapps\<player_name>\sourcesdk\bin\orangebox\bin
Step 5:
Go Properties on the vtex.exe shortcut:
Add the following 2 parameters behind the Target:
-game "C:\Program Files\Steam\steamapps\<player_name>\team fortress 2\tf"
-nop4
III. Transforming the .tga image to a .vtf
Step 6:
Now drag your tga you created (Step 3) onto the vtex.exe deskopt shortcut (Step 5). The vtex.exe will create a menu_photos_mapname.vtf in the following directory:
C:\Program Files\Steam\steamapps\<player_name>\team fortress 2\tf\materials
menu_photos_mapname.vtf CREATED!
--------------------------------------------------------------
-- How to create the .vmt
--------------------------------------------------------------
Step 1:
open notepad
Step 2:
paste these lines of code in it:
Step 3:
Replace 'mapname' in "$basetexture" "vgui\maps\menu_photos_mapname" with the name of your custom map.
Example: "$basetexture" "vgui\maps\menu_photos_ctf_2fort"
Step 4:
Save As... menu_photos_mapname.vmt
menu_photos_mapname.vmt CREATED!
--------------------------------------------------------------
-- Place .vtf & .vmt in propper directory
--------------------------------------------------------------
Cut and past your "menu_photos_mapname.vtf" and "menu_photos_mapname.vmt" in following directory:
C:\Program Files\Steam\steamapps\<player_name>\team fortress 2\tf\materials\vgui\maps
If you correctly edited the Alpha Channel of your tga and did all the other Steps like mentioned, your 2 map screens will be displayed on the Objective Screen on Map Start!
Download Menu Photo's Tutorial
Download Menu Photo's Template PSD's
Cheers! :thumbup1:
END RESULT ctf_example Menu Photo's:

For this tutorial you will need to have some basic knowledge of Photoshop. And I made a ctf_example you can download at the bottom of this Tutorial.
In order for your custom map to have 2 working Menu Photo'sit needs 2 files in following directory:
C:\Program Files\Steam\steamapps\<player_name>\team fortress 2\tf\materials\vgui\maps
These 2 files are:
menu_photos_mapname.vtf
menu_photos_mapname.vmt
--------------------------------------------------------------
-- How to create the .vtf
--------------------------------------------------------------
I. Making a .tga image
II. Vtex Preparation
III. Transforming the .tga image to a .vtf
I. Making a .tga image
Step 1:
Take 1, 2 or 3 screenshots of your map depending on how many you want to show.
Just make sure they will still look good on a 512x512 tga. (Step 2)
Step 2:
Photoshop: create tga:
* create a 512x512 pixels TGA.
* give it a black background
* resize your 2 screenshots and paste them in to make something nice.
(You can use one of the Menu Photo Template PSD's I made to make Menu Photo's like VALVe's maps have. Download at the bottom of this Tutorial.)
* edit the Alpha channel to make it hide the black background and show the pictures only
* Save As... menu_photos_mapname.tga (32 bit, uncompressed)
Step 3:
Copy and paste your "menu_photos_mapname.tga" in following directory:
C:\Program Files\Steam\steamapps\<player_name>\team fortress 2\tf\materialsrc
II. Vtex Preparation
We will create a vtf from the tga using vtex.exe. Let's setup the vtex.exe!
Step 4:
Browse to the following directory and make a desktop shortcut of the vtex.exe:
C:\Program Files\Steam\steamapps\<player_name>\sourcesdk\bin\orangebox\bin
Step 5:
Go Properties on the vtex.exe shortcut:
Add the following 2 parameters behind the Target:
-game "C:\Program Files\Steam\steamapps\<player_name>\team fortress 2\tf"
-nop4
III. Transforming the .tga image to a .vtf
Step 6:
Now drag your tga you created (Step 3) onto the vtex.exe deskopt shortcut (Step 5). The vtex.exe will create a menu_photos_mapname.vtf in the following directory:
C:\Program Files\Steam\steamapps\<player_name>\team fortress 2\tf\materials
menu_photos_mapname.vtf CREATED!
--------------------------------------------------------------
-- How to create the .vmt
--------------------------------------------------------------
Step 1:
open notepad
Step 2:
paste these lines of code in it:
Code:
"UnlitGeneric"
{
	"$basetexture" "vgui\maps\menu_photos_mapname"
	"$translucent" 1
	"$ignorez" 1
	"$vertexcolor" 1
}
Step 3:
Replace 'mapname' in "$basetexture" "vgui\maps\menu_photos_mapname" with the name of your custom map.
Example: "$basetexture" "vgui\maps\menu_photos_ctf_2fort"
Step 4:
Save As... menu_photos_mapname.vmt
menu_photos_mapname.vmt CREATED!
--------------------------------------------------------------
-- Place .vtf & .vmt in propper directory
--------------------------------------------------------------
Cut and past your "menu_photos_mapname.vtf" and "menu_photos_mapname.vmt" in following directory:
C:\Program Files\Steam\steamapps\<player_name>\team fortress 2\tf\materials\vgui\maps
If you correctly edited the Alpha Channel of your tga and did all the other Steps like mentioned, your 2 map screens will be displayed on the Objective Screen on Map Start!
Download Menu Photo's Tutorial
Download Menu Photo's Template PSD's
Cheers! :thumbup1:
Last edited by a moderator:


