- May 31, 2013
- 1,021
- 852
This article will focus on how you can manipulate the lightmaps in your level to reduce compile time and file size, without reducing quality. It is not intended to answer your questions regarding the basics of lightmaps. If you don't know what lightmaps are, check out this tutorial and VDC article.
INTRO
There is a growing list of questions a Source mapper must remember to ask himself before releasing his next iteration. This list actually exists. Today I want to talk about one of the items on this list: lightmap optimization. While not normally necessary during the testing phases of your map's development, lightmap optimization can be the best tool to reduce the final size of your BSP without any loss of quality, outside of repacking. It can be used to great effect in all types of maps, especially ones that are large and open, like those designed for VSH, jump, or trade. If you want to reduce your compile times, lightmap optimization can help there too, but remember that lightmaps are linked to individual faces of your geometry and displacements, so if you ever remake an area or simply delete a brush you've optimized, your work is lost. Don't waste your time doing lightmap optimization in early development stages unless you're in need of faster full compile times (or you really enjoy it).
WHAT IS LIGHTMAP OPTIMIZATION?
Lightmap optimization is the process of reducing the resolution of select geometry and displacement lightmap faces for faster compiling and reduced file size. Lightmap optimization can also include increasing resolution, thereby increasing quality, file size, and compile time. By combining both types, it is possible to increase the fidelity of select shadow transitions while still reducing overall file size.
Reducing lightmap resolution can be used to:
Increasing lightmap resolution can be used to:
HOW CAN I VIEW AND EDIT LIGHTMAPS?
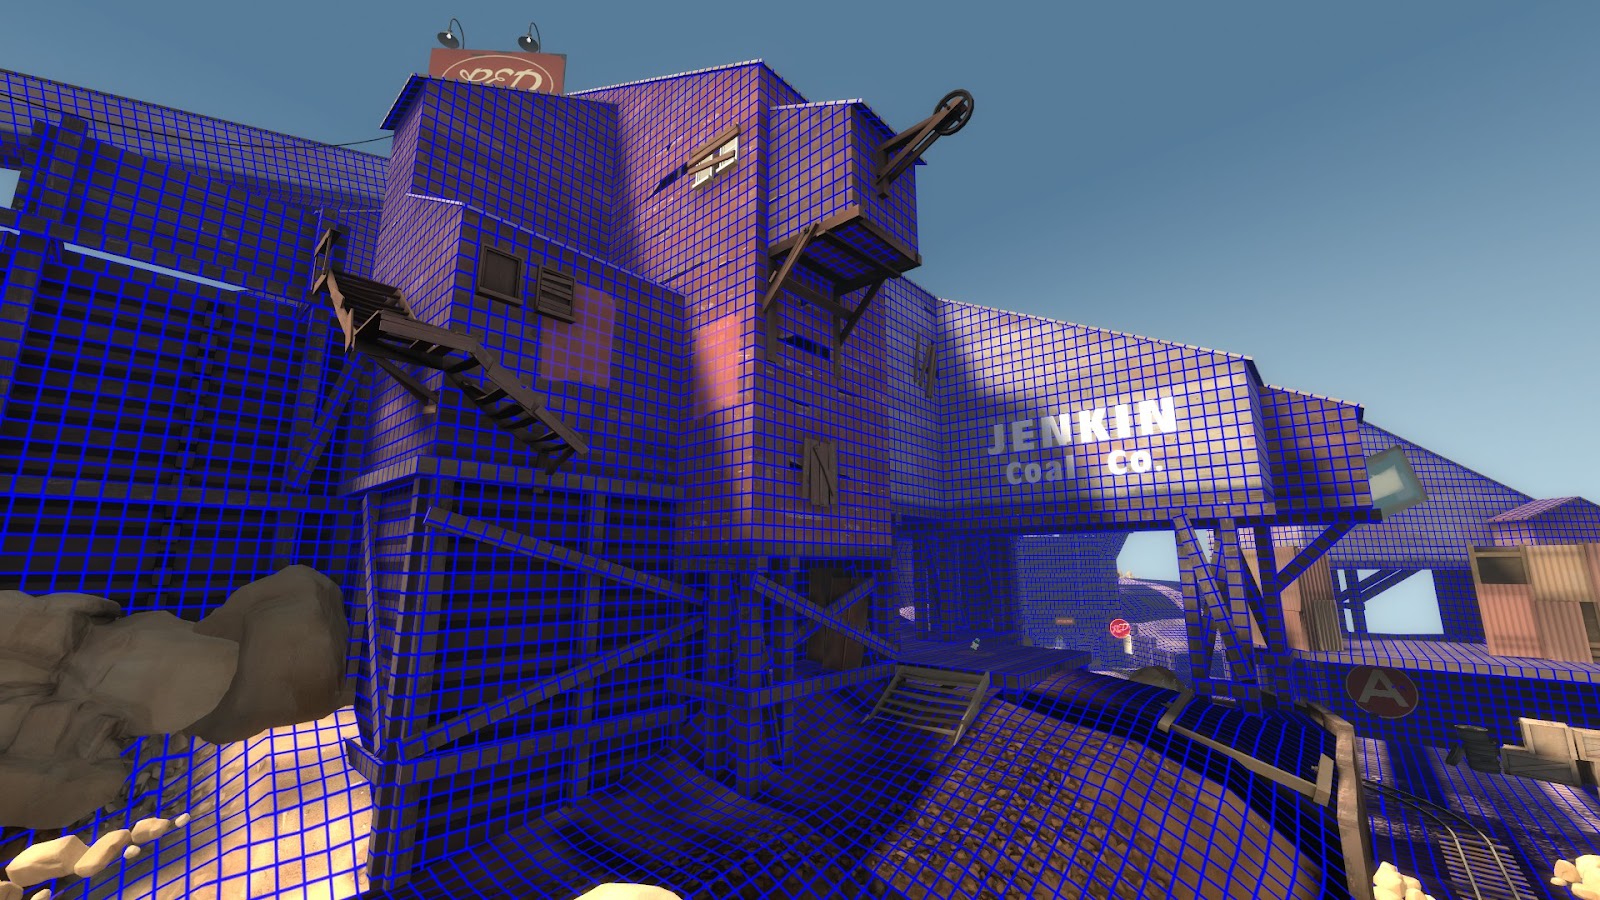
The lightmap scale can be seen in Hammer by selecting the “Lightmap Grid” view in the 3D viewport. This will apply blue-bordered white squares on all brush faces to visualize their luxel density. Since tool brushes and point entities do not receive lightmaps, you can clean your viewport out by unchecking them from the auto visgroups tab. To change the lightmap scale, simply select a face using the face edit sheet. At the top of the face edit sheet you will see a section marked “Lightmap scale” and the default value of 16. When you change the scale here, the lightmap grid for the face will update in the 3D viewport to show you the new luxel density (assuming you’re in the lightmap grid view). You can change the scale of multiple faces at once, just like with textures, or one at a time.
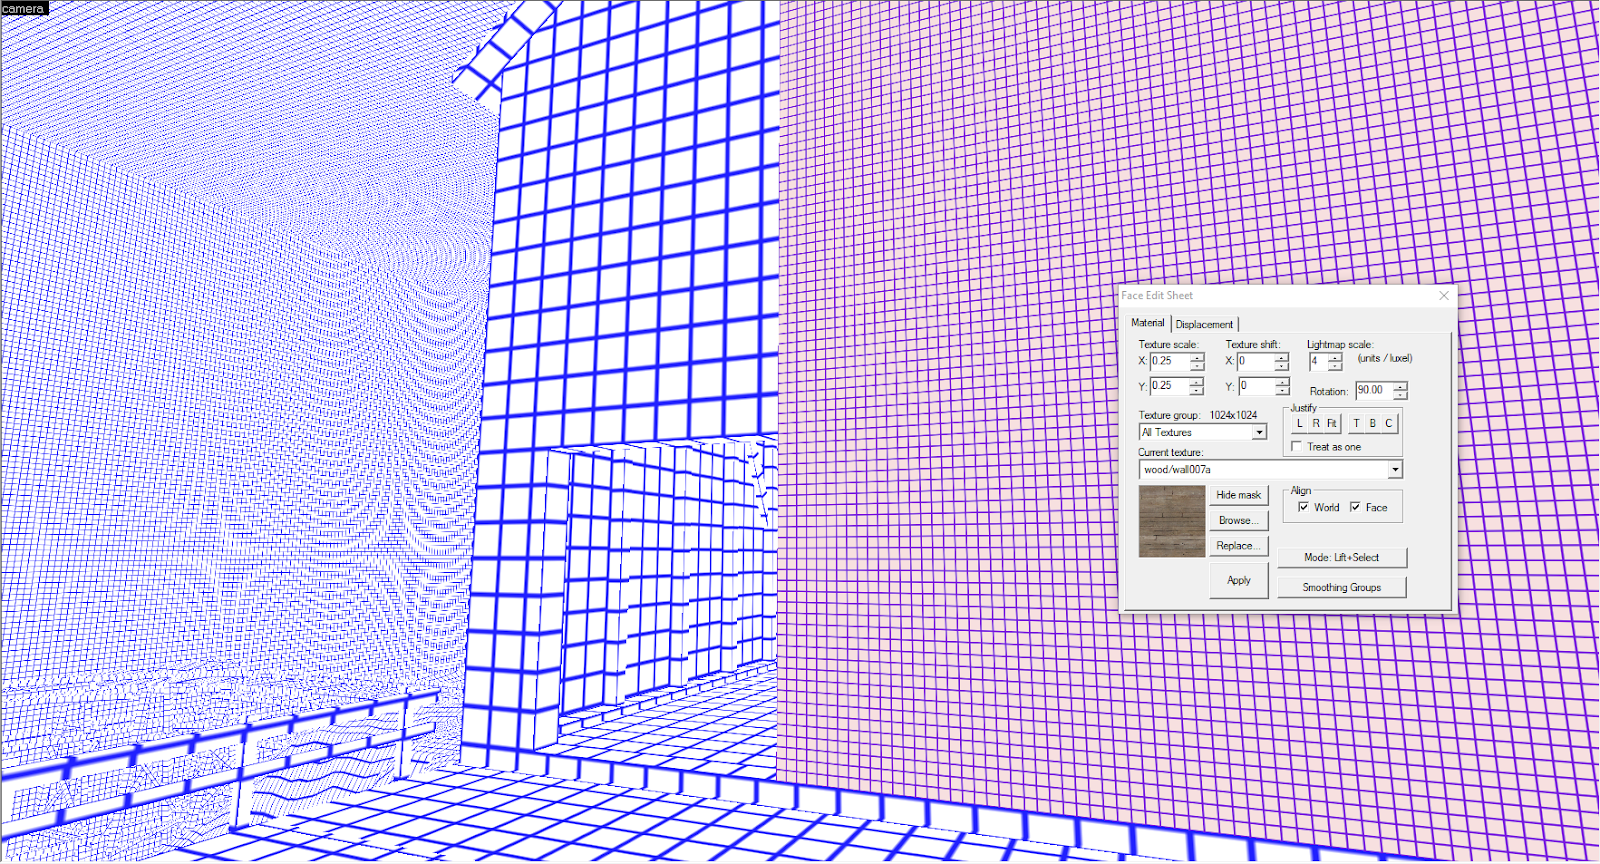
If you change the lightmap scale of a face and copy the brush someplace else, the altered lightmap scale will be preserved. Keep that in mind if you begin optimizing early and you like to copy/shift-drag brushwork around.
WHERE CAN THE RESOLUTION BE DROPPED?
The short answer is in areas of low lighting contrast. Displacements, walls, floors, ceilings etc. that have very little lighting contrast can have their lightmap resolution decreased without any loss in quality. Lightmaps in out-of-bounds areas -- places that the player will never reach -- can be scaled up with less discretion since the player will always view them from a distance, if at all.
Another thing to remember is that shadows get more diffuse the farther away they are from the object that casts them. This makes faces lit almost entirely by sunlight prime candidates for high lightmap scales since sunlight is cast from the skybox, high above player-level geometry.
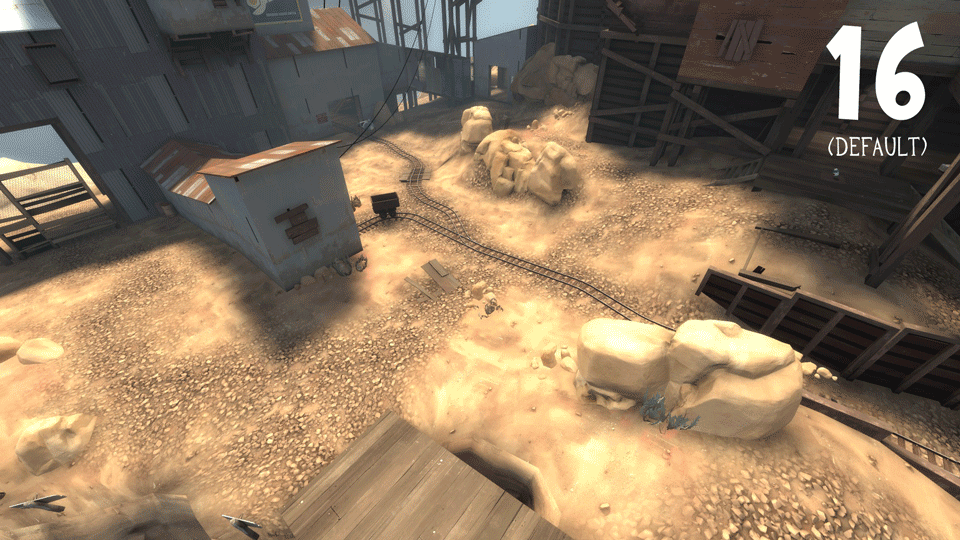
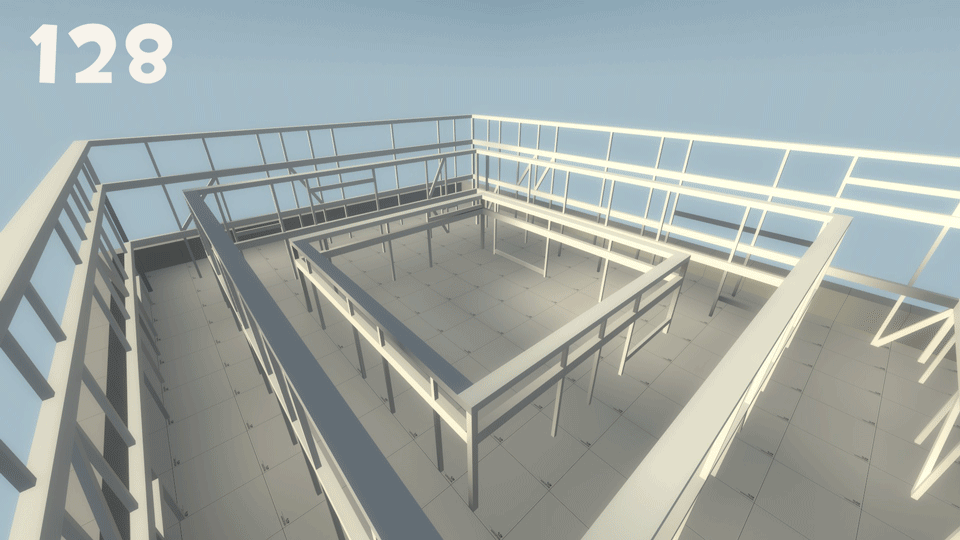
In the above example, I incrementally doubled all ground displacement lightmap scales. Shadows cast by the buildings gradually diffuse out, but the middle areas that had no shadows to begin with change very little.
WHERE SHOULD THE RESOLUTION BE RAISED?
This is more difficult to pin down. High contrast shadow transitions in high-traffic areas should be considered for increased lightmap resolutions, but they won’t always look better.

Goldrush stage 2’s famous split tunnels help showcase what can be achieved with higher lightmap resolutions. The thing is, some people may not even like what the junction looks like at 2 or 4 scale, maybe even 8. There is a case to be made for cohesion with the rest of the map (and the game as a whole); sometimes a high resolution looks out of place and can even create jagged, pixelated shadows when the casting light falls off quickly.
Let’s take a closer look at the tracks in the Goldrush gif:
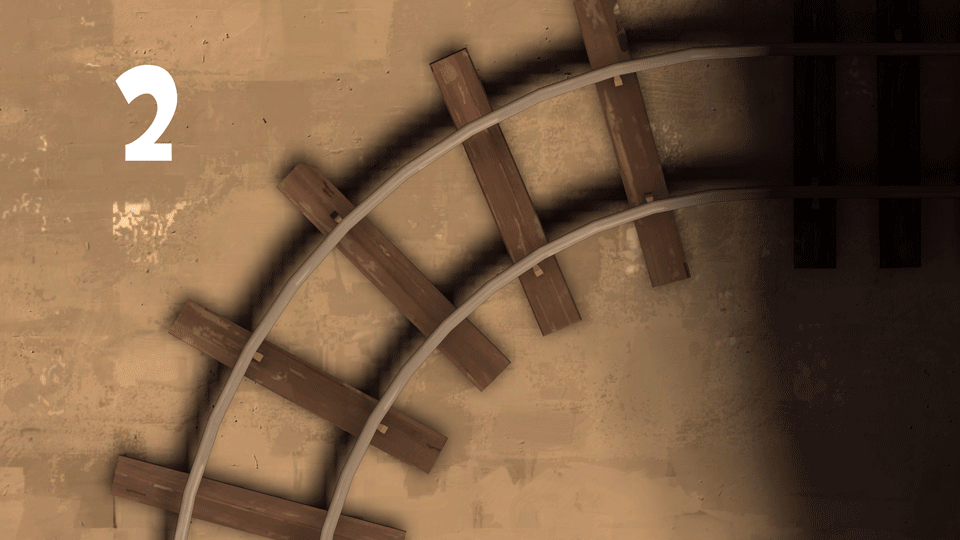
They create very jagged shadows at high resolutions, a rather ugly effect, but by 16, the shadows have almost entirely disappeared.
Use discretion and save your high-resolution lightmap passes for later compiles.
OPTIMIZING
This is where real-time lighting previews would come in handy. To begin optimizing the lightmaps in your map, you will need to do a full lighting compile. When in-game, check around for areas with little or no shadow transitions. Take screenshots or just hop back and forth from the game and Hammer. Try to get as many faces optimized as possible before recompiling as you will need to do a full compile every time you re-check.
You may also want to save a completely new version before you begin optimizing, and ONLY do lightmap optimization in this new version. This is so that in case you make any mistakes cutting brushes to get better control over the scales, you can simply paste-special the old brushwork back into place.
Prime candidates for decreased resolution include:
Some useful console commands for lightmap optimization:

pl_upward with mat_fullbright 2 and mat_filterlightmaps 0.
pl_upward with mat_luxels 1.
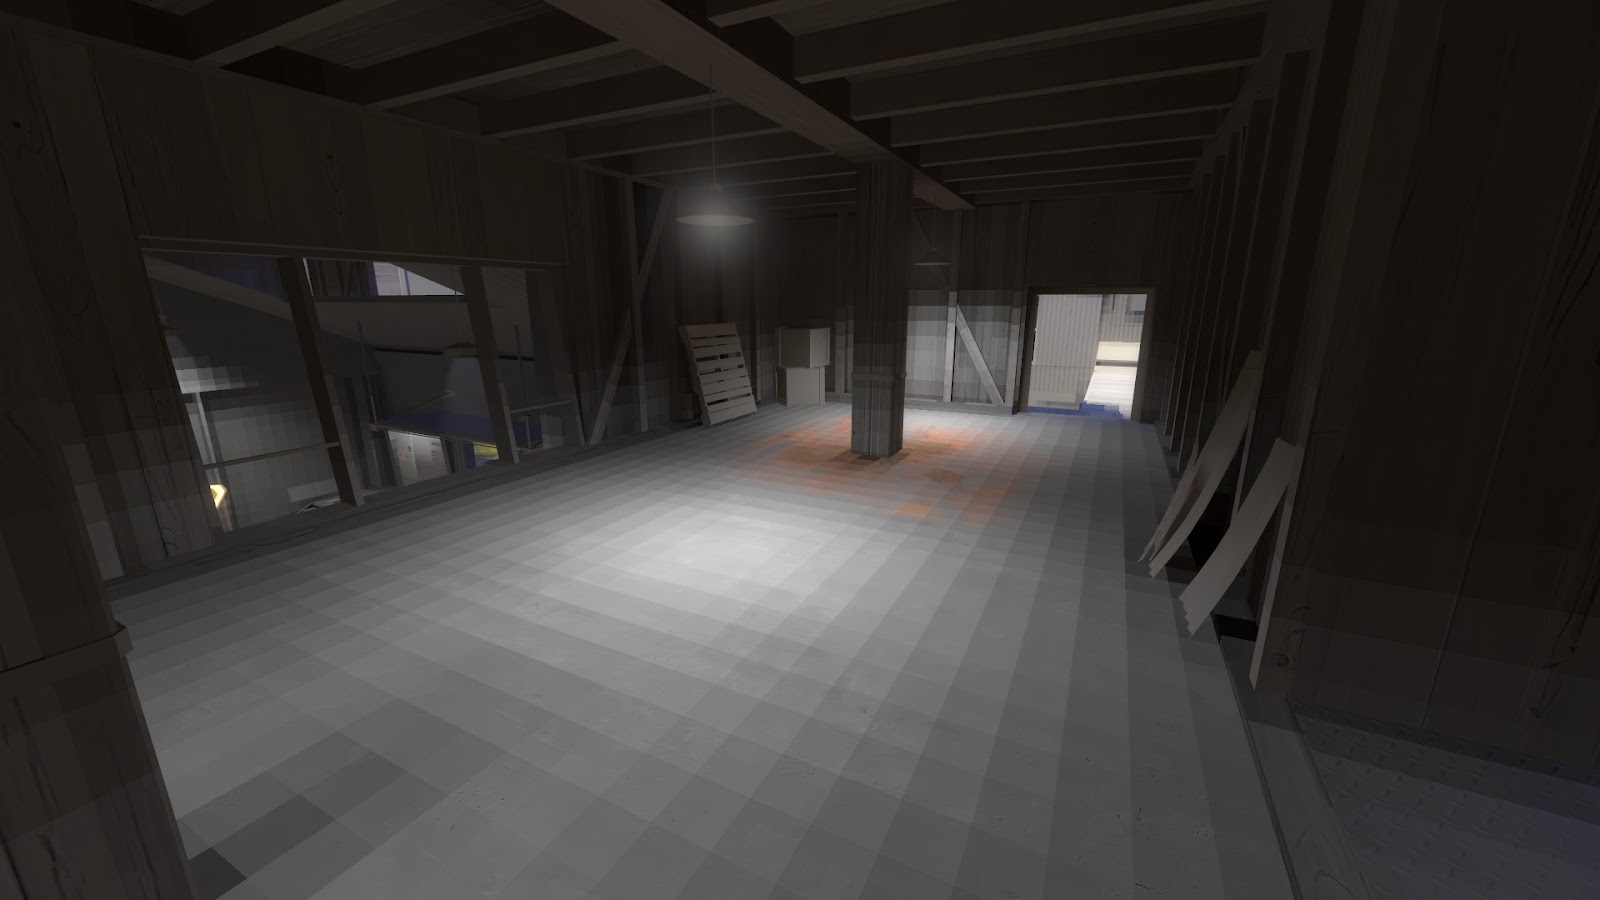
Interior space of arena_lumberyard with mat_fullbright 2 and mat_filterlightmaps 0.
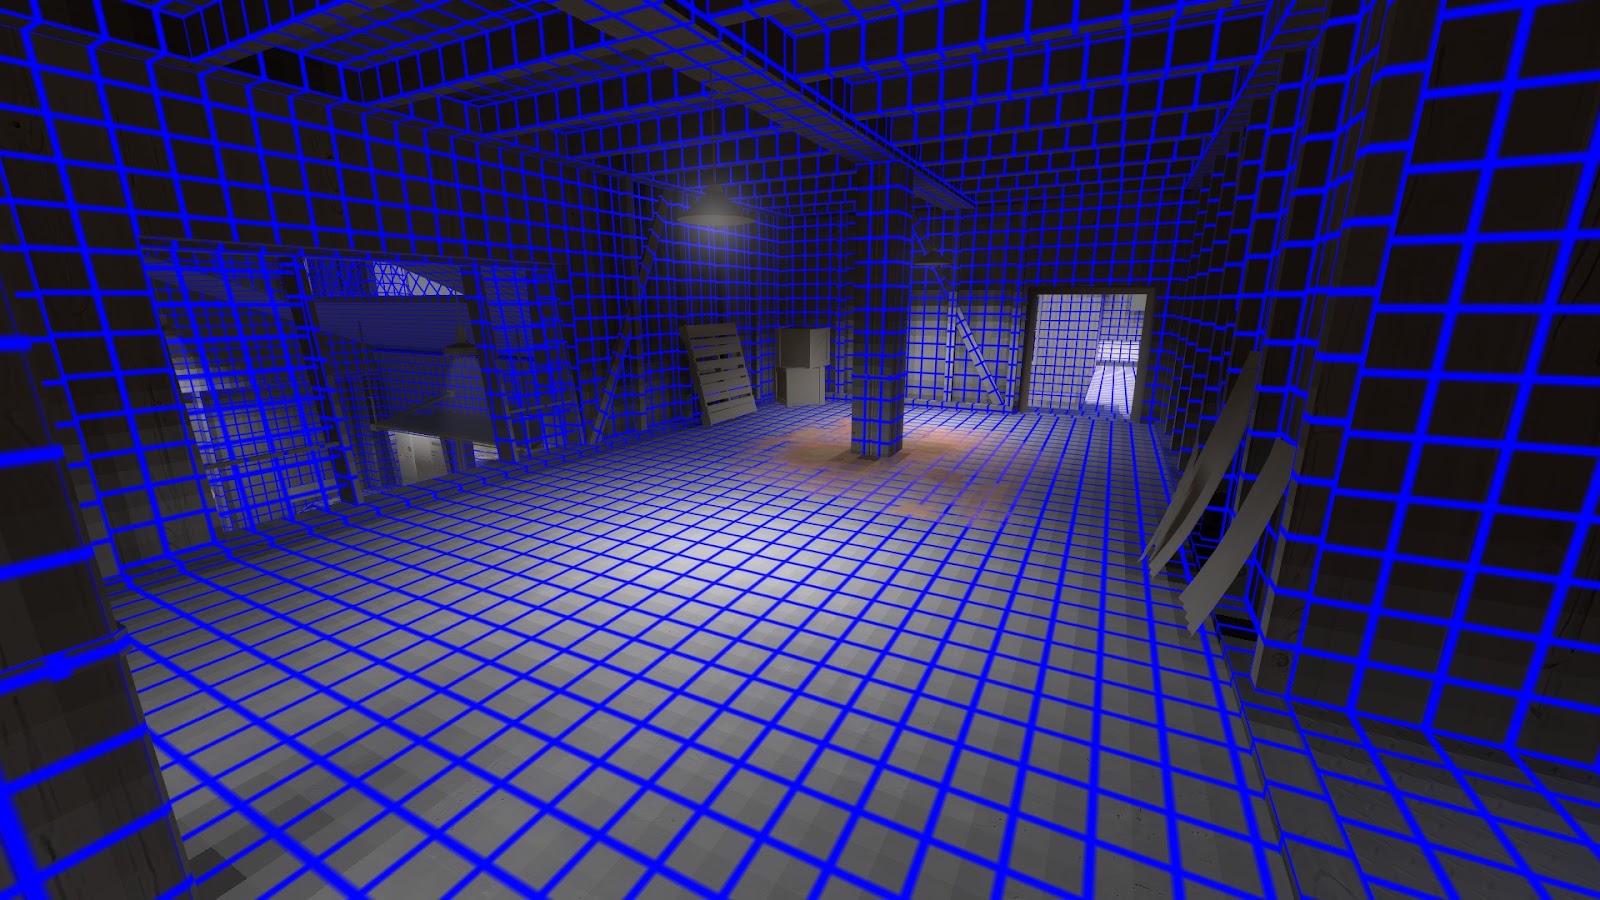
With mat_luxels 1 added.
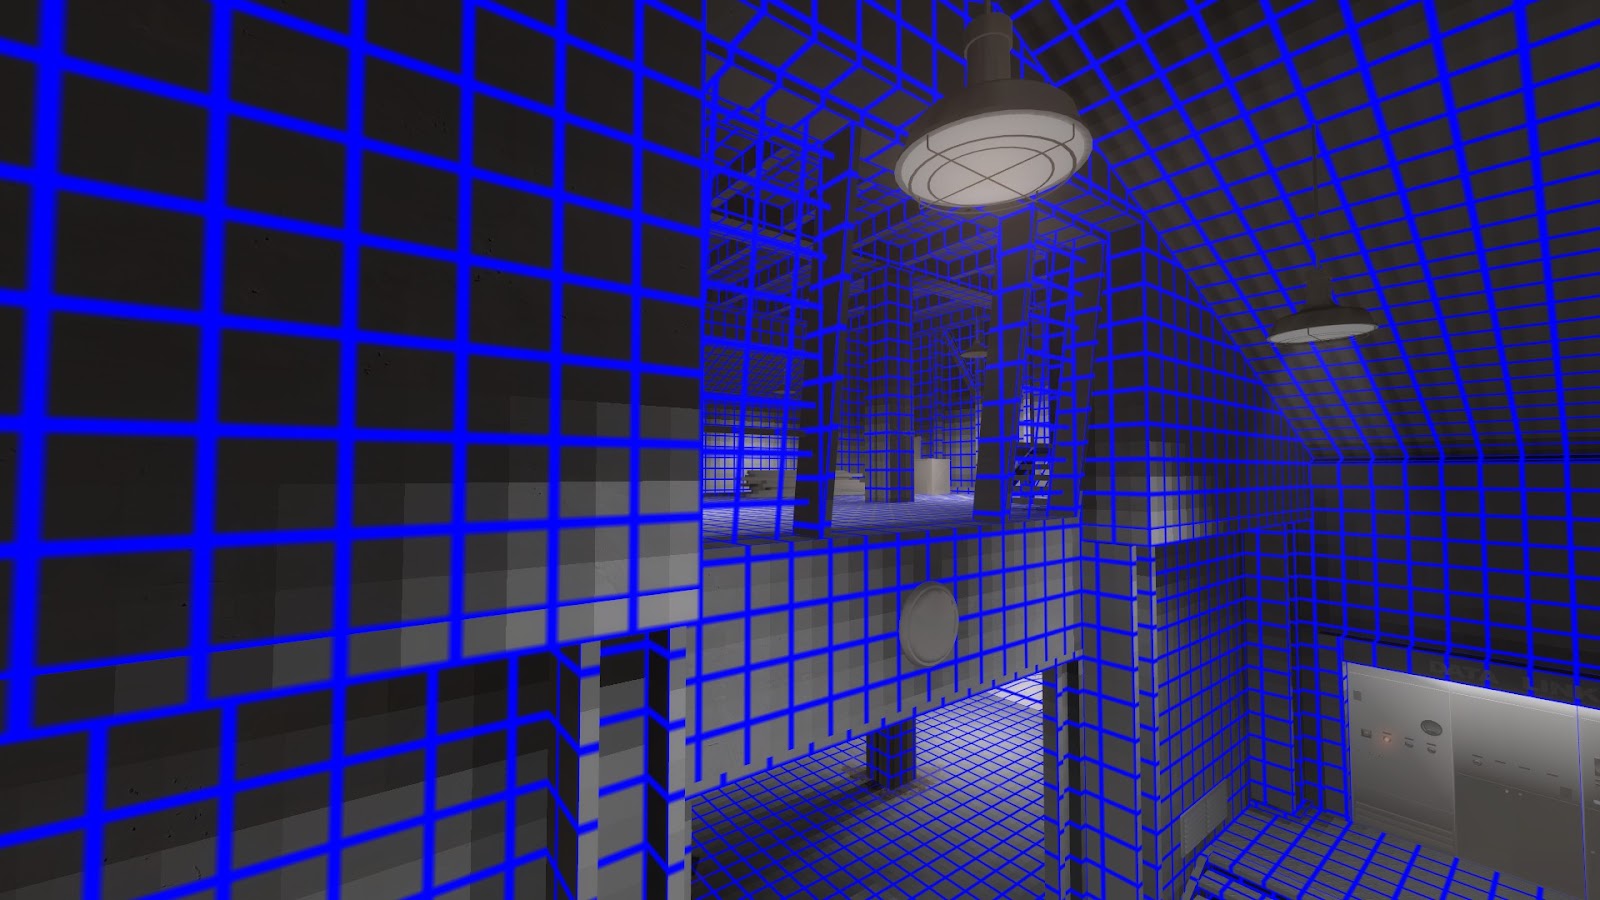
Area showing harsh transitions caused by an intense light_spot.
FULLBLACK FACES
What I’m about to tell you is all guesswork done by @Geit, my friend ericw, and myself, but it seems sound enough.
As best we can figure, lightmap calculation is done at the intersections of the luxel grid, not the centers. During the initial VRAD pass, faces are chopped according to their luxel density (lightmap scale) and each luxel sample is lit individually. The luxels absorb light from all sources in the map and bounce a portion (100 bounces by default) to other luxels; this is called “radiosity”, which is where the name “VRAD” comes from. Then, the luxels interpolate with neighboring luxels and the results are combined in some way to determine the final color/brightness of each luxel. There may also be a third pass for fake ambient occlusion (which may explain why this occurs). In-game, the lightmaps are filtered to diffuse and blend their edges further.
Most brush lighting “errors” can be fixed by increasing the luxel density of the offending faces so there are more sample points for VRAD to use, or by resizing the brush so the luxels get interpolated differently.
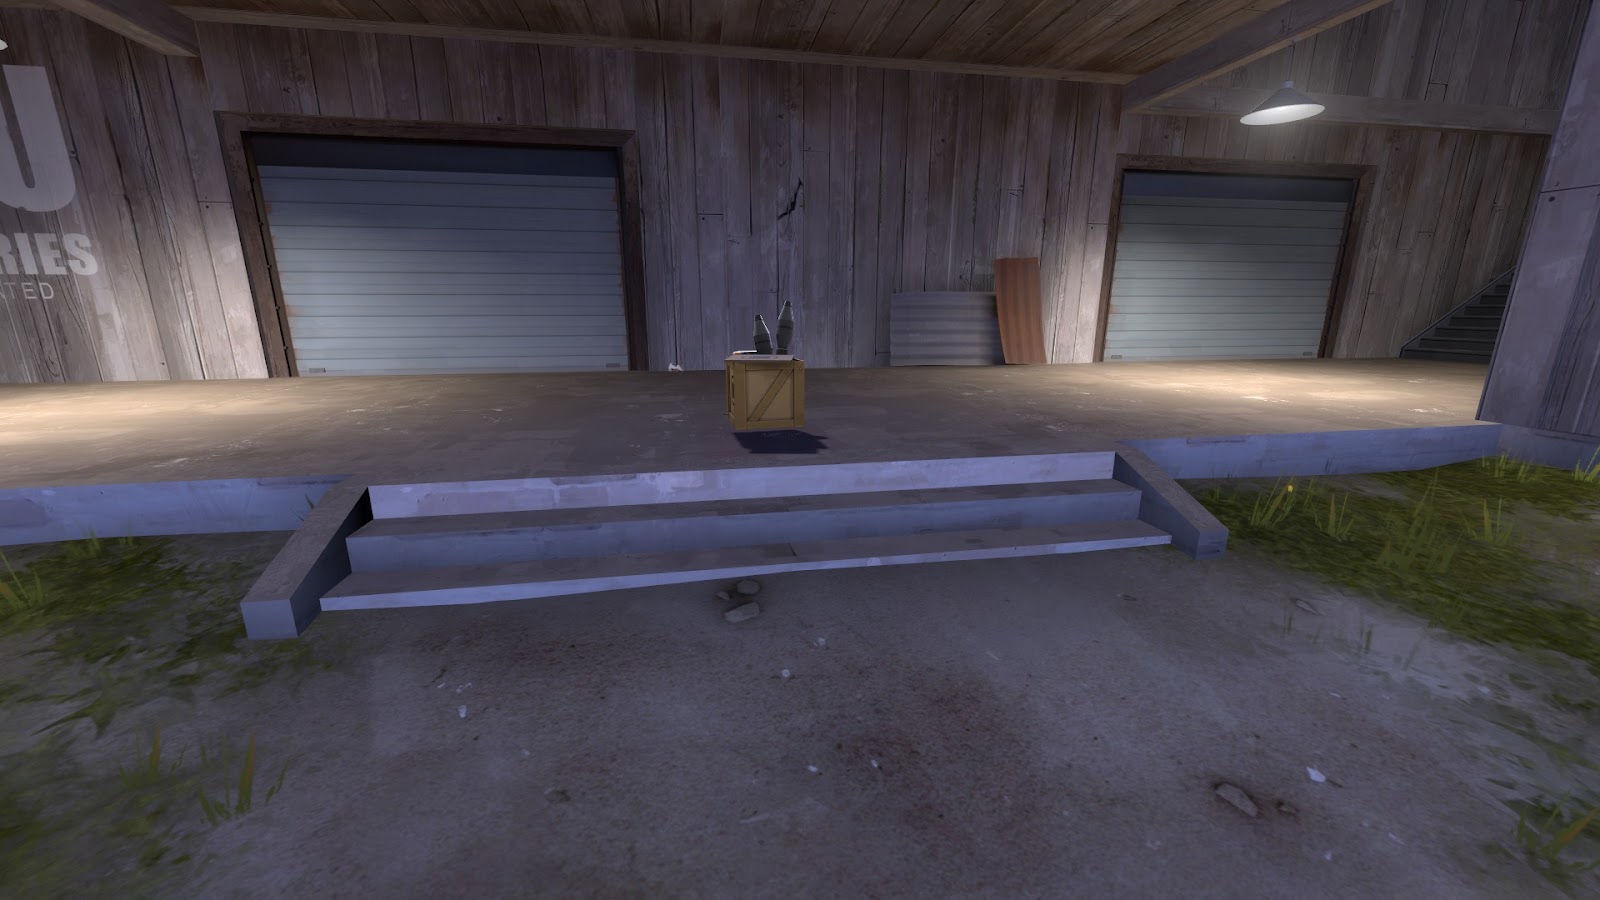
You can find many examples of fullblack faces in Valve maps if you look closely. Let’s take a look at Lumberyard:
In this screenshot, you can see the bottom step’s vertical component is totally black. If we check out the face in Hammer, we can see why:
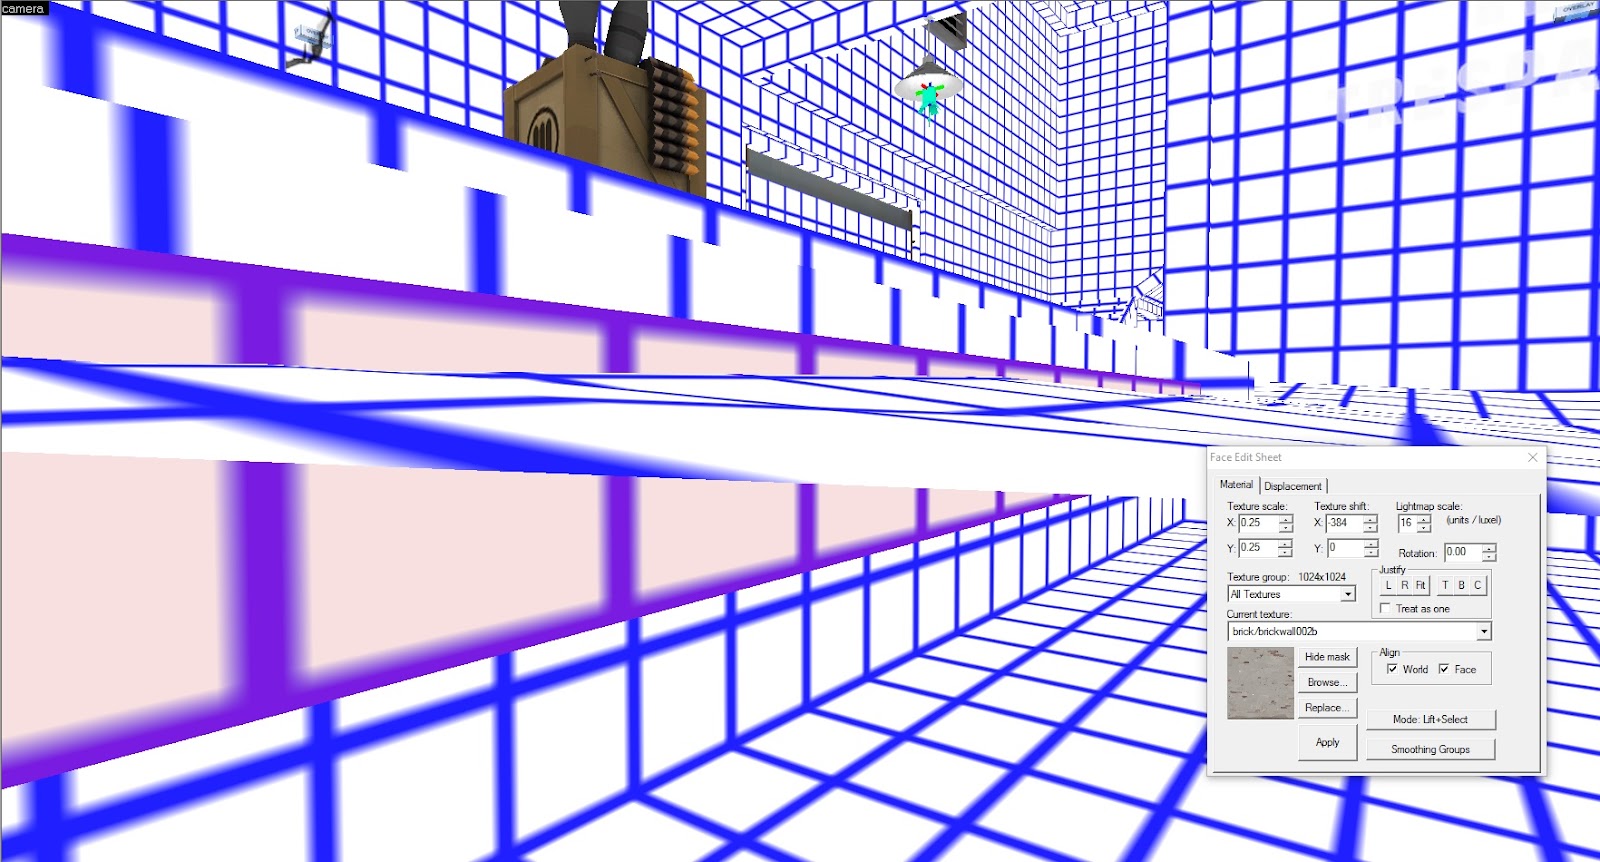
The lightmap scale for the face is set to 16, the default value. The bottom of the step extends underneath the displacement, taking the luxel sample points with it. Geit and I believe the luxel samples are taken from the corners of each luxel and interpolated with neighboring samples. Since the bottom samples would be in complete shadow underneath the displacement, VRAD aggressively interpolates this with the top sample points and puts the entire face in shadow. There are a couple ways to fix this. You can increase the lightmap resolution until there are enough luxels for VRAD to differentiate between the underground portion of the stair and the rest. However, the cheapest way to correct issues caused by faces being lit inside another brush/displacement is to more appropriately size the brush, and then match the lightmap scale if necessary.
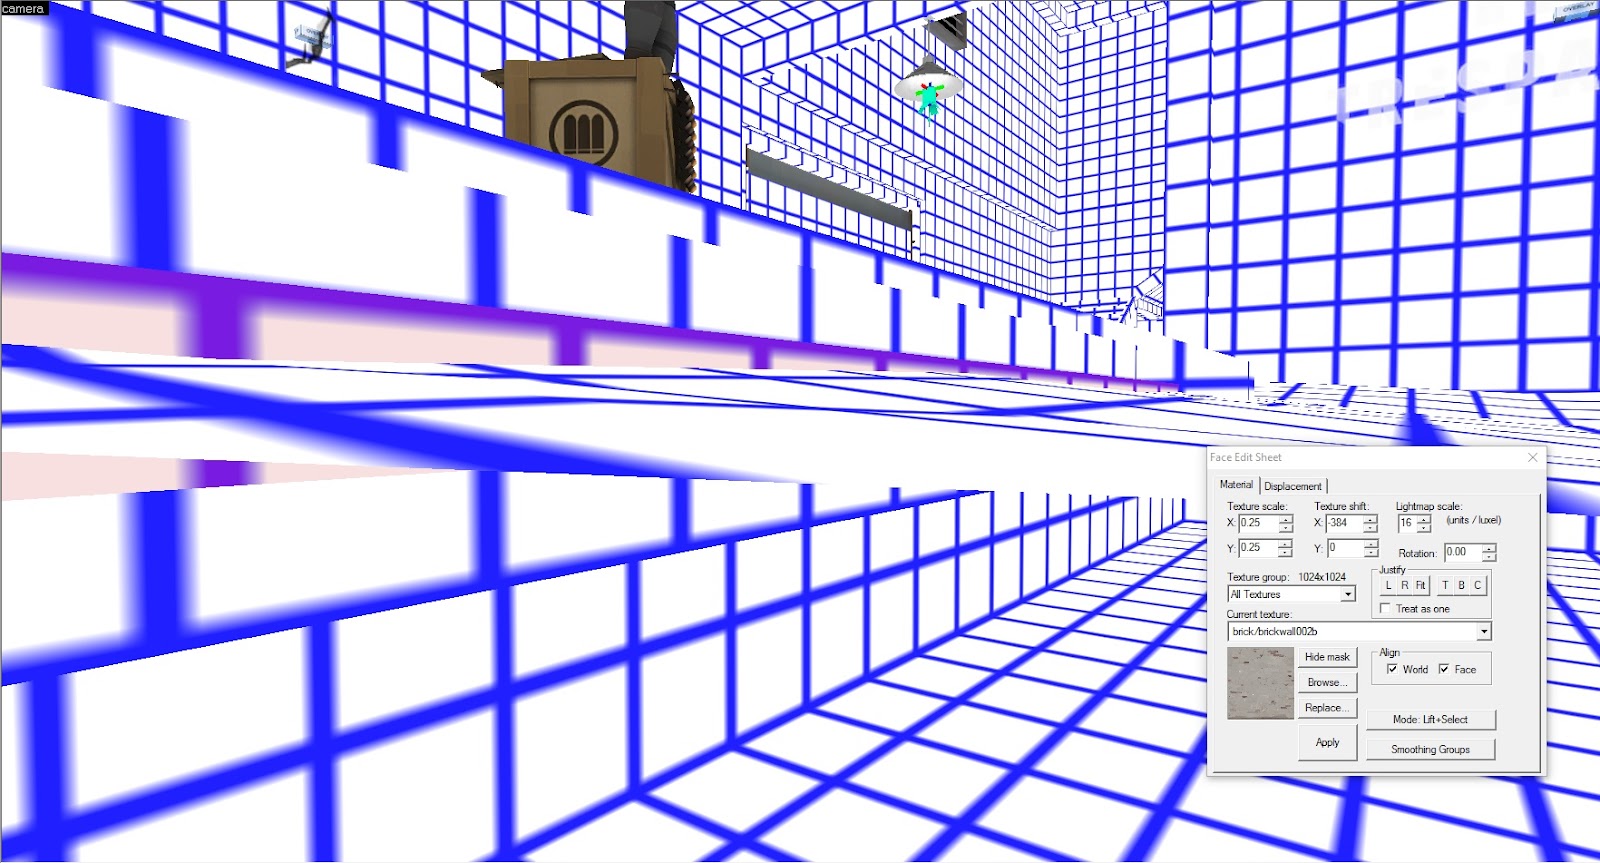
If I just pull the bottom edge of the stair up 8 units and halve the lightmap scale to match, the bottom sample points are now closer enough to the top of the displacement to light most of the luxels properly. Lightmap filtering will take care of the rest.
All fixed!
DATA
Now for some data! I created a small, but complex test map (shoutout to joiner) and changed the lightmap scale globally between compiles to test their final compile times and file sizes. All compiles were done with a sun spread angle of 1, HDR, and -final. No cubemaps were built and no repacking was done.
Pick a spot on the gif and stare at it to see how the area changes. Notice how the shadows cast by beams very close by benefit greatly from very high luxel densities, where shadows cast by the highest and farthest beams from the center don’t get much sharper past 16.
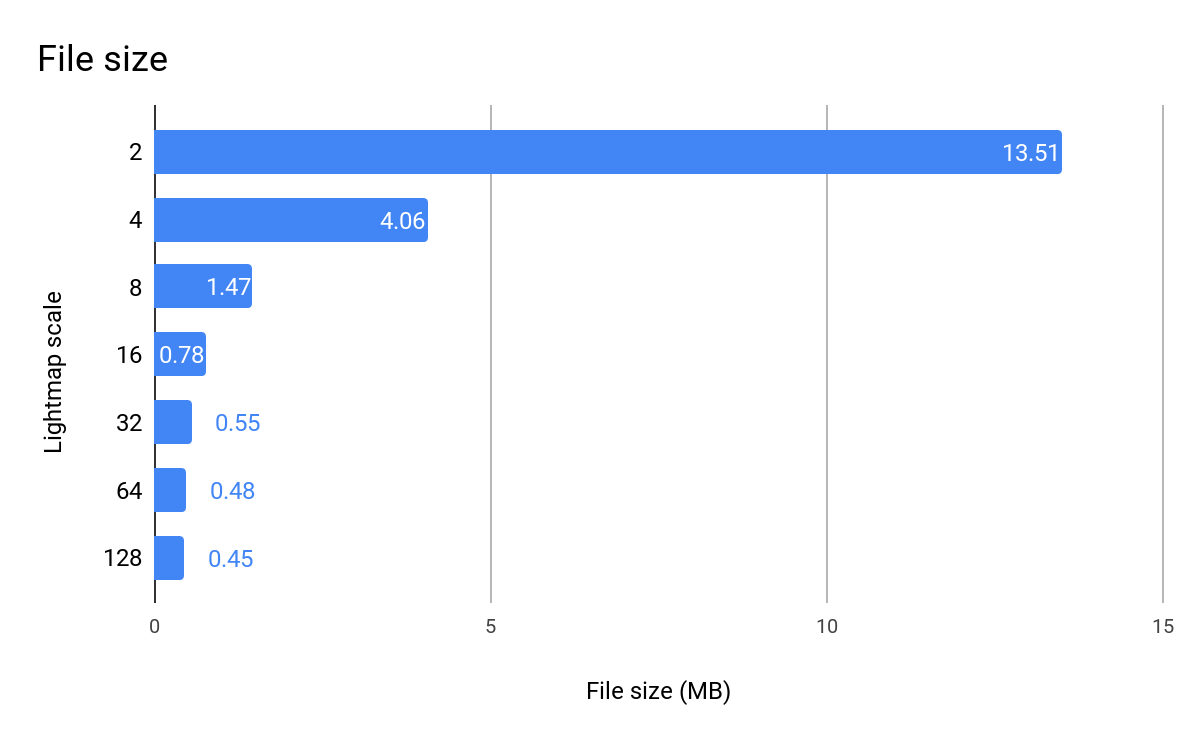
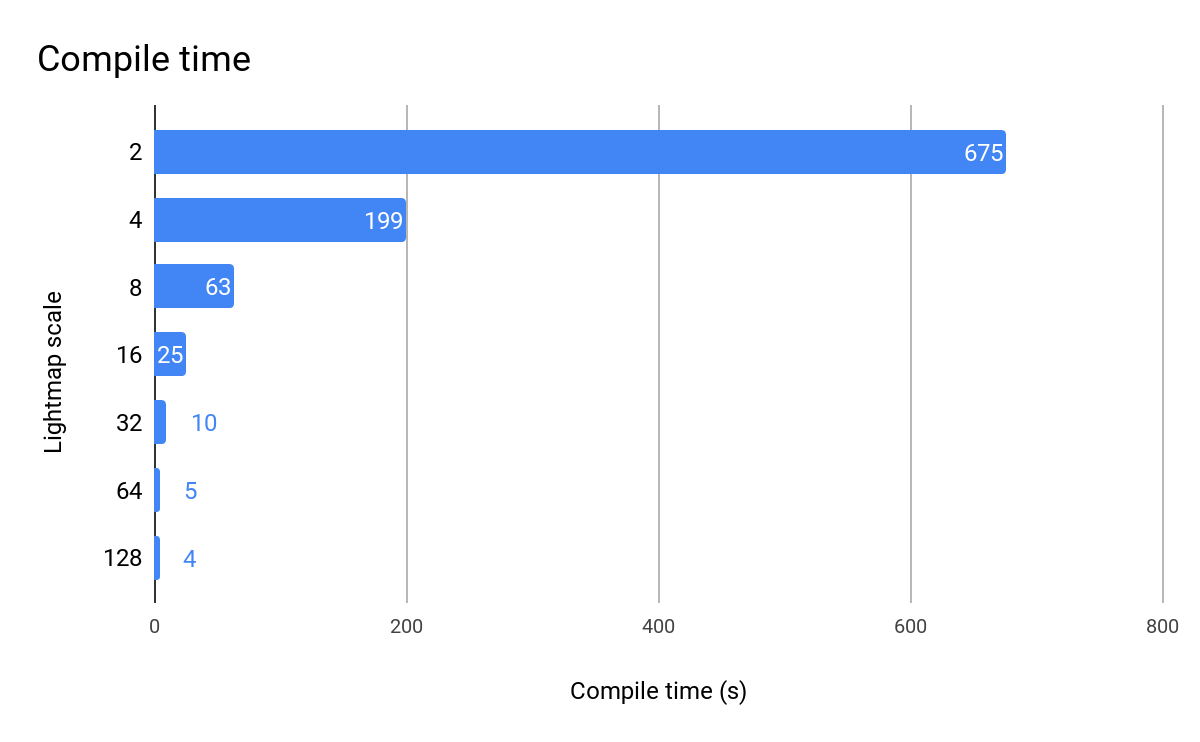
While it's unlikely you will ever raise or lower your lightmap scale globally, this extreme example serves to highlight the exponential increases in compile time and file size that result from widespread use of high luxel densities. The effect of decreasing luxel density is more graduated, but in practice on larger, playable maps, it has a significant impact.
To better illustrate the practicality of optimizing lightmaps, I’ve spent a few hours optimizing the SDK pl_badwater. Compiled with -both and -final. No cubemaps were built and no repacking was done.
Badwater has already been optimized somewhat. Most of the roofs are at 128 scale, and there are several walls in the final areas that are at 64. There are also a few areas in Blu spawn that are at 4, and several more walls and floors later on that are at 8. I tried to cut these to better fit their shadows and limit the dense scales. I increased resolution in an area in the first tunnel to fix a fullblack set of faces.
The final compile time went from 18:44 to 16:59, and the final BSP size went from 44MB to 41MB. Not huge gains, but Valve had already started optimization on this level.
CONCLUSION
While repacking has replaced lightmap optimization as the best method for reducing final BSP size, it is still a great first step in minimizing your BSP size and reducing compile times. It can also help fix certain lighting bugs and make shadow transitions in important areas look better. Make sure to think about it next time you approach RC!
INTRO
There is a growing list of questions a Source mapper must remember to ask himself before releasing his next iteration. This list actually exists. Today I want to talk about one of the items on this list: lightmap optimization. While not normally necessary during the testing phases of your map's development, lightmap optimization can be the best tool to reduce the final size of your BSP without any loss of quality, outside of repacking. It can be used to great effect in all types of maps, especially ones that are large and open, like those designed for VSH, jump, or trade. If you want to reduce your compile times, lightmap optimization can help there too, but remember that lightmaps are linked to individual faces of your geometry and displacements, so if you ever remake an area or simply delete a brush you've optimized, your work is lost. Don't waste your time doing lightmap optimization in early development stages unless you're in need of faster full compile times (or you really enjoy it).
WHAT IS LIGHTMAP OPTIMIZATION?
Lightmap optimization is the process of reducing the resolution of select geometry and displacement lightmap faces for faster compiling and reduced file size. Lightmap optimization can also include increasing resolution, thereby increasing quality, file size, and compile time. By combining both types, it is possible to increase the fidelity of select shadow transitions while still reducing overall file size.
Reducing lightmap resolution can be used to:
- decrease file size
- decrease compile time
- smooth shadow transitions
Increasing lightmap resolution can be used to:
- increase file size
- increase compile time
- sharpen shadow transitions
- fix fullblack faces
HOW CAN I VIEW AND EDIT LIGHTMAPS?
The lightmap scale can be seen in Hammer by selecting the “Lightmap Grid” view in the 3D viewport. This will apply blue-bordered white squares on all brush faces to visualize their luxel density. Since tool brushes and point entities do not receive lightmaps, you can clean your viewport out by unchecking them from the auto visgroups tab. To change the lightmap scale, simply select a face using the face edit sheet. At the top of the face edit sheet you will see a section marked “Lightmap scale” and the default value of 16. When you change the scale here, the lightmap grid for the face will update in the 3D viewport to show you the new luxel density (assuming you’re in the lightmap grid view). You can change the scale of multiple faces at once, just like with textures, or one at a time.
If you change the lightmap scale of a face and copy the brush someplace else, the altered lightmap scale will be preserved. Keep that in mind if you begin optimizing early and you like to copy/shift-drag brushwork around.
WHERE CAN THE RESOLUTION BE DROPPED?
The short answer is in areas of low lighting contrast. Displacements, walls, floors, ceilings etc. that have very little lighting contrast can have their lightmap resolution decreased without any loss in quality. Lightmaps in out-of-bounds areas -- places that the player will never reach -- can be scaled up with less discretion since the player will always view them from a distance, if at all.
Another thing to remember is that shadows get more diffuse the farther away they are from the object that casts them. This makes faces lit almost entirely by sunlight prime candidates for high lightmap scales since sunlight is cast from the skybox, high above player-level geometry.
In the above example, I incrementally doubled all ground displacement lightmap scales. Shadows cast by the buildings gradually diffuse out, but the middle areas that had no shadows to begin with change very little.
WHERE SHOULD THE RESOLUTION BE RAISED?
This is more difficult to pin down. High contrast shadow transitions in high-traffic areas should be considered for increased lightmap resolutions, but they won’t always look better.
Goldrush stage 2’s famous split tunnels help showcase what can be achieved with higher lightmap resolutions. The thing is, some people may not even like what the junction looks like at 2 or 4 scale, maybe even 8. There is a case to be made for cohesion with the rest of the map (and the game as a whole); sometimes a high resolution looks out of place and can even create jagged, pixelated shadows when the casting light falls off quickly.
Let’s take a closer look at the tracks in the Goldrush gif:
They create very jagged shadows at high resolutions, a rather ugly effect, but by 16, the shadows have almost entirely disappeared.
Use discretion and save your high-resolution lightmap passes for later compiles.
OPTIMIZING
This is where real-time lighting previews would come in handy. To begin optimizing the lightmaps in your map, you will need to do a full lighting compile. When in-game, check around for areas with little or no shadow transitions. Take screenshots or just hop back and forth from the game and Hammer. Try to get as many faces optimized as possible before recompiling as you will need to do a full compile every time you re-check.
You may also want to save a completely new version before you begin optimizing, and ONLY do lightmap optimization in this new version. This is so that in case you make any mistakes cutting brushes to get better control over the scales, you can simply paste-special the old brushwork back into place.
Prime candidates for decreased resolution include:
- Out-of-bounds areas
- Ceilings
- Roofs
Some useful console commands for lightmap optimization:
- mat_fullbright 2: replaces most textures with a greyscale representation of lighting information. Makes it easier to see where shadow transitions are or are not occurring. Has difficulty rendering over displacement blends.
- mat_luxels 1: projects blue-bordered luxels on top of your lightmapped geometry, just like in the Hammer view. It breaks the lighting on displacements.
- mat_filterlightmaps 0: removes the filtered blending that is normally added to luxel borders to help smooth transitions. In combination with mat_fullbright 2, this command makes it easy to identify individual luxels.
- r_drawbeams 0: removes the point_spotlight effect, makes looking at ceilings that use these easier.
pl_upward with mat_fullbright 2 and mat_filterlightmaps 0.
pl_upward with mat_luxels 1.
Interior space of arena_lumberyard with mat_fullbright 2 and mat_filterlightmaps 0.
With mat_luxels 1 added.
Area showing harsh transitions caused by an intense light_spot.
FULLBLACK FACES
What I’m about to tell you is all guesswork done by @Geit, my friend ericw, and myself, but it seems sound enough.
As best we can figure, lightmap calculation is done at the intersections of the luxel grid, not the centers. During the initial VRAD pass, faces are chopped according to their luxel density (lightmap scale) and each luxel sample is lit individually. The luxels absorb light from all sources in the map and bounce a portion (100 bounces by default) to other luxels; this is called “radiosity”, which is where the name “VRAD” comes from. Then, the luxels interpolate with neighboring luxels and the results are combined in some way to determine the final color/brightness of each luxel. There may also be a third pass for fake ambient occlusion (which may explain why this occurs). In-game, the lightmaps are filtered to diffuse and blend their edges further.
Most brush lighting “errors” can be fixed by increasing the luxel density of the offending faces so there are more sample points for VRAD to use, or by resizing the brush so the luxels get interpolated differently.
You can find many examples of fullblack faces in Valve maps if you look closely. Let’s take a look at Lumberyard:
In this screenshot, you can see the bottom step’s vertical component is totally black. If we check out the face in Hammer, we can see why:
The lightmap scale for the face is set to 16, the default value. The bottom of the step extends underneath the displacement, taking the luxel sample points with it. Geit and I believe the luxel samples are taken from the corners of each luxel and interpolated with neighboring samples. Since the bottom samples would be in complete shadow underneath the displacement, VRAD aggressively interpolates this with the top sample points and puts the entire face in shadow. There are a couple ways to fix this. You can increase the lightmap resolution until there are enough luxels for VRAD to differentiate between the underground portion of the stair and the rest. However, the cheapest way to correct issues caused by faces being lit inside another brush/displacement is to more appropriately size the brush, and then match the lightmap scale if necessary.
If I just pull the bottom edge of the stair up 8 units and halve the lightmap scale to match, the bottom sample points are now closer enough to the top of the displacement to light most of the luxels properly. Lightmap filtering will take care of the rest.
All fixed!
DATA
Now for some data! I created a small, but complex test map (shoutout to joiner) and changed the lightmap scale globally between compiles to test their final compile times and file sizes. All compiles were done with a sun spread angle of 1, HDR, and -final. No cubemaps were built and no repacking was done.
Pick a spot on the gif and stare at it to see how the area changes. Notice how the shadows cast by beams very close by benefit greatly from very high luxel densities, where shadows cast by the highest and farthest beams from the center don’t get much sharper past 16.
While it's unlikely you will ever raise or lower your lightmap scale globally, this extreme example serves to highlight the exponential increases in compile time and file size that result from widespread use of high luxel densities. The effect of decreasing luxel density is more graduated, but in practice on larger, playable maps, it has a significant impact.
To better illustrate the practicality of optimizing lightmaps, I’ve spent a few hours optimizing the SDK pl_badwater. Compiled with -both and -final. No cubemaps were built and no repacking was done.
Badwater has already been optimized somewhat. Most of the roofs are at 128 scale, and there are several walls in the final areas that are at 64. There are also a few areas in Blu spawn that are at 4, and several more walls and floors later on that are at 8. I tried to cut these to better fit their shadows and limit the dense scales. I increased resolution in an area in the first tunnel to fix a fullblack set of faces.
The final compile time went from 18:44 to 16:59, and the final BSP size went from 44MB to 41MB. Not huge gains, but Valve had already started optimization on this level.
CONCLUSION
While repacking has replaced lightmap optimization as the best method for reducing final BSP size, it is still a great first step in minimizing your BSP size and reducing compile times. It can also help fix certain lighting bugs and make shadow transitions in important areas look better. Make sure to think about it next time you approach RC!
Last edited:

