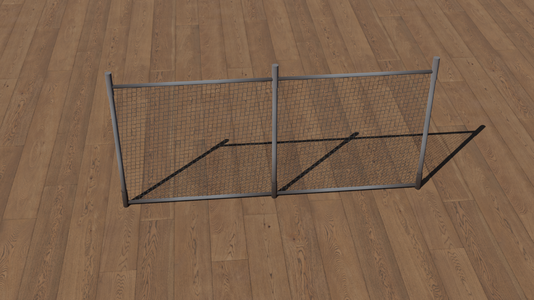
Cimroa's Modular Fences 1.0
A small fence pack. Blender file included
Modular Fences v1.0
View: https://youtu.be/cDq_HoPu7yQ
Tired of the one-notedness and the utter stagnation of props_gameplay\security_fence_section01? Well, cry no longer! This model pack comes with six unique sizes of fence to choose from! That's right, six! There's so many to choose from, you might find yourself paralyzed in indecision!
Included in this package is:
Wow! What a selection! But...
Why is it called "Modular Fences"?
This pack was specifically designed for anybody of (nearly) any skill level to be able to create a visually consistent model of their own. This model set was created nearly entirely from a magical tool called "Geometry Nodes"!
Yes, I know! It's terrifying, but fear not! You don't need to even look at them! There's only two numbers you need to worry about, one that controls the width and another than controls the number of posts. (And some other things, but we can save that for later.)
How do I install the model pack?
Simply unzip the folder you download from this page and drag the "tf" folder into your Team Fortress 2 game directory. It should merge with the already existing tf folder.
How do I make a fence prop for myself?
You will need the following software:
You are expected to have at least a surface level idea of how to use the software listed, but this won't be too difficult anyways.
The Blender project is located at tf\custom\modularFence\models\source\CimroasModularFence-ForDistribution.blend. Open it in Blender, and you should see something like this.
View: https://imgur.com/SHatp57
Over here, on the right, are the two things we care about: User Dimension and UV controller.
View: https://imgur.com/ZvbMqeR
The scale of User Dimension controls the properties of the fence. The X value will control how wide the fence is, and the Y value will control how many posts the fence has.
Next, click on the UV Editing tab at the top of the screen. With UV controller selected, enter edit mode and adjust the UV boundaries so that they match the aspect ratio of the fence. If you don't do this, the texture will not look right!
For a fence that is 256 Hammer Units wide the ratio of the UVs should be 2x1, like so:
View: https://imgur.com/bSkDTSq
Once the model is to your satisfaction, export both the fence and the collision as .smd files to a unique directory and compile them using Crowbar. Inside the directory is the .smd files used to create the models along with the .qc files. You can copy one of the qc files to use as a template.
View: https://imgur.com/hSe4P9a
Here is a Steam guide on using Crowbar. It goes much farther into depth on how to use the program than I am able or willing to do here.
Tired of the one-notedness and the utter stagnation of props_gameplay\security_fence_section01? Well, cry no longer! This model pack comes with six unique sizes of fence to choose from! That's right, six! There's so many to choose from, you might find yourself paralyzed in indecision!
Included in this package is:
- modular_fence_256x3
- modular_fence_128x2
- modular_fence_64x2
- modular_fence_32x2
- modular_fence_16x2
- modular_fence_4x1
Why is it called "Modular Fences"?
This pack was specifically designed for anybody of (nearly) any skill level to be able to create a visually consistent model of their own. This model set was created nearly entirely from a magical tool called "Geometry Nodes"!
Yes, I know! It's terrifying, but fear not! You don't need to even look at them! There's only two numbers you need to worry about, one that controls the width and another than controls the number of posts. (And some other things, but we can save that for later.)
How do I install the model pack?
Simply unzip the folder you download from this page and drag the "tf" folder into your Team Fortress 2 game directory. It should merge with the already existing tf folder.
How do I make a fence prop for myself?
You will need the following software:
- Blender
- Crowbar
- Notepad
You are expected to have at least a surface level idea of how to use the software listed, but this won't be too difficult anyways.
The Blender project is located at tf\custom\modularFence\models\source\CimroasModularFence-ForDistribution.blend. Open it in Blender, and you should see something like this.
View: https://imgur.com/SHatp57
Over here, on the right, are the two things we care about: User Dimension and UV controller.
View: https://imgur.com/ZvbMqeR
The scale of User Dimension controls the properties of the fence. The X value will control how wide the fence is, and the Y value will control how many posts the fence has.
Next, click on the UV Editing tab at the top of the screen. With UV controller selected, enter edit mode and adjust the UV boundaries so that they match the aspect ratio of the fence. If you don't do this, the texture will not look right!
For a fence that is 256 Hammer Units wide the ratio of the UVs should be 2x1, like so:
View: https://imgur.com/bSkDTSq
Once the model is to your satisfaction, export both the fence and the collision as .smd files to a unique directory and compile them using Crowbar. Inside the directory is the .smd files used to create the models along with the .qc files. You can copy one of the qc files to use as a template.
View: https://imgur.com/hSe4P9a
Here is a Steam guide on using Crowbar. It goes much farther into depth on how to use the program than I am able or willing to do here.
Want to help me pay my rent? Donate to my Ko-fi.
- License
- Free to use and modify.

