- Sep 6, 2022
- 20
- 49
1-) Introduction And Required Things
The explosions you see in the finals of TF2 payload maps like Gold Rush, Badwater Basin, Barnblitz and more are not actually made in the source engine, these types of explosions are simulations made using 3D modeling programs. In this tutorial I will tell you how these explosion simulations are made.
=====================================
Required program and extensions
=====================================1- SourceOps (It will be used in model rigging and exporting models.)
Download Link => https://developer.valvesoftware.com/wiki/SourceOps
2- SourceIO (To import maps from source to blender)
Download Link => https://developer.valvesoftware.com/wiki/SourceIO
3- Cell Fracture (It will be used to divide the models into many pieces.)
Download Link => It is installed in the Blender Add-on list
4- Blender 3.6.9 (Program to do modeling, animation and simulation)
Download Link => https://www.blender.org/download/
2-) Preparing The Scene In Hammer
First make sure you have completely finished your map or the final control point of your map. These simulations we will make are baked animations so the changes you make may not match the previously baked animation.
First make a copy of your map, you can delete the places you think are unnecessary for the simulation to reach, but do not delete the skybox because you need to be able to compile the map.
Now decide what will be blown up on your map and make the entire world geometry that will explode func_brush
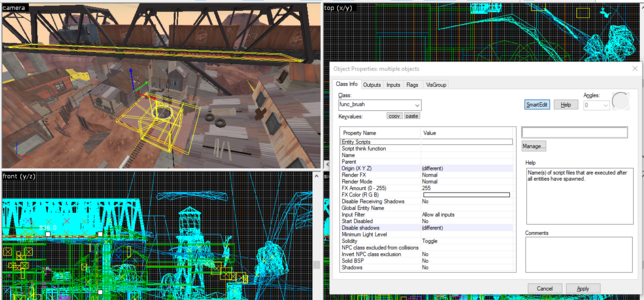
(Photo - 1)
And turn all the props that will explode to prop_dynamic_override
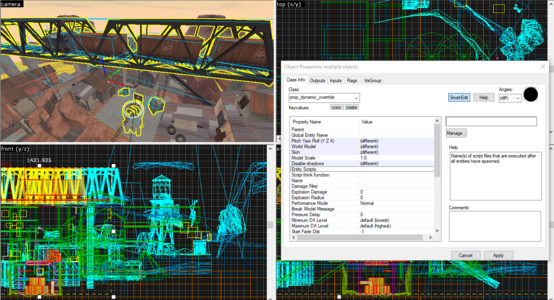
(Photo - 2)
After you have done everything, compile your map
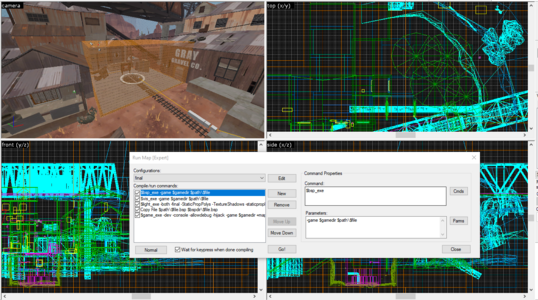
(Photo - 3)
3-) Importing The Map Into Blender
Using the SourceIO extension after compiling the map, open blender and import your map.
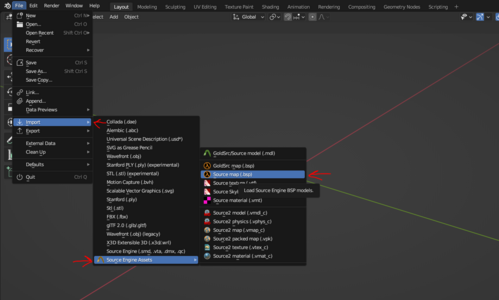
(Photo - 4)
Find and select the bps file from where you saved your map and don't forget to select the override steamapp id to Team Fortress 2
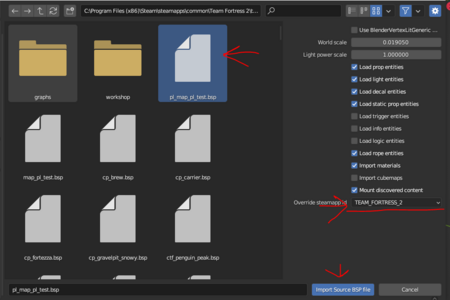
(Photo - 5)
Click on the viewport shading above and turn on the textures
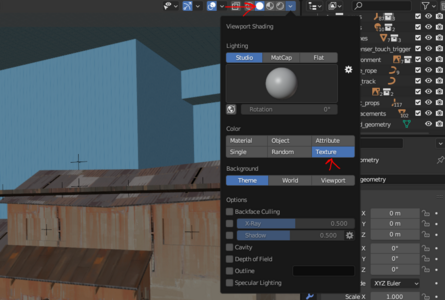
(Photo - 6)
Select the world geometry and press tab to enter edit mode. While in edit mode, select a face from the skybox and press ctrl + l. Select the material from the menu that will appear and delete all the faces of the skybox.
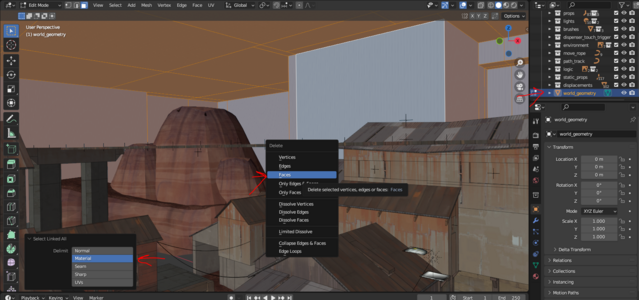
(Photo - 7)
As you can see, there are no props on the map. To bring back the props on the map, first select all the props from the right and then press the n key to enter the Source IO menu from the right and press load all entities.
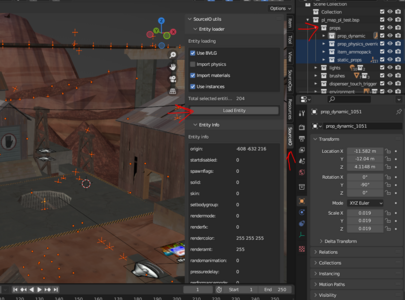
(Photo - 8)
After that, press ctrl + a and click Make Instances real.
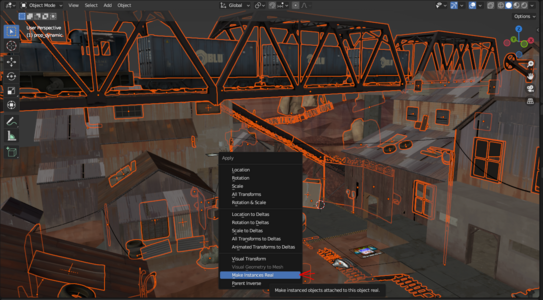
(Photo - 9)
4-)Pre-Destruction Models
Now it's time to turn all the brushes we made with func_bush into models. Select the brush you want to make a model of and duplicate it by pressing ctrl + c and ctrl + v.
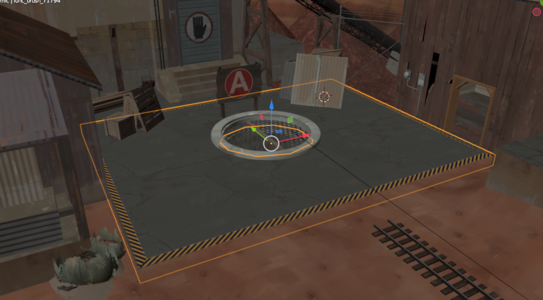
(Photo - 10)
Delete all the faces below in edit mode
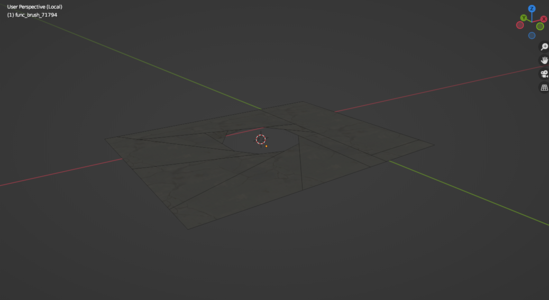
(Photo - 11)
Simplify the mesh a bit using the Decimate modifier
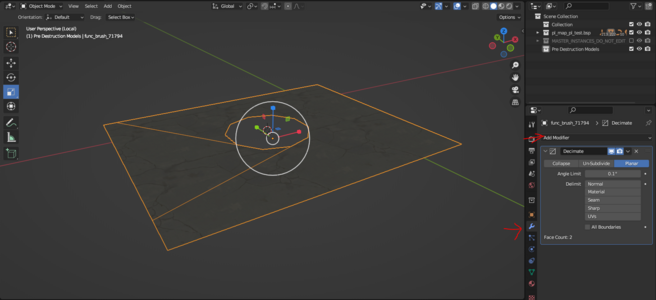
(Photo - 12)
Convert the model to mesh
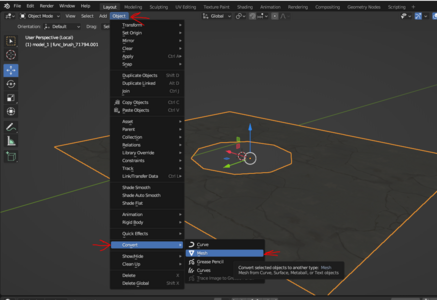
(Photo - 13)
After doing this, open SourceOps and make settings for tf2
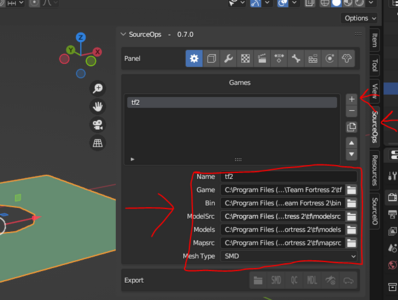
(Photo - 14)
Go to the Models section and put the collection that contains the model in the reference section and put the collision collection in the collision section.
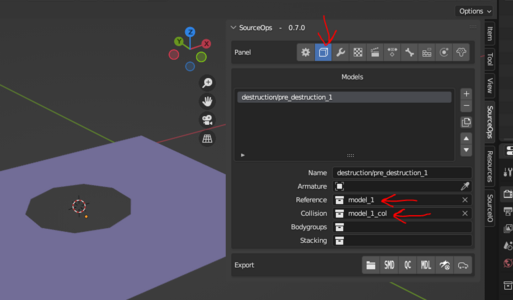
(Photo - 15)
After this, go to the model settings and make the setting you see here. ( Make the model size 52.60 )
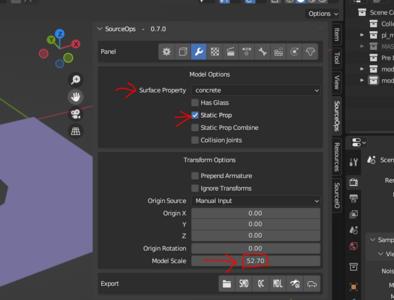
(Photo - 16)
After that, find the texture you used in the model and make the vertexlit version of the texture.
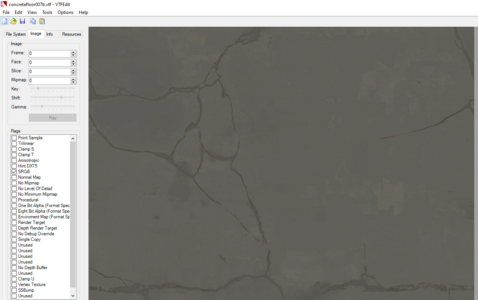
(Photo - 17)
Go to the materials section and write the file path where you saved the texture in the section below and also make the name of the material the same as the texture in the file on the right.
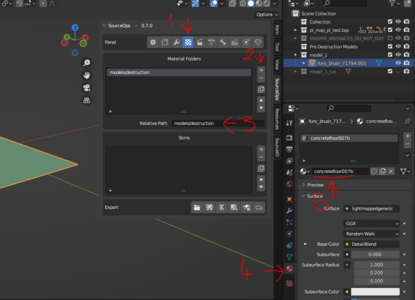
(Photo - 18)
Don't forget to check the face orientation before compiling the model. Blue = visible, red = invisible.
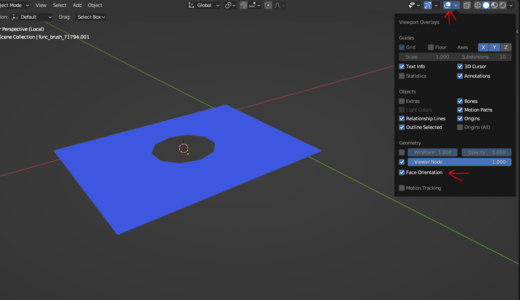
(Photo - 19)
Click on export auto
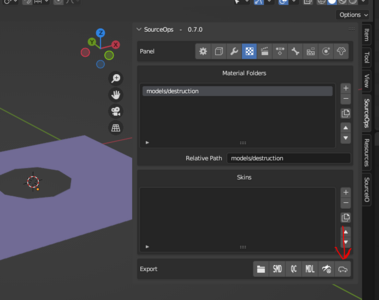
(Photo - 20)
After the model is compiled, place your model in the game and repeat this process for other brushes.
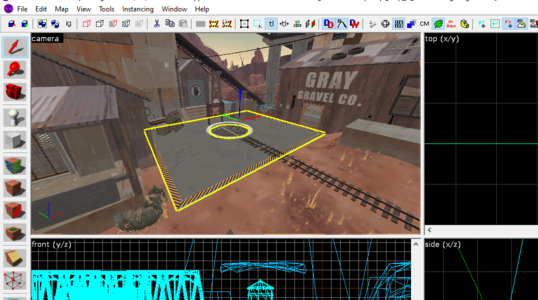
(Photo - 21)
5-) Pre-baked lighting ( Optional)
First, separate the model and brush that you will bake the light on, then separate the model and lights that will affect the lighting.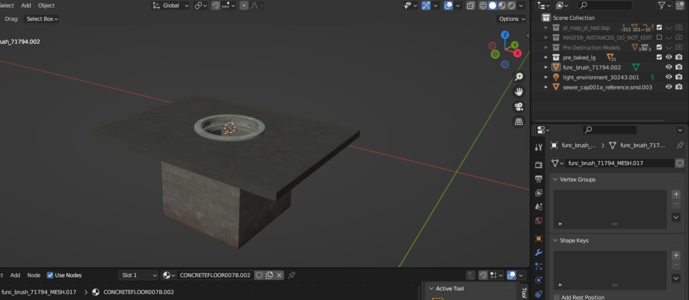
(Photo - 22)
After doing this, enter the shader editor from where the 1st arrow is pointing and press shift + a and search for image texture from the menu that appears and put it on the clipboard. Then create an empty texture. You can make the texture size 1024 by 1024 or 2048 by 2048. The size can vary depending on the size of the model. After that, copy and paste this image texture to all textures and models with a selection.
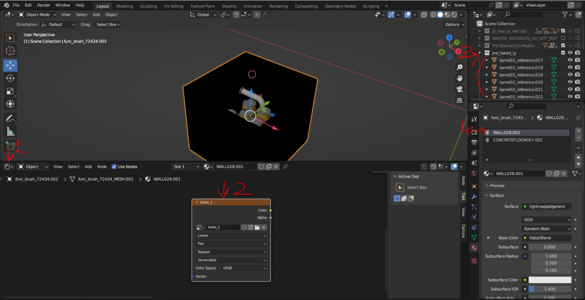
(Photo - 23)
Select uv map from the data section on the right and add a new uv and select the uv map you just added do this for all models.
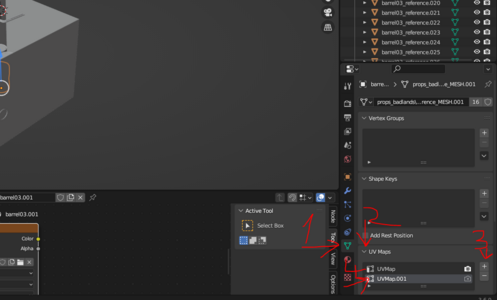
(Photo - 24)
After you have done everything, go to the uv edit mode and edit the uv of your model and wrap it so that no uv overlaps each other.
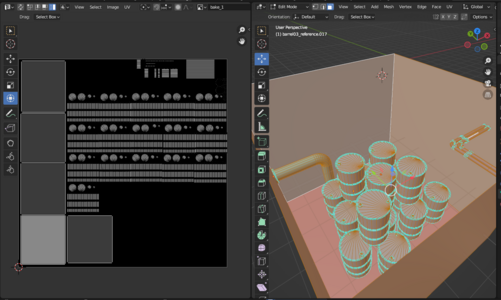
(Photo - 25)
After making a UV map, go to the render section and select Cycles and make the settings you see and click Bake and make sure that only the things you selected are in the render.
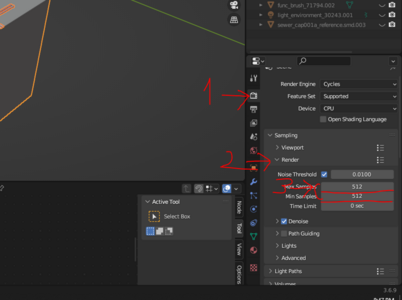
(Photo - 26)
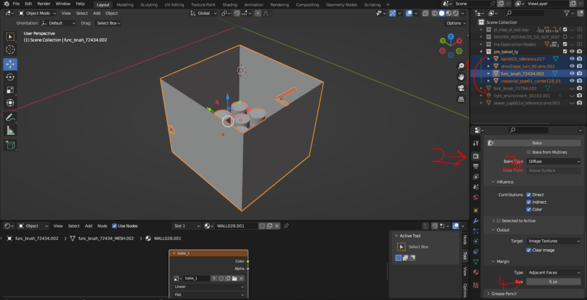
(Photo - 27)
After baking the model, place your model where it is on your map.
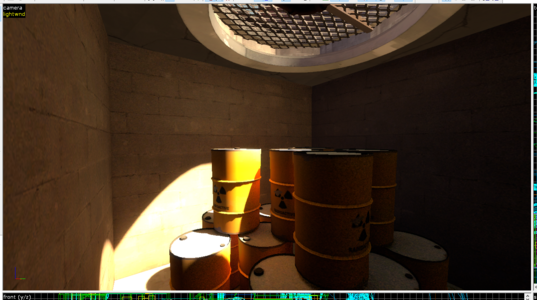
(Photo - 28)
6-) Simulations
Before doing the simulations, we need to organize the collisions in the world. First, make 2 collections. The first one is the world itself (things that do not move) and the second one is the simulation itself (things that we will add animations and rigs to).
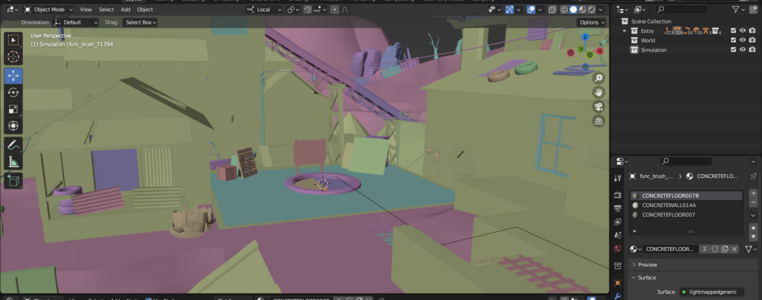
(Photo - 29)
Place all props and brushes that will be affected by the simulation in the simulation section.
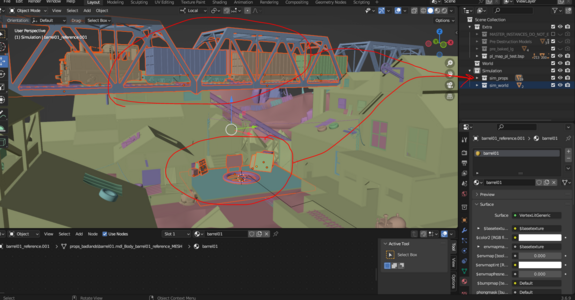
(Photo - 30)
Put all props and brushes that will not be affected by the simulation into the World.
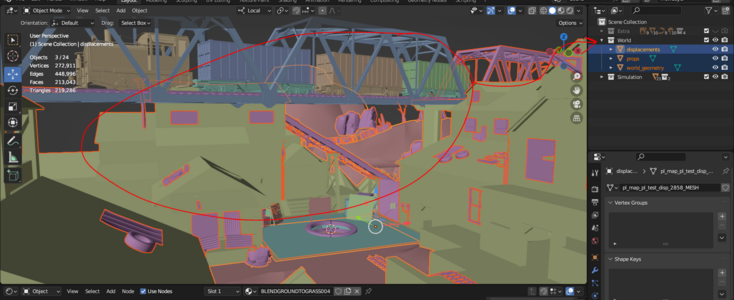
(Photo - 31)
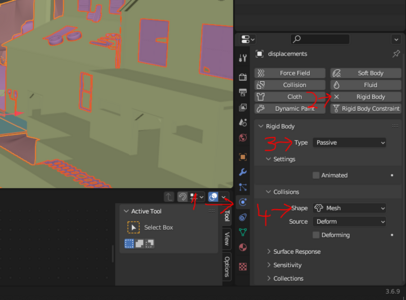
After doing these, select everything in the world collection and enter the object section from above and from there enter the rigid body menu and click on the copy from active , then enter the physics section, from here enter the rigid body section and make the type passive, then select the shape from the collision menu to mesh.
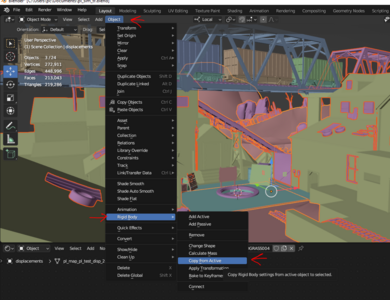
(Photo - 32)
(Photo - 33)
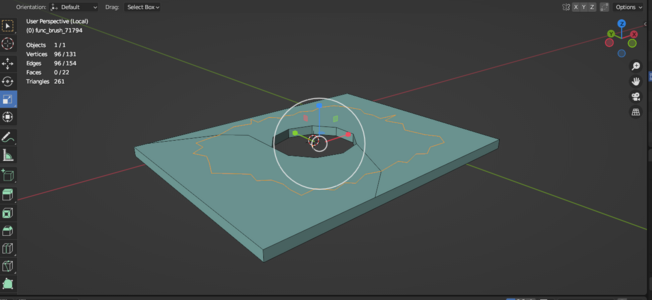
Select the platform you want to simulate, first clean the mesh of the model and enter edit mode, select the knife tool and cut the model as if there was an explosion.
(Photo - 34)
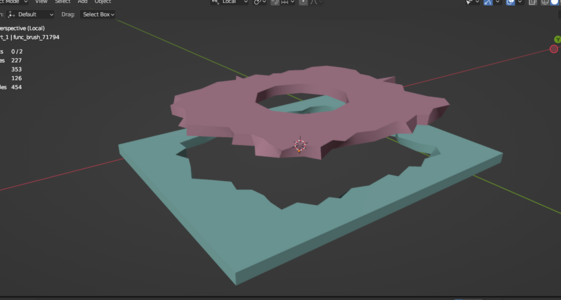
After doing this, select the entire piece you cut and separate it as a selection by pressing p and fill the open faces with f after separation.
(Photo - 35)
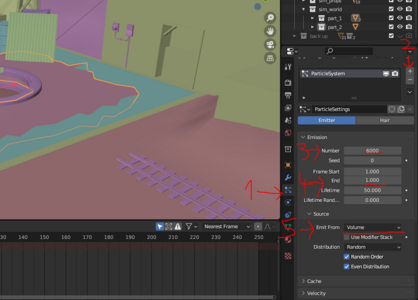
After doing this, go to the partical section on the right and add the paritical system and make the settings you see in the photo. (the emission number controls how many parts the model will be divided into)
(Photo - 36)
After you have done this, click on the quick effects section from the object menu above and select cell fracture from there.
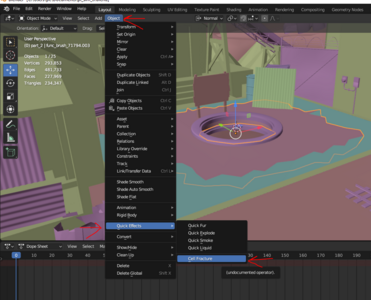
(Photo - 37)
Increase the source limit and randomness from the window that opens and click ok
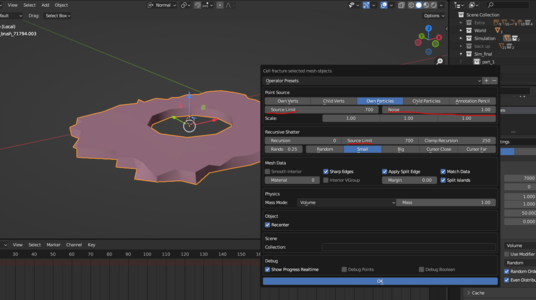
(Photo - 38)
Select all the parts that will be affected by the simulation, do not select the other parts now because we will use them elsewhere
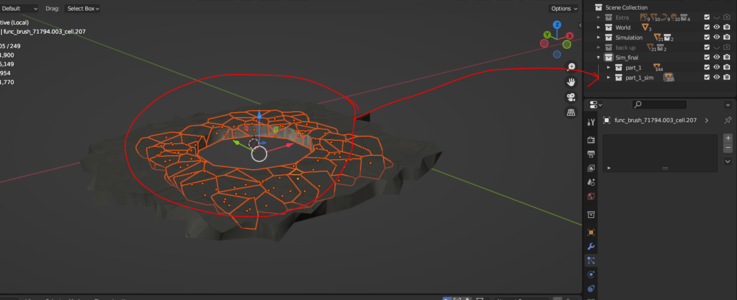
(Photo - 39)
After that, go to the physics section again and select rigid body from there and make the settings you see in the photos (don't forget to copy from active)
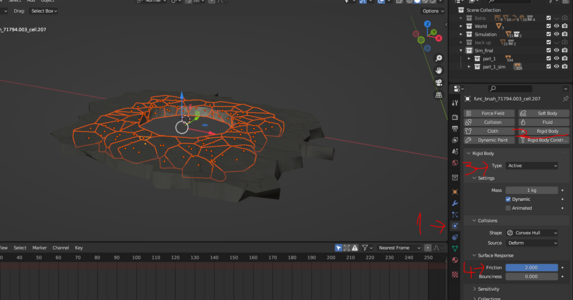
(Photo - 40)
And for the parts that will not be affected by this simulation, give them rigid body and make them passive from the settings and select mesh from the shape settings.
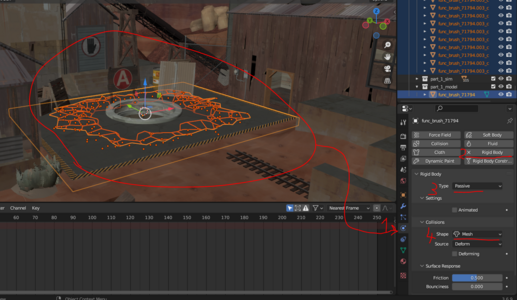
(Photo - 41)
Now, in the props, select the prop that will be affected by the simulation. First, let's fix the props. First, enter the edit mode and select all the faces of the prop and then press the m key and select the by distance setting from the menu that opens and also select the sharp edges.
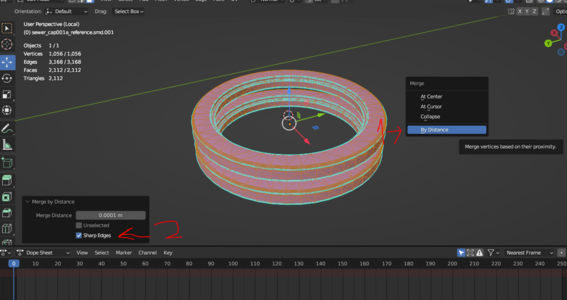
(Photo - 42)
After that select face from above and from there select Tris to Quads
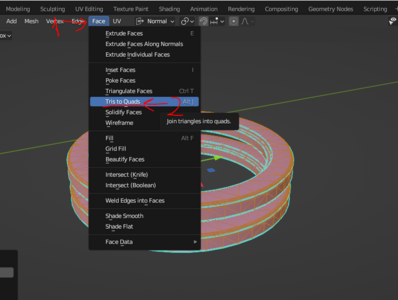
(Photo - 43)
After that use the cell fracture extension in the model
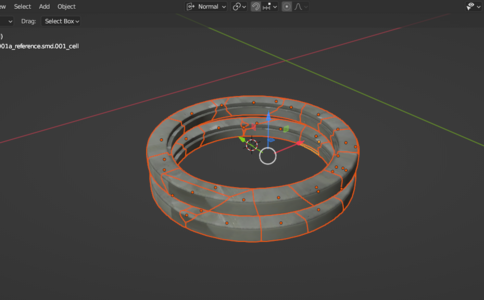
(Photo - 44)
Don't forget to fix the textures of the model parts. When you use cell fracture, the UV of the inner faces will be distorted.
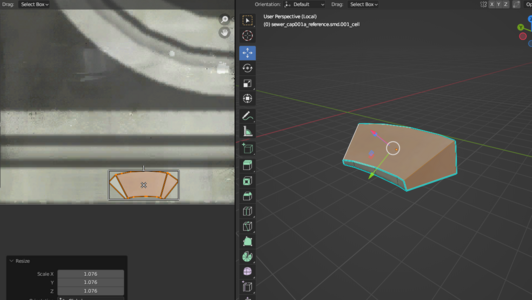
(Photo - 45)
After you have done these things, do these two things for the other models that will be affected by the simulation.
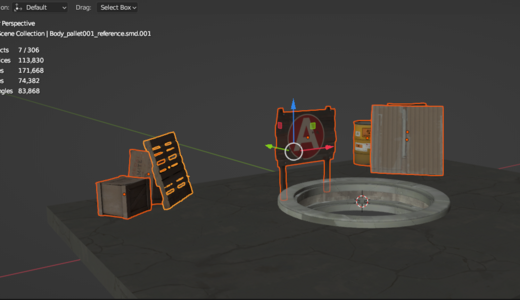
(Photo - 46)
7-) Rigid Body Connections
By using Rigid Body connections, you can connect any two objects you want to each other, thus we can make more realistic destructions.
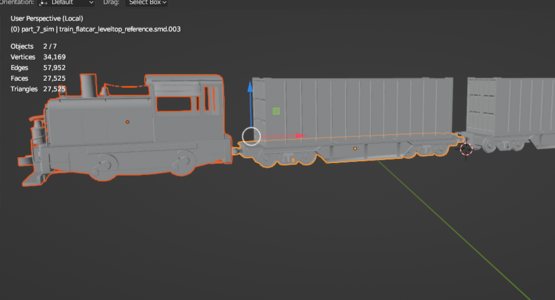
(Photo - 47)
After that, go to the object menu from above and enter rigid body here and click connect.
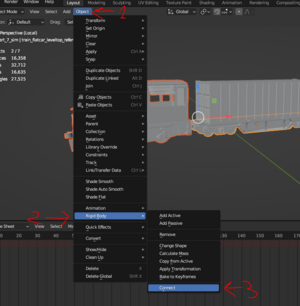
(Photo - 48)
After that place the Constraint where you want to connect it
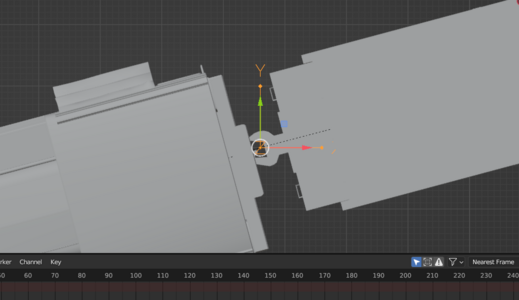
(Photo - 49)
And done, do this for all the models you want to connect
8- ) Explosion Simulations
After setting up all your simulations you will see that all the models are just falling from where they are, to change this first create an Ico sphere
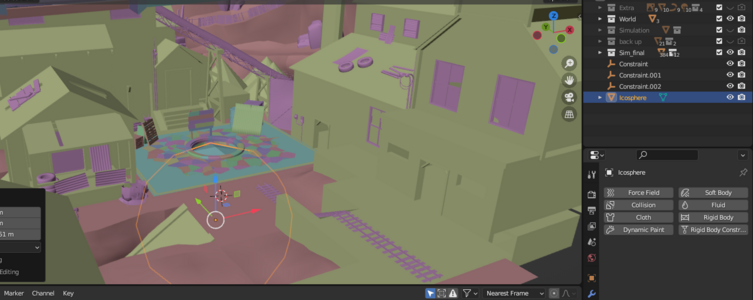
(Photo – 50)
After doing this, place the shape under the place where the simulation will be and add the rigid body and activate the animated from here.
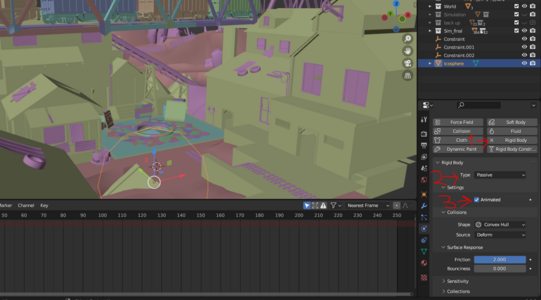
(Photo – 51)
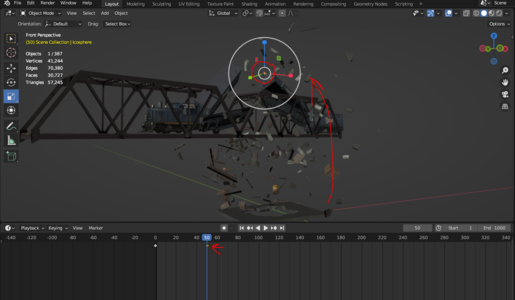
After that open the timeline and select the shape and press I and add a keyframe
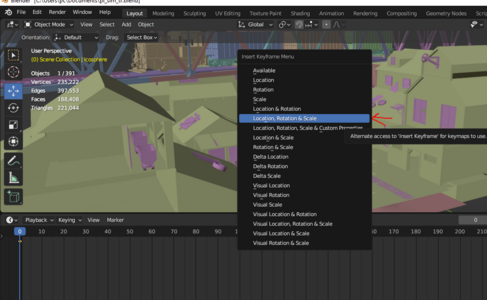
(Photo – 52)
After that move the shape up and push the line forward on the timeline and add a keyframe (make sure the shape hits all the objects as it moves up)
(Photo – 53)
9-) Rigging Simulations
Before we bake the simulation animation, we need to rig the simulation. To do this, first create a new collection
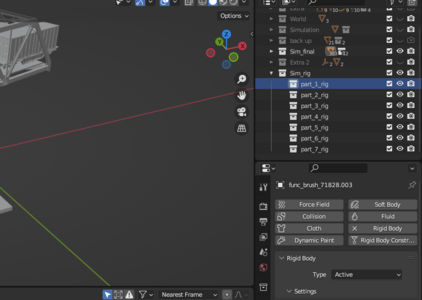
(Photo – 54)
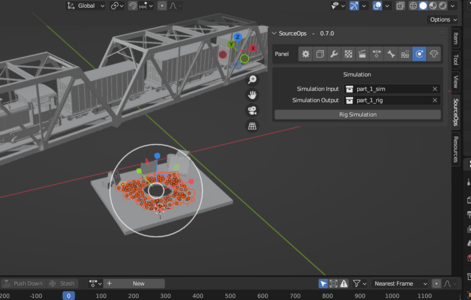
After that, go to the simulation section from the source ops menu and put the simulation model in the input section and put the rig collection as the output and click on the rig simulation
(Photo – 55)
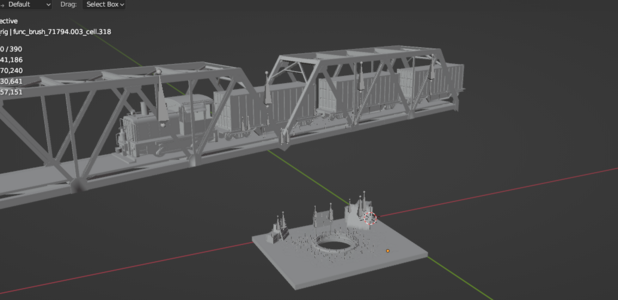
Now do this for all models that will be affected by the simulation
(Photo – 56)
10-) Simulation Baking And Timed Destruction
After rigging the models, open the dope sheet from below and enter the action editor from here and create a new action from here.
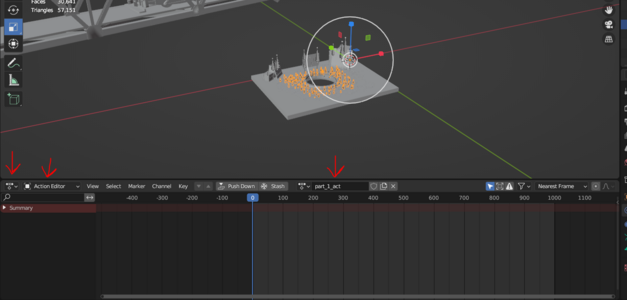
(Photo – 57)
After that, select your armature and put a keyframe at the beginning and play the simulation. After your simulation is finished, put a keyframe at the end and your simulation will be baked. Do this for the other props as well.
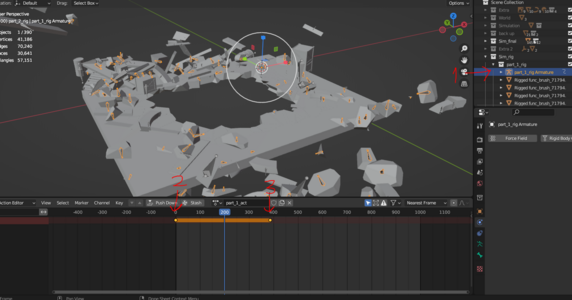
(Photo – 58)
(Remember to do this on an unrigded model) If you want to do timed destruction, first bring the line to the beginning in the timeline and select the animated setting from the settings and hover your mouse over it and press I
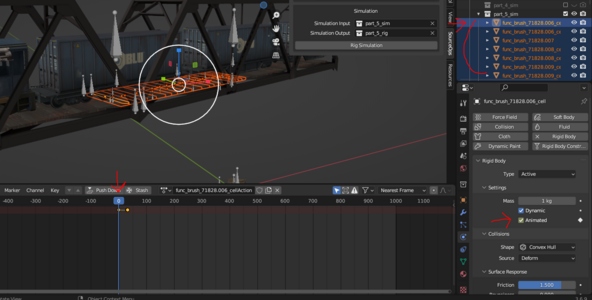
(Photo – 59)
After this, do the same process again at a time close to the demolition.
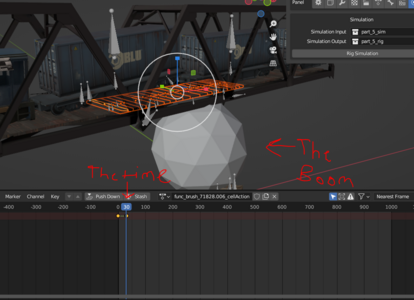
(Photo – 60)
Go one frame further and turn off the animated setting
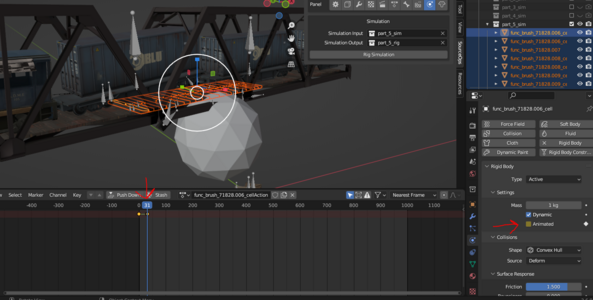
(Photo – 61)
11-) Animated Destruction
If you want to make an animated demolition, first select the models you will animate and set the model origin from where you will rotate.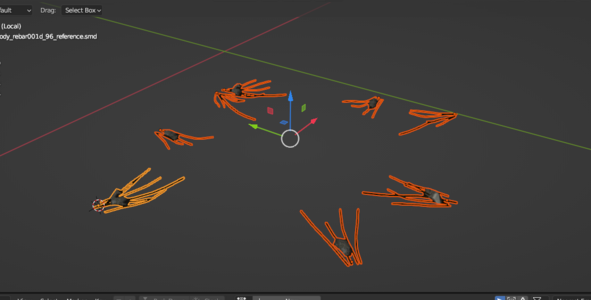
(Photo – 62)
After that, add an armature to each origin and join these armatures and put these armatures in the collection where the models are.
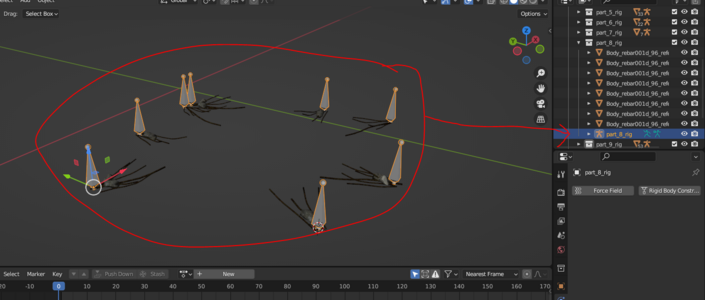
(Photo – 63)
Select the armature you want to rig and then select the model you want to give the armature to. First make sure the armature is selected, then press ctrl + p and select automatic weights from the menu that opens.
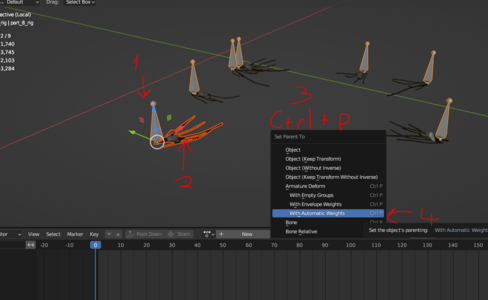
(Photo – 64)
Click on the model we just rigged and enter data here. Leave only the bone that affects your model from the vertex groups here and delete the othe
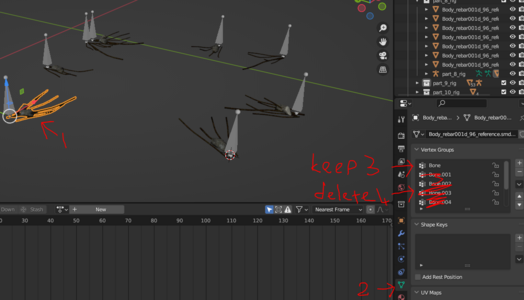
(Photo – 65)
Select your model and enter Weight painting from here, paint the entire model with a weight, do this for other models as well.
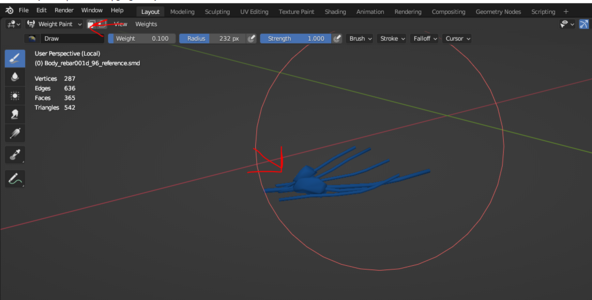
(Photo – 66)
After doing these, open the dope sheet and make your animation.
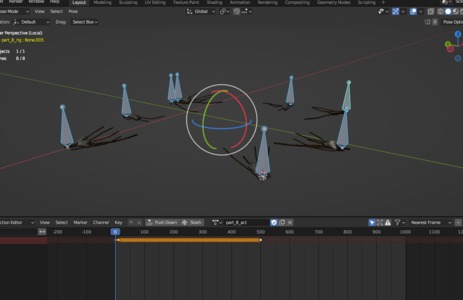
(Photo – 67)
12-) Exporting Models Back To Source
Open the Source Ops menu and select the collection and armature of the model you want to export.
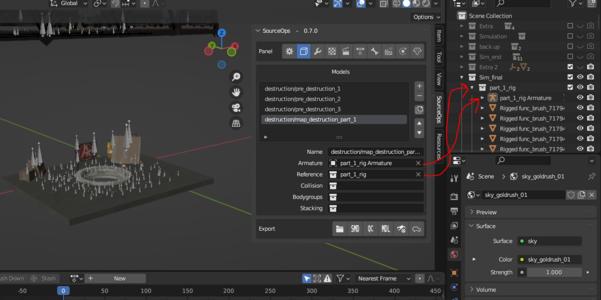
(Photo – 68)
Enter the model settings and make the settings you see in the picture.
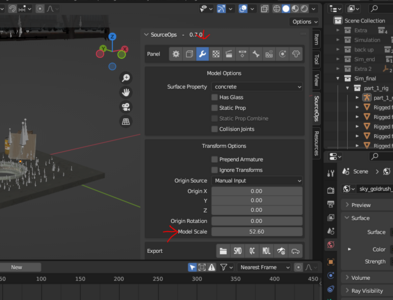
(Photo – 69)
After that, add all the material file addresses used in the demolition here.
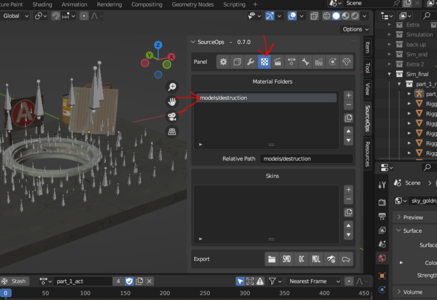
(Photo – 70)
Go to the Sequences section and create a new sequence here, put your model's action in this sequence action section and don't forget to activate the snap setting below.
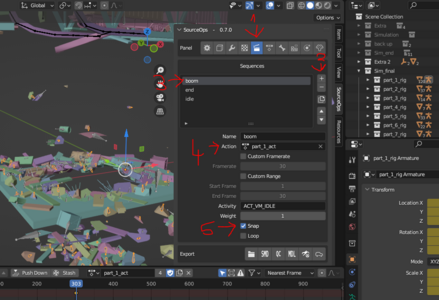
(Photo – 71)
After this, make two more sequences, one end and one idle, enable the custom range setting in the end sequence and put the last frame of the animation here (be careful, if you put a frame number higher than your animation in the custom range settings, the model cannot be compiled)
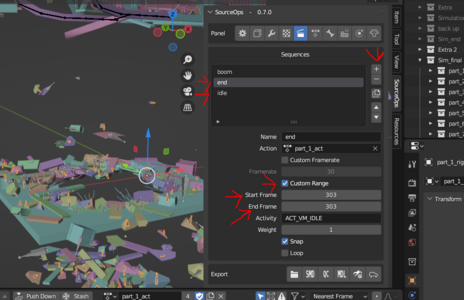
(Photo – 72)
In Idle, make the same settings again, but set the special range settings to 0 to 0. After making all the settings, compile your model and do this for the other models.
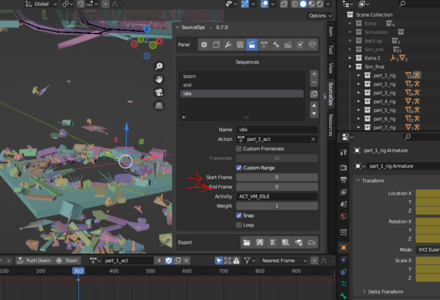
(Photo – 73)
13-) Setting Up Destruction Models In Hammer
If you exported all your models to Hammer like this, we can start making destruction models.
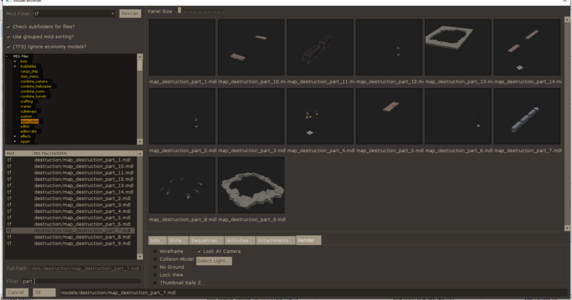
(Photo – 74)
First, place all the models you have as dynamic props to fit into their places.
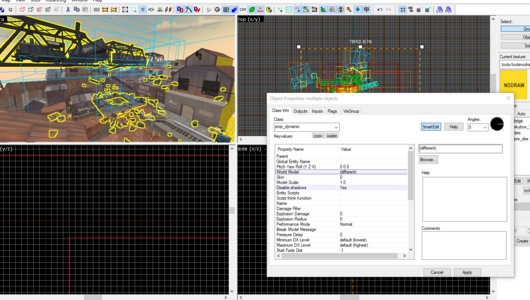
(Photo – 75)
After that, name all the models and disable the shadows.
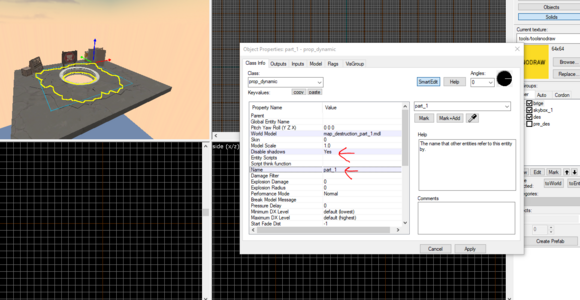
(Photo – 76)
Select pre- destruction models and name them too
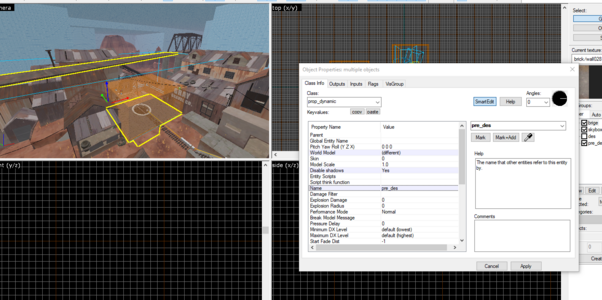
(Photo – 77)
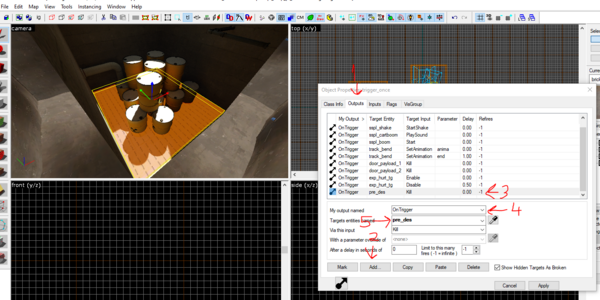
Open the payload explosion trigger on your map and add a new output here to destroy the pre-destruction models and make the settings in the photo and do the same for func_brushes
(Photo – 78)
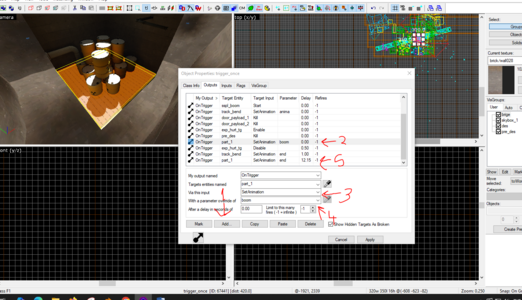
After that, select one of the names of the destruction models from the output section of the trigger and select the explosion animation. After that, copy the same output again and delay the last animation in accordance with the end time of the animation. Do this for the other models as well.
(Photo – 79)
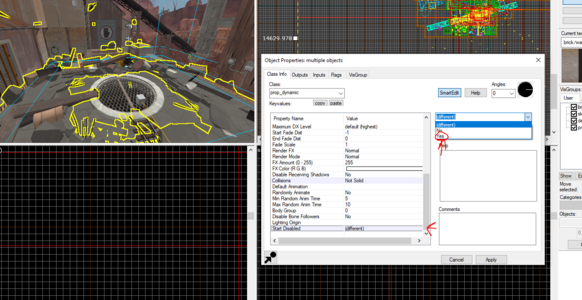
Don't forget to disable the destruction modes at the beginning
(Photo – 80)
And then don't forget to enable the models from the explosion trigger too.
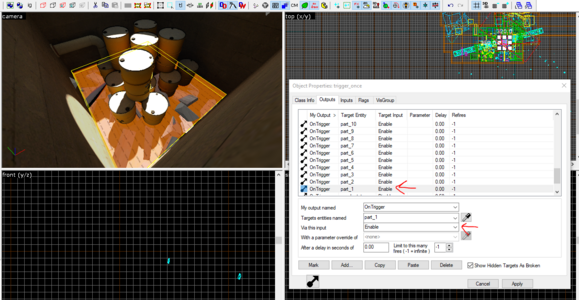
(Photo – 81)
After you have done everything, compile your map and test the destruction you have made in the game.
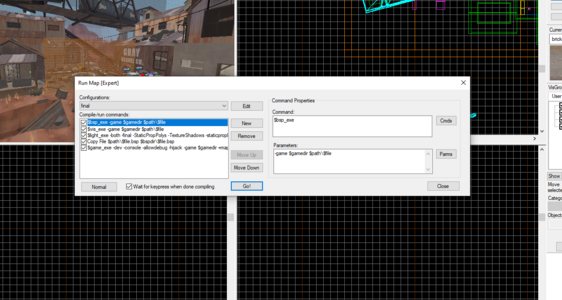
(Photo – 82)
And enjoy
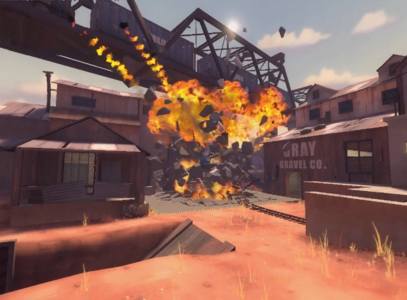
(Photo – 83)
14-) Destruction Collision (Optional)
If you want to give collision to demolition models, first make a model that will not be seen, this model will be a placeholder model for the collision
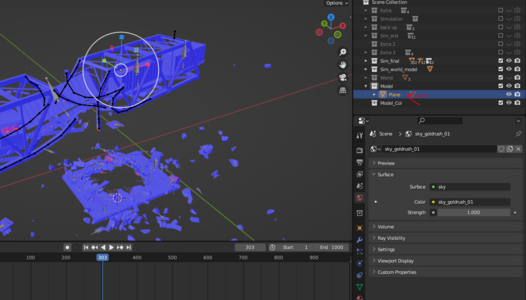
(Photo – 84)
Set the time to the end of the animation from the timeline
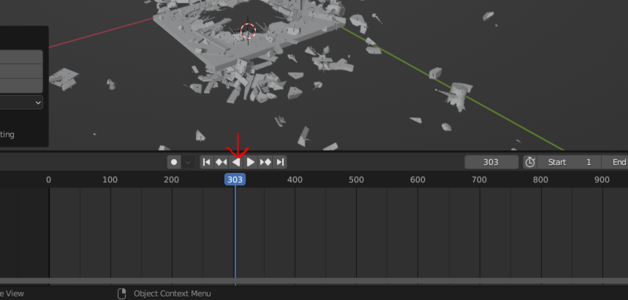
(Photo – 85)
Make a rough model of the model you want to give collision to and make the smoothness of the models 180
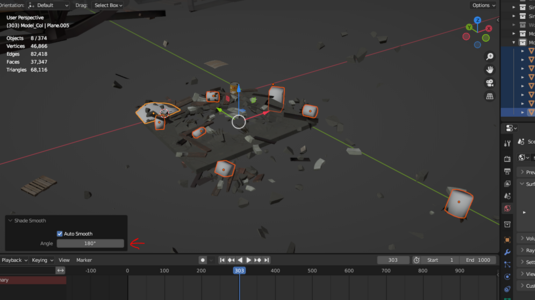
(Photo – 86)
Open Source Ops and create a new model here, put the model collision collection in the place where there is a model collision below and compile it
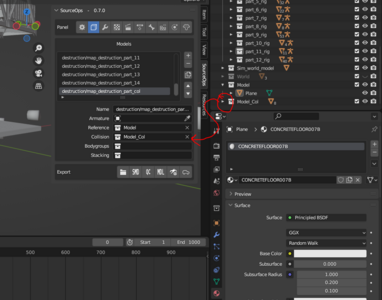
(Photo – 87)
Once your model is complete, place it in its proper place
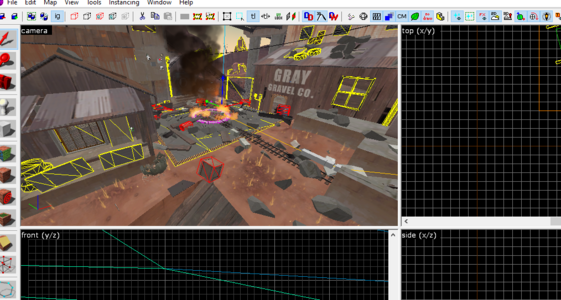
(Photo – 88)
Make the model a dynamic prop, give it a name and make the collisions not solid
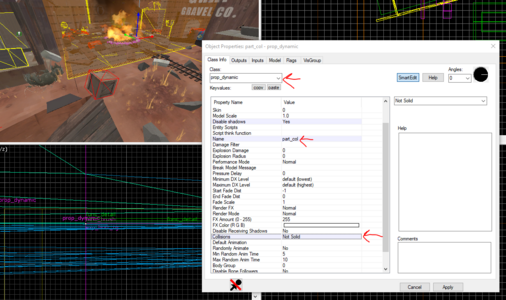
(Photo – 89)
After that, add the collision model to the output section of the payload explosion trigger and enable the collisions with delay here
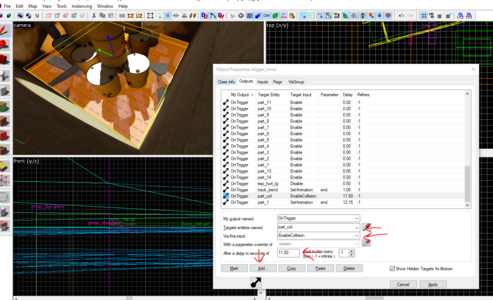
(Photo – 90)
(End of tutorial If there is an error in the tutorial, you can inform me from tf2 maps.)
Project Files (Download link for everything you see in the Tutorial)
https://www.mediafire.com/file/v7ifsy4nj24se4v/Tutorial.zip/file
Last edited:

