Spawn Problems
- Thread starter Knife
- Start date
You are using an out of date browser. It may not display this or other websites correctly.
You should upgrade or use an alternative browser.
You should upgrade or use an alternative browser.

T
The Asylum
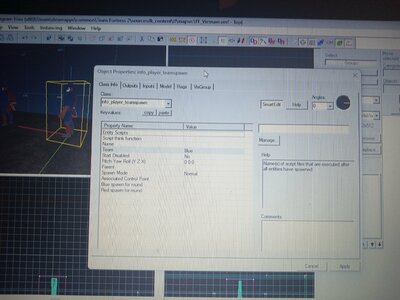
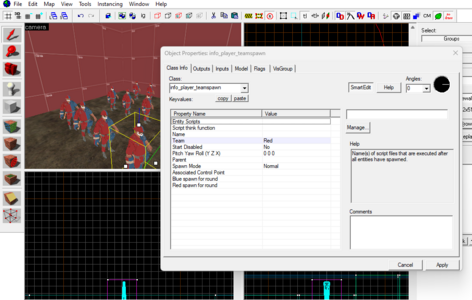
Make sure all of your spawnpoints are valid
 developer.valvesoftware.com
info_player_teamspawn - Valve Developer Community
This button, the red circle with an R in it, is bad! Compiling your map with it enabled can cause a huge section of your map to not exist in-game, and you obviously can't spawn in a place that doesn't exist.
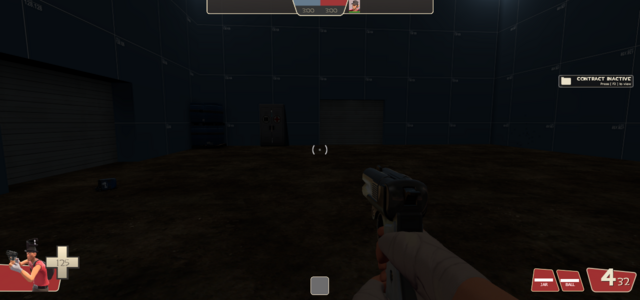
Also, I asked for screenshots of both spawns, Red and Blue, so please do that.
It looks like you are using an old version of Windows, so here is a tip how to take a screenshot:
Press the "Print Screen" button on your keyboard, then open Paint, press "Ctrl + V" to insert the screenshot, remove the parts of the image you don't want us to see (like the taskbar) and then save the picture.
On new versions of Windows (8 and above) you can simply press "Win + Shift + S" and drag a rectangle to take a screenshot, which you can then insert here on the forums with "Ctrl + V". I did that for my screenshot above.
One last thing I want to mention: For a few years now, all TF2 mappers use a modified version of Hammer, called "Hammer++". It is free to use. Installing it together with the ABS pack requires a slight bit of extra effort, though. If you want help with that, let me know.

Now I can also make out the shape of the windows better. Is this Windows 11? I remember Windows 7 and older also having rounded corners.
Anyway, to install Hammer++, you first need to download it from the official website: https://ficool2.github.io/HammerPlusPlus-Website/index.html
Feel free to look at the website for a bit. The videos in the "Index" tab showcase a ton of features. If you don't think these features are worth it, you can wait. If you enjoy mapping so far, I recommend installing it as soon as you can!
The whole installation boils down to copying some files from one folder to another, and I made sure to explain it as detailed as possible, so nothing can go wrong.
Click on the "Download" tab, scroll down, and click on the TF2 logo. Your browser should now be downloading a .zip file. You should also watch the first 2 minutes of the video on the top of the Download tab. It explains how to install Hammer++ for CS:GO, which has a few differences from TF2, but is still helpful.
Inside the .zip file should be a folder with the same name as the .zip itself. Right now, the .zip is called "hammerplusplus_tf2_build8864.zip" and the folder inside is called "hammerplusplus_tf2_build8864". Inside of that should be a text file called "README.txt" and a folder called "bin".
We will need that "bin" folder.
Find your game's installation folder. It should be "<steam install location>/steamapps/common/Team Fortress 2". You can also open it with Steam by right-clicking TF2 in the Steam library, then clicking on "Properties" on the bottom, then "Installed Files" on the left, and finally "Browse..." on the top right.
Here you will also find a folder called "bin". Be careful not to go inside the "tf" folder! The tf folder has its own bin folder, but it's a completely different thing that has nothing to do with mapping.
And now, just like the tutorial video said, copy everything from the bin folder you downloaded into the bin folder in your game files. If you did it right, "hammerplusplus.exe" should be right next to "hammer.exe".
You can now delete the .zip file.
To use Hammer++, just launch "hammerplusplus.exe". (The one you just copied into your game files.) I recommend making a shortcut to that, or pinning it to your task bar.
You will notice that the ABS pack isn't fully working. The spawns all use the green Gordon Freeman model! Here is how to fix it:
Open Hammer++, click on "Tools" on the top, then "Options" on the bottom of the list. You should have a window in front of you with the "Game Configurations" tab selected by default. Stay in this tab.
There is an "Add" button on the right, next to the "Game Data files:" list. Click this button and select the file "tf-abs.fgd". (If you can't find it, make sure you are in the game's bin folder.) That's it!
What is this file? When installing the ABS pack, this file is added to your game's bin folder and automatically added to Hammer by the installer. .fgd files control how entities are shown in the editor, and what properties you can edit. Hammer++ has its own settings, and the ABS pack installer is much older than Hammer++, so the final step of adding it to that list has to be done manually.
Also, the ABS fgd isn't the only community-made fgd file out there. ficool2, Da Spud Lord and Brokkhouse have all made their own fgd files as well, improving on the ABS one. I don't think you should bother with these just yet, though.