- Jan 27, 2010
- 65
- 118
Alternate title: Particle Control Points, AND YOU!
For this tutorial, I'm going to assume that you have a basic knowledge of the Particle Editor, and know how to make a simple continuously emitted particle, which is what these explanations stem from.
So let's say you want a laser effect for your map but you're too gosh darn lazy to do the measurements, or can't seem to get the movement angled properly. This is where particle control points come into play!
What the Dickens are Control Points?
Control points are invisible spots that can be set in the particle editor or through Hammer that can help dictate particle movement and placement. These allow for setting particles to go to precise locations and even allow them to do so while having one control point moving around. There's a few methods that can you can go about using them.
Before We Start…
Some useful tidbits of information you all should remember:
And with that, a good two to break you into are "Position Along Path Sequential" and "Position Along Path Random".
Position Along Path
“Position Along Path Sequential/Random” are particle initializers that create particles along a set 'string' between two control points. On this 'string', you can set how many particle spots there will be that they're allowed to spawn on, as well as the distance they can spawn away from these spots. The key difference between sequential and random is that sequential spawns them in order from the first control point you set, to the last with limited spawning points, while random spawns them wherever in between the two.
These initializers are used in place of “Position in Sphere/Box Random”, and set the info_particle_system that creates it to be Control Point 0. This also does not require a “Movement Basic”.
Move Particles Between 2 Control Points
“Move Particles Between 2 Control Points” is a particle initializer as well that pulls particles towards a set control point, killing them once they reach it (if a killing operator exists). The particles can only be moved with a ForceGenerator if this is present. Even if they move away from the control point, their lifespan is determined by the distance they spawned away from the control point with the initial spawning speed accounted for. The drag option in “Movement Basic” will slow the particles, but their lifespan will still be set as if it were a ForceGenerator doing it.
Constrain distance to path between two control points
This Constraint pulls particles between two control points similar to the previous initializer, however it prevents them from moving outside a designated range. This one can be used for a variety of tube-like effects. Both control points act slightly like gravity wells, pulling or throwing the particles towards them, which will lead to pinching particle streams in some cases
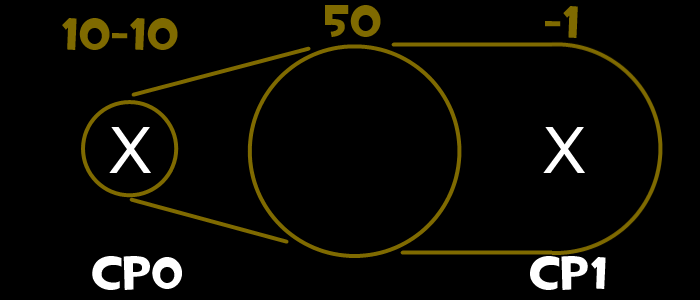
It’s a little tricky to describe how these effects work together. This is sadly where I have to say that experimentation is your best bet to learning how it works. However, I do have some diagrams that can help get an idea of some shapes you can make. The two numbers on the top left are the min-max distances, the middle one is the “maximum distance middle”, and the one in the top right is the “maximum distance end”. Assume CP0 is the start and CP1 is the end, so that the particles are traveling to the right.
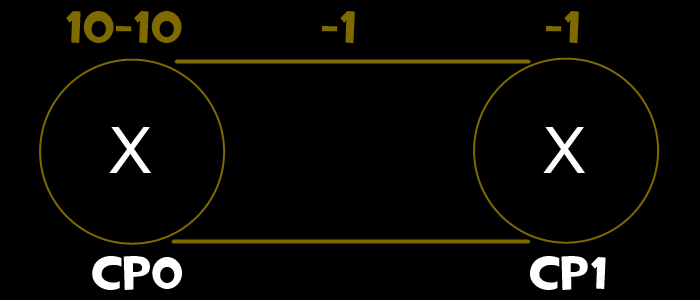
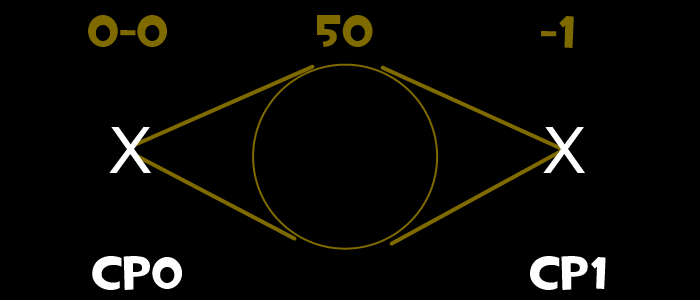
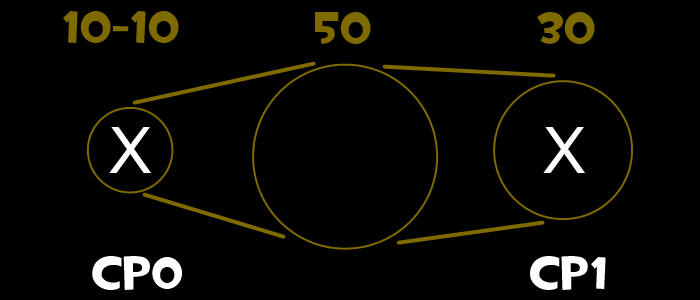
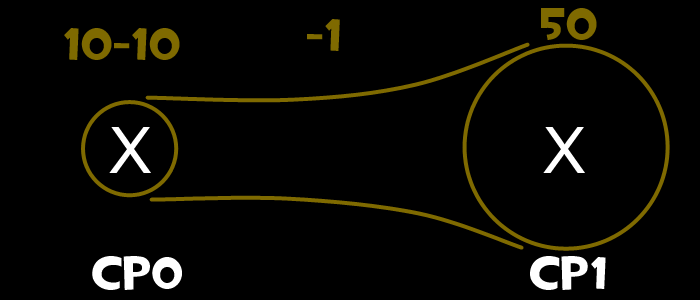
There are a lot of other options for particles that correspond with control points, however, this covers all of the methods to have the particles move in between CPs (to my knowledge). Here you can find a particle file with examples relating to these various options, and of each diagram (in order of how they appear of course). The Constraint ones flicker between blue and red to show which particles are younger and older respectively. They also have some other control point related effects applied for you to experiment with, and to see how they work. Also included in the pcf are examples of what not to do. Compare the initializers to see what's breaking them!
If you have any questions, complaints, or threats, feel free to say/ask them here, and I’ll try my best to get back with you.
For this tutorial, I'm going to assume that you have a basic knowledge of the Particle Editor, and know how to make a simple continuously emitted particle, which is what these explanations stem from.
So let's say you want a laser effect for your map but you're too gosh darn lazy to do the measurements, or can't seem to get the movement angled properly. This is where particle control points come into play!
What the Dickens are Control Points?
Control points are invisible spots that can be set in the particle editor or through Hammer that can help dictate particle movement and placement. These allow for setting particles to go to precise locations and even allow them to do so while having one control point moving around. There's a few methods that can you can go about using them.
Before We Start…
Some useful tidbits of information you all should remember:
- ”Position in Sphere/Box Random” is required for most control point related controllers. You should pretty much always have this.
- ”Position in Sphere/Box Random” by default has its control point set to 0, but can be changed if desired. If it's 0, the info_particle_system that creates it will be CP0.
- If the "Set Control Point Positions" operator is missing from the particle, then you'll need to set the control points in Hammer. Empty info_particle_systems make for good control points for other particles! In the editor though, you can move the control point location wherever you wish in by going to the Preview Panel's 'Ctrl Pts' tab. The XYZs will only appear when a control point is active.
- Order counts when messing with certain options! Examples of what can go wrong will be mentioned later.
- Don’t be afraid to experiment. I’m still learning new stuff with this crazy editor, and it’s all through trying new things.
- SAVE OFTEN and make backups of particles you’ll make drastic changes to! Source is prone to crashing, and can only remember so many undos.
- I only know so much. Like I said before, I don’t know everything and I’m still learning, so I’ll be skipping over some options that are either too finicky to get working or that I have no bloody idea how to work.
And with that, a good two to break you into are "Position Along Path Sequential" and "Position Along Path Random".
Position Along Path
“Position Along Path Sequential/Random” are particle initializers that create particles along a set 'string' between two control points. On this 'string', you can set how many particle spots there will be that they're allowed to spawn on, as well as the distance they can spawn away from these spots. The key difference between sequential and random is that sequential spawns them in order from the first control point you set, to the last with limited spawning points, while random spawns them wherever in between the two.
These initializers are used in place of “Position in Sphere/Box Random”, and set the info_particle_system that creates it to be Control Point 0. This also does not require a “Movement Basic”.
- maximum distance – The maximum distance that a particle can spawn from one of the spawn points.
- start control point number – The control point that the string will start on.
- end control point number - The control point that the string will end on.
- mid point position – The middle of where the string will be, with 0 being closer to the start and 1 being at the end. Can be used to create a higher density at one of the areas.
- particles to map from start to end – The amount of spawn points for the particles. (Sequential only)
- restart behavior (0 = bounce, 1 = loop) – This makes it so that the particles spawn in order from the start to end, then either restarts back at the first control point, or bounces back from the end to start. (Sequential only)
Move Particles Between 2 Control Points
“Move Particles Between 2 Control Points” is a particle initializer as well that pulls particles towards a set control point, killing them once they reach it (if a killing operator exists). The particles can only be moved with a ForceGenerator if this is present. Even if they move away from the control point, their lifespan is determined by the distance they spawned away from the control point with the initial spawning speed accounted for. The drag option in “Movement Basic” will slow the particles, but their lifespan will still be set as if it were a ForceGenerator doing it.
- minimum speed – The slowest speed that the particles will travel towards the control point.
- maximum speed – The fastest speed that the particles will travel towards the control point.
- end spread – This option makes the particles spread as they travel. It essentially turns the end control point into a sphere, with the particles having to end somewhere inside it.
- end control point – Pretty self-explanatory. Just be sure it’s not the control point the particles are spawning from.
Constrain distance to path between two control points
This Constraint pulls particles between two control points similar to the previous initializer, however it prevents them from moving outside a designated range. This one can be used for a variety of tube-like effects. Both control points act slightly like gravity wells, pulling or throwing the particles towards them, which will lead to pinching particle streams in some cases
- minimum distance – The shortest distance (as a sphere’s radius) that the particles should recognize the control points as… I think? Usually should be kept the same as the maximum distance.
- maximum distance – The maximum distance the particles are allowed to go between the two control points. Also the largest distance (as a sphere’s radius) that the particles should recognize the control points as.
- maximum distance middle – Makes the particles recognize the middle distance between the two points as a sphere, allowing for a bulge in the particle tube. If you don’t want this, leave it as -1, which defaults it to the “maximum distance”.
- maximum distance end – Makes the particles recognize the end control point as a sphere of that size. Should often be left -1, which defaults it to ”maximum distance middle”.
- travel time – The amount of seconds it takes for the particles to travel from the start control point’s sphere to the end’s sphere.
- start control point number – Pretty self-explanatory.
- end control point number - Pretty self-explanatory.
- mid point position - The middle of where the tube will be, with 0 being closer to the start and 1 being at the end. Can be used to make the particles travel faster at certain areas.
It’s a little tricky to describe how these effects work together. This is sadly where I have to say that experimentation is your best bet to learning how it works. However, I do have some diagrams that can help get an idea of some shapes you can make. The two numbers on the top left are the min-max distances, the middle one is the “maximum distance middle”, and the one in the top right is the “maximum distance end”. Assume CP0 is the start and CP1 is the end, so that the particles are traveling to the right.


There are a lot of other options for particles that correspond with control points, however, this covers all of the methods to have the particles move in between CPs (to my knowledge). Here you can find a particle file with examples relating to these various options, and of each diagram (in order of how they appear of course). The Constraint ones flicker between blue and red to show which particles are younger and older respectively. They also have some other control point related effects applied for you to experiment with, and to see how they work. Also included in the pcf are examples of what not to do. Compare the initializers to see what's breaking them!
If you have any questions, complaints, or threats, feel free to say/ask them here, and I’ll try my best to get back with you.
Last edited:


