
For TF2, but applies to any Source Engine game. If you have your own model, start from "Materials in Blender".
Table of Contents


Duplicate your mesh's collection, then for each piece of the collision model, do the following:

Create a .txt file and change the extension to .qc, or edit the existing .qc. The .qc file may be named anything.
The .qc file needs to contain several parameters.
If you need to add new skins to a model, then add/modify
Place the .vtf and .vmt in your materials folder. Your .vmt should be in the path specified by

Table of Contents
- Extracting Assets
- Decompiling Models
- Import to Blender
- Materials in Blender
- Creating a Collision Model
- Export From Blender
- Creating/Modifying a .qc File (Adding New Skins)
- Creating Material Files .vmt/.vtf
- Compiling Models
- Common Issues
Extracting Assets
GCFScape: https://developer.valvesoftware.com/wiki/GCFScape- Navigate to
C:\Program Files (x86)\Steam\steamapps\common\Team Fortress 2\tf - For model files/.vmt's, use GCFScape to open
tf2_misc_dir.vpk. For texture files/.vtf's, opentf2_textures_dir.vpk - For models, use GCFScape's search function. Type in the model's name and surround with asterisks (*), using "Match: Using Wildcards" EX:
*chair_01*. - Extract the model's six matching files with the following extensions: .dx80.vtx, .dx90.vtx, .mdl, .phy. sw.vtx, .vvd
- For textures, the process is similar. Extract the .vmt from
tf2_misc_dir.vpkand the .vtf fromtf2_textures_dir.vpk. The name is often shared with the model, but if there's more than one texture, the names can be found in the Materials In Blender section below.
Decompiling Models
Crowbar: https://developer.valvesoftware.com/wiki/Crowbar- Open Crowbar and select the "Decompile" tab.
- Set "MDL input:" using "Browse..." to select the model's .mdl file. All six of the previously extracted files should be in the same folder.
- Set "Output to:" using "Browser..." to your desired work folder.
- Click "Decompile" in the bottom left.
- Crowbar will generate a .qc files at least one .smd file
Import to Blender
Blender Source Tools: https://developer.valvesoftware.com/wiki/Blender_Source_Tools- Install Blender Source Tools.
- File > Import > Source Engine.
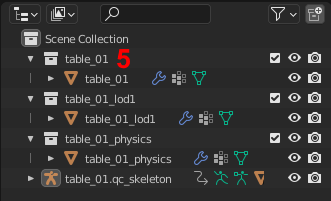
- Either select an individual .smd to load just that model, or the .qc to load every .smd, including the LODs, and the Physics models.
- If it is not an animated model, delete the Skeleton from the Scene Collection to remove unwanted rotation between Object/Edit mode.
Materials in Blender
- Select your model's mesh in Object Mode.
- Open the now visible "Material Properties" Tab.
- At the top, you can view Existing materials and their names, or create new ones.
- To create a new material, click the "+" icon.
- Then select it in the window and click "New".
- Then double-left click the material's name to rename it.
- In "Edit" mode, select the faces on your mesh you want to have a specific material, select the material from the window, then click "Assign".
- The names of the materials specified in Blender must match the names of each texture's .vmt file.
- If you are creating a new skin for a model, you do not need to add a new material.
Creating a Collision Model
A Collision Model must be made of individually convex pieces. Each piece must be shaded smooth and have no holes or incorrectly facing normals. If it is possible to draw a straight line that intersects with a model more than twice, that is, it enters, exits, and re-enters, then it is concave.Duplicate your mesh's collection, then for each piece of the collision model, do the following:
- Select a portion of your model.
- F3 > "Convex Hull".
- Ctrl + E > Clear Seams.
- Ctrl + E > Clear Sharp.
- F3 > "Shade Smooth".
- F3 > "Recalculate Outside".
- If your collision in game ends up as one solid piece, instead of concave, repeat the steps above. Ensure that there are no individually concave pieces, no holes, and every piece is shaded smooth.
Export From Blender
Blender Source Tools: https://developer.valvesoftware.com/wiki/Blender_Source_Tools- Enter the Scene Properties Tab.
- Under "Source Engine Export" define an Export Path.
- Set the Export Format. For TF2, SMD works.
- Click "Export" and select "Scene Export"
- Each Collection is exported as its own .smd. To rename a collection, double-left click the collection's name.
Creating/Modifying a .qc File
A .qc file defines various properties for a model and is necessary for compiling a model.Create a .txt file and change the extension to .qc, or edit the existing .qc. The .qc file may be named anything.
The .qc file needs to contain several parameters.
If you need to add new skins to a model, then add/modify
$texturegroup and change $modelname.Essential Parameters:
1.
$modelname "props_example\example_01.mdl". The name and path of the model, relative to the models folder.2.
$cdmaterials "models\props_example\". The path where the .vmt files are located, relative to the materials folder. You may have more than one with different paths if necessary.3.
$bodygroup The name and path of the base model's .smd, relative to the .qc file.
Code:
$bodygroup "body"
{
    studio "example_01.smd"
}
4.
$sequence "idle" "idle.smd". The name of an animation, followed by the path and name of the animation's .smd, relative to the .qc. Every model needs at least one, even if there are no animations. A default idle .smd is attached to this post.Common Parameters:
1.
$staticprop. Allows the prop to be used as a prop_static.2.
$surfaceprop "default". Defines footstep sounds and bullet decals. Full list: https://developer.valvesoftware.com/wiki/Material_surface_properties3.
$lod Controls the "Level of Detail" models. The first value defines the distance at which the LOD takes effect. You may have more than one LOD defined at different distances.
Code:
$lod 45
{
    replacemodel "example_01.smd" "example_01_lod1.smd"
    nofacial
}
4.
$collisionmodel Defines the name of the collision model's .smd. Include $concave if the collision is concave, and $maxconvexpieces as the number of convex pieces used to create the collision model.
Code:
$collisionmodel "example_01_physics.smd"
{
    $concave
    $maxconvexpieces 7
}
5.
$scale 1. Control the scale of the model. MUST come BEFORE the definition of any .smd file!
6.
$texturegroup Defines new texture skins. Only the materials which are being replaced need to be defined for Skin 0.
Code:
$texturegroup <name>
{
    { "<default material 1>" "<default material 2>" [...] } //Skin 0 (default)
    { "<new material 1>"     "<new material 2>"     [...] } //Skin 1
    [...]
}
Delete These Parameters:
$illumposition
$cbox
$bbox
$definebone
These parameters will be generated during compile. Leaving them as their old values may cause issues with the model.
Creating Material Files .vmt/.vtf
VTFEdit: https://developer.valvesoftware.com/wiki/VTFEdit- Open VTFEdit and use File > Import to import your texture file.
- File > Save As... to save your texture as a .vtf.
- Create a .txt file and change the extension to .vmt. This file's name should match the name of the material in Blender.
Code:
"VertexLitGeneric"
{
    "$basetexture" "models/props_example/exampleTexture_01"
}
Place the .vtf and .vmt in your materials folder. Your .vmt should be in the path specified by
$cdmaterials in your .qc.Compiling Models
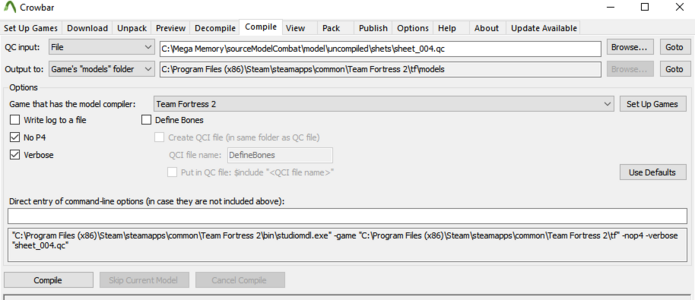
- Go to Crowbar's "Compile" tab.
- Set "QC input" to your .qc file.
- Set "Output to" to "Game's "models" folder" or a work folder if desired.
- Set Game to the one you're compiling for.
- Click "Compile"
Common Issues
- Model is invisible
- The model's textures are using
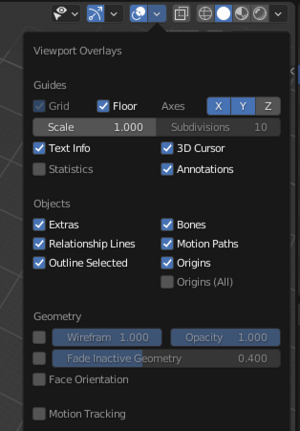
LightMappedGenericinstead ofVertexLitGenericorUnlitGeneric. - The model's normals are flipped. Enable "Face Orientation". Only blue sides should be showing, not red. Use F3 > Recalculate Outside, or F3 > Flip Normal for an individual face.
- The model's textures are using
- Model shows missing textures
- In the .qc,
$cdmaterialsis incorrect, or the .vmt files are not in the specified path. - The .vmt file does not point to where the .vtf file is located.
- The name of the .vmt file does not match the name specified in Blender's Material Properties tab.
- In the .qc,
- Model not Decompiling
- One of the six necessary files is missing/not in the folder with the .mdl. Check the log for Errors or Warnings.
- Model not Compiling
- One of the specified .smd's spelling does not match what is in the .qc or is missing. Check the log for Errors or Warnings.
- Collision is a solid block
- Collision model has a hole, is not made of entirely convex pieces, or is not entirely shaded smooth.
- Model disappears at some angles
- $ccbox and $bbox were not deleted from the model's .qc
Attachments

Last edited: