Okay, let's start from the beginning.
SteamCMD is a command-line tool that assists you in installing game server software. It's what you use the first time you download all the files needed for a TF2 server, and it's what you use to update that server. SteamCMD is not a game server itself, and does not come with any of the needed files to host one. The TF2 server files are around 6GB in size, so it's a big download and a long wait.
SteamCMD needs to be installed somewhere on your hard drive. You have done this in
C:\Users\Jnae\SteamCMD. Inside that directory you have an executable program file named
steamcmd.exe (though you may not see the .exe extension, depending on your Windows configuration). This is what you run to get to the command line interface that lets you download and update servers.
In order to set up a TF2 server, you need to tell SteamCMD to download all of the necessary files to a folder of your choosing. You have chosen to install your TF2 server in
F:\tfserva.
It does not matter where you put the .bat and .txt files. You can put them in your SteamCMD folder, or your TF2 server folder (F:\tfserva) or even on your Desktop if you like. You just have to make sure that wherever you put them, they are configured to point to the right locations. The .bat file needs to know where steamcmd.exe is, and the .txt file needs to know where your TF2 server directory is.
C:\Users\Jnae\SteamCMD\steamcmd.exe
F:\tfserva
So, let's say we are making the
validate .bat and .txt files and you want to put them in F:\tfserva for convenience.
validate_tf2.bat
validate_tf2.txt
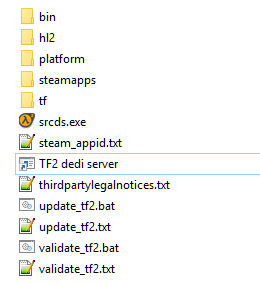
That should get SteamCMD to check all your TF2 server files, and download any that are missing or corrupt. When the download completes, your TF2 server directory should look something like this:
You can then run srcds.exe to start a server, or you can make a Windows shortcut for it and add some launch commands such as
-game tf -console +map ctf_turbine.


