AddOutput is an input in Hammer. If you aren't familiar with the IO system, this tutorial may be a bit confusing, so I'd advise you brush up on it before coming here. AddOutput is an output that does some funky stuff with outputs, so it would be really confusing if you don't know the basics.
Well, for starters, AddOutput is an input that can do one of two things:
For a video tutorial, for all those visual learners (which I highly recommend checking out since I show you it working in game), watch this guy over here:
View: https://www.youtube.com/watch?v=sUgOWOpjkhc
ADDING AN OUTPUT
It's pretty basic in concept (as well as in practice, don't let the syntax scare you) - all you do is add an output to another entity. Now before I explain how, let's ask - why?
Why would you want to add an output to another entity? Why not just have it there? Well, I'm glad you asked, Me, since that's what I'm gonna explain!
For this output in general, you can probably accomplish what you'd like to accomplish with multiple logic_relays, math_counters, and logic_cases. It's just a waste and unnecessarily complicated is all. There are also some cases that can't be solved with all those other entities, but you'll know when you get to them - I'm gonna discuss some other cases.
Now, when would you use this? Well, let's say you had a button that did one thing, but you wanted it to do an additional thing when a certain condition was met. Let's say you wanted to control the number of times an output was allowed to be fire, like only 13 times or something (without using a math_counter and logic_relay). Let's also say that you wanted to give the player a choice between a few buttons, but only display the result of the button the player picked when they hit a different button. All of those can be accomplished using AddOutput.
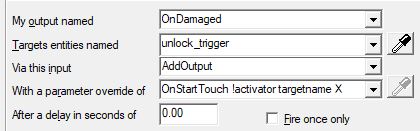
Now for the format. As described on the valve wiki page, the format goes like this:
You can use the image above for reference, but let's give a typed example:
That basically means that when a player touches this trigger, play the sound called my_sound with no additional parameters (since PlaySound doesn't accept any parameters), with no delay, and make it fire infinitely (meaning not fire once).
Remember that this is all in the Parameter section of the output and that there is a space instead of a colon between the output name and the target name.
Now that you're somewhat familiar with the format, let's move on to the cool cases. I won't be explaining each one in too much detail. I'll instead be posting pics of the output and giving short descriptions.

this one above is a button that makes another button play a sound upon being damaged. It is also set to only fire once, as that last number indicates

This one above is the same as the one before it, it just applies it to itself. The !self target is whatever the entity you're typing this on. This button will do nothing on the first hit but play a sound every time after.
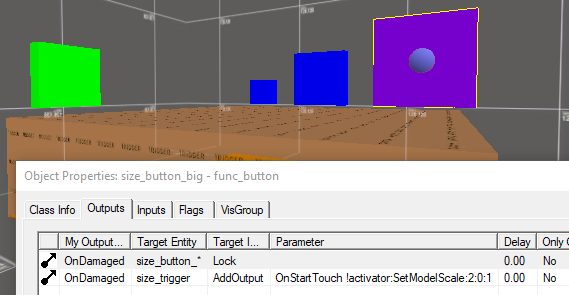
I had to take a pic of the viewport here since this one's a bit interesting. Each button adds a different output to the trigger that fires once. The trigger is blank and disabled by default, but the green button enables it and then disables it directly after. With this method over here, we can have buttons add different outputs to a trigger and only having the trigger's output be applied upon the player hitting another button. Basically, we have a custom trigger that can be enabled whenever!

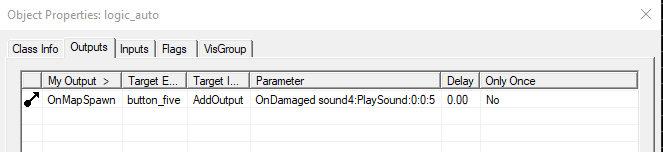
This one was pasted above before, but the thing that makes this special is the last number in the parameter.
This is a logic_auto that adds a normal output to a button, but the 5 there makes it fire 5 times and then stop. As opposed to having fire once or fire forever, you can add a custom amount!
Well, that's all for this part. Of course there are many other cases, but get creative, ya dingus! Let's move on to changing an entity's property's value:
CHANGING PROPERTY VALUES

Now this guy's got less syntax, but you have to keep a few things in mind. Before we get to that, like before, let's discuss why you'd use this guy in the first place.
Some examples of its use are changing properties of a filter. You can also change which filter a trigger/button accepts. You can change the targetname of an entity to give it a whole nother set of inputs! On top of all that (and much more) you can change certain properties of the player! Yup! The player is considered an entity and has got a few properties you can mess with which makes for some rather interesting uses.
Now for the syntax. It's super simple. As before it's gonna be in the Parameter section, but an important thing to note is that the name HAS to be the actual property name, not the Smart Edit name. You'll have to turn it off to see the actual name you'll be using. You just have to put
W let's look at a few examples:
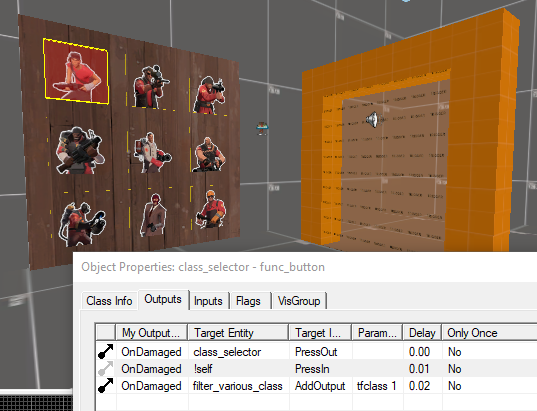
needed to include the viewport for reference. This guy here has 9 buttons which each change a filter named filter_various_class to a different tfclass. The classes are in numbers from 1 to 9. Each button corresponds to its class. The filter affects the trigger which plays a sound OnStartTouch.

Now, this isn't a super functional thing to do. This is a button that changes the speed of a func_door_rotating. There's one problem though - the speed doesn't change! Not unless it gets fully closed or collides with an object. If this button is hit while the brush is rotating, nothing will happen. Not until it closes or collides with something (can be the player).
That's just to show that many times the property that's value was changed won't necessarily update. It may wait for an event such as OnMapLoad or OnCollide or something else. Test things! TEST THEM!

Now this one is pretty interesting. This time it changes a property of the player, the one who pressed it, the !activator. This specific property it's changing is the origin. In this way you can set the coordinates to teleport to without the player getting into a trigger_teleport! This means it doesn't matter where the player is, as long as the player presses the button, he'll get teleported!
An important thing to note is that you have to use OnPressed instead of OnDamaged. You can tick damage activates so that it's essentially the same thing, but the reason why is that there is no !activator for OnDamaged, only Onpressed.
Now, I'll leave you with a list of things that can be applied to the player. Some things here are not an AddOutput, but that should be fine for most purposes. They're all outputs which means you can use them with buttons.
Output
|
Target
|
Input
|
Parameter
|
What it does
OnSomething|!activator|AddOutput|targetname [string]|Changes player name to be used with filter_activator_name
OnSomething|!activator|AddOutput|SetDamageFilter [damage filter name]|Changes what source can damage player.
OnSomething|!activator|AddOutput|origin [X, Y, Z]|Teleport Player to coordinates
OnSomething|!activator|AddOutput|basevelocity [X, Y, Z]|Shoots player in desired direction. Acts like trigger_impulse
OnSomething|!activator|AddOutput|gravity [? - ?]|Acts like trigger_gravity. negative values only work once player is in air. 0 does nothing.
OnSomething|!activator|AddOutput|health [integer]|Sets health to a certain value. Over max health will result in overheal, negative is glitched
OnSomething|!activator|SetHealth|[integer]|same as above, but no overheal. max health and 0 are limits.
OnSomething|!activator|AddOutput|renderColor [R, G, B]|Adds tint to player.
OnSomething|!activator|Color|[R, G, B]|Does same thing as above.
OnSomething|!activator|SetTeam|[0/1/2/3]|Changes player's team. 1=spectate 2=red 3=blue 0=none. Acts like team glitch, can only join team through console
OnSomething|!activator|AddOutput|rendermode [integer]|Changes rendermode. Not too well versed in the effects.
OnSomething|!activator|Alpha|0|Values other than 1 make player invisible. Only works if rendermode is set to 1
OnSomething|!activator|SetModelScale|[? - ?]|Changes player model. negative values may crash TF2
The maps I've used in the video, where these examples come from, are attached to the thread. Download them and mess around to get a feel for how AddOutput works. The video may also prove as a great resource as it acts as a visual demonstration as well.
Hapyy Mapping!
Well, for starters, AddOutput is an input that can do one of two things:
- Add an output to another entity (as its name implies)
- Change the value of a property of another entity
For a video tutorial, for all those visual learners (which I highly recommend checking out since I show you it working in game), watch this guy over here:
ADDING AN OUTPUT
It's pretty basic in concept (as well as in practice, don't let the syntax scare you) - all you do is add an output to another entity. Now before I explain how, let's ask - why?
Why would you want to add an output to another entity? Why not just have it there? Well, I'm glad you asked, Me, since that's what I'm gonna explain!
For this output in general, you can probably accomplish what you'd like to accomplish with multiple logic_relays, math_counters, and logic_cases. It's just a waste and unnecessarily complicated is all. There are also some cases that can't be solved with all those other entities, but you'll know when you get to them - I'm gonna discuss some other cases.
Now, when would you use this? Well, let's say you had a button that did one thing, but you wanted it to do an additional thing when a certain condition was met. Let's say you wanted to control the number of times an output was allowed to be fire, like only 13 times or something (without using a math_counter and logic_relay). Let's also say that you wanted to give the player a choice between a few buttons, but only display the result of the button the player picked when they hit a different button. All of those can be accomplished using AddOutput.
Now for the format. As described on the valve wiki page, the format goes like this:
Code:
<output name> <targetname>:<inputname>:<parameter>:<delay>:<max times to fire, -1 means infinite>You can use the image above for reference, but let's give a typed example:
Code:
OnStartTouch my_sound:PlaySound:0:0:-1Remember that this is all in the Parameter section of the output and that there is a space instead of a colon between the output name and the target name.
Now that you're somewhat familiar with the format, let's move on to the cool cases. I won't be explaining each one in too much detail. I'll instead be posting pics of the output and giving short descriptions.
this one above is a button that makes another button play a sound upon being damaged. It is also set to only fire once, as that last number indicates
This one above is the same as the one before it, it just applies it to itself. The !self target is whatever the entity you're typing this on. This button will do nothing on the first hit but play a sound every time after.
I had to take a pic of the viewport here since this one's a bit interesting. Each button adds a different output to the trigger that fires once. The trigger is blank and disabled by default, but the green button enables it and then disables it directly after. With this method over here, we can have buttons add different outputs to a trigger and only having the trigger's output be applied upon the player hitting another button. Basically, we have a custom trigger that can be enabled whenever!
This one was pasted above before, but the thing that makes this special is the last number in the parameter.
This is a logic_auto that adds a normal output to a button, but the 5 there makes it fire 5 times and then stop. As opposed to having fire once or fire forever, you can add a custom amount!
Well, that's all for this part. Of course there are many other cases, but get creative, ya dingus! Let's move on to changing an entity's property's value:
CHANGING PROPERTY VALUES
Now this guy's got less syntax, but you have to keep a few things in mind. Before we get to that, like before, let's discuss why you'd use this guy in the first place.
Some examples of its use are changing properties of a filter. You can also change which filter a trigger/button accepts. You can change the targetname of an entity to give it a whole nother set of inputs! On top of all that (and much more) you can change certain properties of the player! Yup! The player is considered an entity and has got a few properties you can mess with which makes for some rather interesting uses.
Now for the syntax. It's super simple. As before it's gonna be in the Parameter section, but an important thing to note is that the name HAS to be the actual property name, not the Smart Edit name. You'll have to turn it off to see the actual name you'll be using. You just have to put
Code:
<property to change> <value to change to>needed to include the viewport for reference. This guy here has 9 buttons which each change a filter named filter_various_class to a different tfclass. The classes are in numbers from 1 to 9. Each button corresponds to its class. The filter affects the trigger which plays a sound OnStartTouch.
Now, this isn't a super functional thing to do. This is a button that changes the speed of a func_door_rotating. There's one problem though - the speed doesn't change! Not unless it gets fully closed or collides with an object. If this button is hit while the brush is rotating, nothing will happen. Not until it closes or collides with something (can be the player).
That's just to show that many times the property that's value was changed won't necessarily update. It may wait for an event such as OnMapLoad or OnCollide or something else. Test things! TEST THEM!
Now this one is pretty interesting. This time it changes a property of the player, the one who pressed it, the !activator. This specific property it's changing is the origin. In this way you can set the coordinates to teleport to without the player getting into a trigger_teleport! This means it doesn't matter where the player is, as long as the player presses the button, he'll get teleported!
An important thing to note is that you have to use OnPressed instead of OnDamaged. You can tick damage activates so that it's essentially the same thing, but the reason why is that there is no !activator for OnDamaged, only Onpressed.
Now, I'll leave you with a list of things that can be applied to the player. Some things here are not an AddOutput, but that should be fine for most purposes. They're all outputs which means you can use them with buttons.
OnSomething|!activator|AddOutput|targetname [string]|Changes player name to be used with filter_activator_name
OnSomething|!activator|AddOutput|SetDamageFilter [damage filter name]|Changes what source can damage player.
OnSomething|!activator|AddOutput|origin [X, Y, Z]|Teleport Player to coordinates
OnSomething|!activator|AddOutput|basevelocity [X, Y, Z]|Shoots player in desired direction. Acts like trigger_impulse
OnSomething|!activator|AddOutput|gravity [? - ?]|Acts like trigger_gravity. negative values only work once player is in air. 0 does nothing.
OnSomething|!activator|AddOutput|health [integer]|Sets health to a certain value. Over max health will result in overheal, negative is glitched
OnSomething|!activator|SetHealth|[integer]|same as above, but no overheal. max health and 0 are limits.
OnSomething|!activator|AddOutput|renderColor [R, G, B]|Adds tint to player.
OnSomething|!activator|Color|[R, G, B]|Does same thing as above.
OnSomething|!activator|SetTeam|[0/1/2/3]|Changes player's team. 1=spectate 2=red 3=blue 0=none. Acts like team glitch, can only join team through console
OnSomething|!activator|AddOutput|rendermode [integer]|Changes rendermode. Not too well versed in the effects.
OnSomething|!activator|Alpha|0|Values other than 1 make player invisible. Only works if rendermode is set to 1
OnSomething|!activator|SetModelScale|[? - ?]|Changes player model. negative values may crash TF2
The maps I've used in the video, where these examples come from, are attached to the thread. Download them and mess around to get a feel for how AddOutput works. The video may also prove as a great resource as it acts as a visual demonstration as well.
Hapyy Mapping!
Attachments
Last edited: