- Nov 18, 2017
- 8
- 1
Hello Guys,
This past month, I've been working on my second map ever: Koth_Guttersplit.
My experience with level design in the past was only with single player games so I wanted to try something new.
I also didn't want to just copy-paste a formula (Koth_viaduct in mind) to really think about the layout.
The result is a very open map that seems to throw off a lot of people for reasons I don't deeply understand.
One feedback that kind-of hurt me was "This looks like a playground that was thrown off without much of a though" or something along those lines.
The post is my attempt at explaining my process behind the creation. This way, I hope more experienced mappers will see the flaws in my logic and help me improve my work.
Let's start with naming areas, so we're all on the same point.
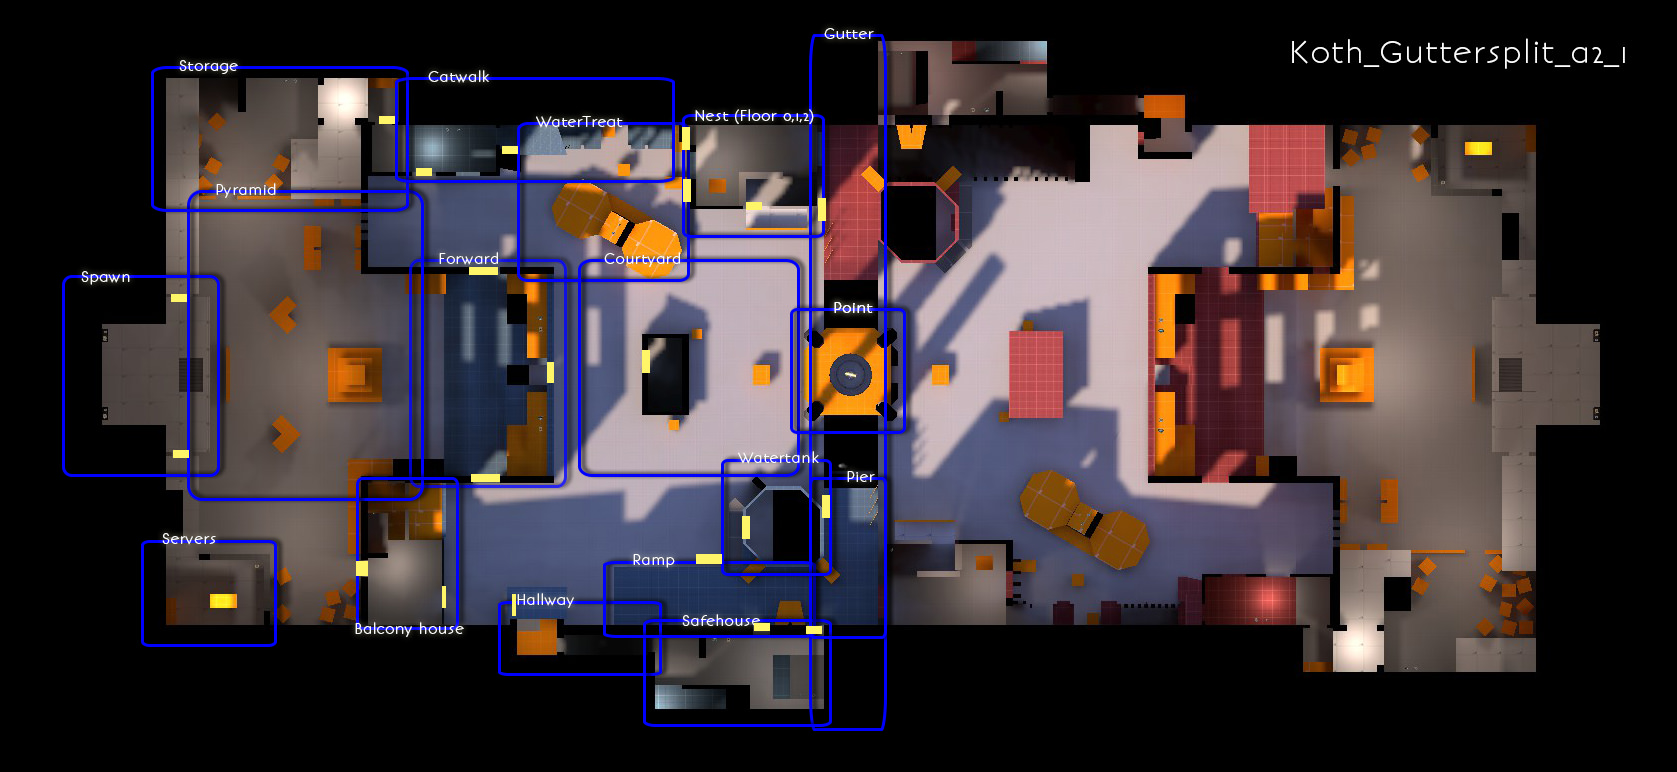
The point
The idea started with the gullywash point. I liked the fact that the point was dominating the flanks at the expense of being cramped and risking to be thrown off lower.
I didn't really liked the fact that you couldn't quickly get up there if you had to.
So i compromised :
You can get up from courtyard at the expense of cover
You have the high grounds by taking the pier. Howerver, there's no going back up. You have to commit !
Under the point, there's health and ammo. You can reach it either by croushing through an opening (slow) or skillfully jumping in from the sides ( Quick but no covers ).
Watertank
Watertank was placed here so you'd have cover from the ennemy pier but also, so it'll take longer to reach yours. (Contrasting with the quick but coverless access of Courtyard)
If you jump on the watertank, you have to be on the very edge, effectivly trading highgrounds against cover. (This was the same effect with lava).
Soldiers can spam the point this way but have to trade health for it (Rocket jump) and have to retreat to gain health and ammo.
You can, however, reach the top of Watertank by using the orange modules of Ramp and some skillfull crouchjumps.
Falling in the watertanks means getting back in the courtayard (Unless you're a jump class)
This spot is also a great way to spam the enemy sniper nest too.
The catwalk from tank can be used as a flanking route to Ramp from ennemies coming from Gutter/Courtyard
Pier and Ramp
The junction of those two were supposed to be the place to prepare your push, build uber, recharge health, maybe put an agressive TELE.
Playtest shown that is was too vulnarableto flank routes and jumping class so i've pushed back this function to safehouse.
The access to ramp is guarded by the ennemy sniper nest but reaching it means health and safety.
Safehouse and hallway
As said above, safehouse is were you prepare your push. You can build a sentry in here and there is not a lot of flank routes for the ennemy to creep in (Gutter, entrances from Ramp)
Hallway serves as a longer but safer option to reach Safehouse. You can completrly avoid sniper sighlines from snipernest if you come from BalconyHouse. This should negate the impact of extremely skillfull snipers that cannot be counter-sniped.
Balcony House
A way to counter-snipe Sniper-nest. You have more hiding spot than him and also more healthpack and ammo but loose a lot visibily on the point and basically can't see the enemy Pier/Ramp
This can serve as a flank route for ennemies to Pyramid (Especially Spies)
Pyramid
A quick and cover-full way to get to Forward (Quickest and most flexible way to the point)
Let the ennemies set up ambush. High roads for scouts and skillfull spies (You can go from storage to servers without touching the ground)
Severs
Ennemi spies can decloak, hide and recharge cloak here, at the expense of having only one exit.
You can get out by the windows by crouching, wich make you slower, and an easier target.
Spawnroom :
Take the side doors for a height advantage on spawn camping pricks.
Take the trapdoor for a quick access and frontcover. This is were the TP will most likly be. Carefull of backstabbing frenchmans and pyros.
The glass always you to directly see the point, assessing the situation and directing the new player towards his objective.
Storage :
A longer but safer way to reach catwalk.
Can be used for ambush by the ennemy as you can hide among the crates.
Catwalk :
Can be reached by coming from Forward (No cover) or Storage (Cover, longer route)
Used to reach Snipernest ( Floor 2)
Multiple spots to countersnipe the enemy Sniper-nest at the expense of vision on their Pier
Snipernest (Floor 2)
Deny the access to the ennemy ramp at the expense of sight line on the point.
Can be shot/Spammed from a lot of places. (But not the ennemy Snipernest)
There's a small window where the sniper can see part of the point but is also exposed to the ennemy snipernest
From there, you can drop down to Floor 1
Nest (Floor 1)
Can be quiclky accessed form water-treat but doing so give the info the ennemy team on Pier/ramp, as there is a Window there.
Dropping down from floor 2 gives you a conceled acces to the balcony which can be used either as an attacking point to the ennemy safe house or as a flanking route the the ennemy pushing from Pier to Point
This can be used by the ennemy team to flank Watertreat or reach Nest (Floor 0)
Nest (Floor 0)
Lot of ammo and health make for a good place to reatreat when defending the points flanks / UnderPier.
Can be used as a sentry spot that covers Flanks and part of the point but can be spammed from the ennemi's right courtyard or can be dropped on from floor 1, Giving the ennemy both health and Heigh Advantage.
Watertreat
At the same level of the point. A good spot to covert yourself at the expense of sightline of the ennemies pier. Can be used to reach Nest Floor 1 with skillfull jumps.
Courtyard
Despite the shed, a coverless area. Quickly reach any point of your side or the ennemy Courtyard by running through this no man's land. Quick but coveless access to the point.
The shed can be used either by your allies as a defensive position, (Maybe put a sentry or a TP here) or the opposing team as Highground and covers from peoples coming from Forward.
Forward
A safe place to retreat and patch up. Visibility on the battlefield, thanks to the huge glass but also pretty far from the point. Ennemies can't see you coming from here due to the inclination.
Gutter
An way to travese the map sideway by being hidden. Can be used to reach safehouse.
Mostly used to slow down the flanking routes around the point / From under Pier.
Generalities
I think Snipers aren't overpowered on this map because most of the good sightlines don't have great covers or can be easily accessed by a scout or a rocket-jumping soldier.
IMO, Where to find most classes :
Scouts : Flanking the point or Underpier
Soldiers : Spamming the point from WaterTank or jumping to pick threats (Courtyard's shed, Ennemy Pier)
Pyros : Reflecting people of the point or protecting it from spam. Flanking UnderPier/Nest Floor1
Demo : Spaming Snipernest From Ramp, Spamming the point from courtyard & Reatreating to Watertreat
Heavy : Building Uber on Pier for a push or flanking through Nest Floor 1 balcony
Engi : Building in safehouse or Nest Floor 0, Maybe Minis in courtyard.
Sniper : In the sniper nest, In counter sniping positions (Catwalk/BalconyHouse)
Medic : Building At ramp/Safehouse/forward, healing from courtyard on friendly pushes.
Spies : Ambush from BalconyHouse, Flank from gutter to Safehouse, Ambush in Pyramid.
Thanks a lot for reading everything.
Your constructive feedback are more than welcomed !
This past month, I've been working on my second map ever: Koth_Guttersplit.
My experience with level design in the past was only with single player games so I wanted to try something new.
I also didn't want to just copy-paste a formula (Koth_viaduct in mind) to really think about the layout.
The result is a very open map that seems to throw off a lot of people for reasons I don't deeply understand.
One feedback that kind-of hurt me was "This looks like a playground that was thrown off without much of a though" or something along those lines.
The post is my attempt at explaining my process behind the creation. This way, I hope more experienced mappers will see the flaws in my logic and help me improve my work.
Let's start with naming areas, so we're all on the same point.
The point
The idea started with the gullywash point. I liked the fact that the point was dominating the flanks at the expense of being cramped and risking to be thrown off lower.
I didn't really liked the fact that you couldn't quickly get up there if you had to.
So i compromised :
You can get up from courtyard at the expense of cover
You have the high grounds by taking the pier. Howerver, there's no going back up. You have to commit !
Under the point, there's health and ammo. You can reach it either by croushing through an opening (slow) or skillfully jumping in from the sides ( Quick but no covers ).
Watertank
Watertank was placed here so you'd have cover from the ennemy pier but also, so it'll take longer to reach yours. (Contrasting with the quick but coverless access of Courtyard)
If you jump on the watertank, you have to be on the very edge, effectivly trading highgrounds against cover. (This was the same effect with lava).
Soldiers can spam the point this way but have to trade health for it (Rocket jump) and have to retreat to gain health and ammo.
You can, however, reach the top of Watertank by using the orange modules of Ramp and some skillfull crouchjumps.
Falling in the watertanks means getting back in the courtayard (Unless you're a jump class)
This spot is also a great way to spam the enemy sniper nest too.
The catwalk from tank can be used as a flanking route to Ramp from ennemies coming from Gutter/Courtyard
Pier and Ramp
The junction of those two were supposed to be the place to prepare your push, build uber, recharge health, maybe put an agressive TELE.
Playtest shown that is was too vulnarableto flank routes and jumping class so i've pushed back this function to safehouse.
The access to ramp is guarded by the ennemy sniper nest but reaching it means health and safety.
Safehouse and hallway
As said above, safehouse is were you prepare your push. You can build a sentry in here and there is not a lot of flank routes for the ennemy to creep in (Gutter, entrances from Ramp)
Hallway serves as a longer but safer option to reach Safehouse. You can completrly avoid sniper sighlines from snipernest if you come from BalconyHouse. This should negate the impact of extremely skillfull snipers that cannot be counter-sniped.
Balcony House
A way to counter-snipe Sniper-nest. You have more hiding spot than him and also more healthpack and ammo but loose a lot visibily on the point and basically can't see the enemy Pier/Ramp
This can serve as a flank route for ennemies to Pyramid (Especially Spies)
Pyramid
A quick and cover-full way to get to Forward (Quickest and most flexible way to the point)
Let the ennemies set up ambush. High roads for scouts and skillfull spies (You can go from storage to servers without touching the ground)
Severs
Ennemi spies can decloak, hide and recharge cloak here, at the expense of having only one exit.
You can get out by the windows by crouching, wich make you slower, and an easier target.
Spawnroom :
Take the side doors for a height advantage on spawn camping pricks.
Take the trapdoor for a quick access and frontcover. This is were the TP will most likly be. Carefull of backstabbing frenchmans and pyros.
The glass always you to directly see the point, assessing the situation and directing the new player towards his objective.
Storage :
A longer but safer way to reach catwalk.
Can be used for ambush by the ennemy as you can hide among the crates.
Catwalk :
Can be reached by coming from Forward (No cover) or Storage (Cover, longer route)
Used to reach Snipernest ( Floor 2)
Multiple spots to countersnipe the enemy Sniper-nest at the expense of vision on their Pier
Snipernest (Floor 2)
Deny the access to the ennemy ramp at the expense of sight line on the point.
Can be shot/Spammed from a lot of places. (But not the ennemy Snipernest)
There's a small window where the sniper can see part of the point but is also exposed to the ennemy snipernest
From there, you can drop down to Floor 1
Nest (Floor 1)
Can be quiclky accessed form water-treat but doing so give the info the ennemy team on Pier/ramp, as there is a Window there.
Dropping down from floor 2 gives you a conceled acces to the balcony which can be used either as an attacking point to the ennemy safe house or as a flanking route the the ennemy pushing from Pier to Point
This can be used by the ennemy team to flank Watertreat or reach Nest (Floor 0)
Nest (Floor 0)
Lot of ammo and health make for a good place to reatreat when defending the points flanks / UnderPier.
Can be used as a sentry spot that covers Flanks and part of the point but can be spammed from the ennemi's right courtyard or can be dropped on from floor 1, Giving the ennemy both health and Heigh Advantage.
Watertreat
At the same level of the point. A good spot to covert yourself at the expense of sightline of the ennemies pier. Can be used to reach Nest Floor 1 with skillfull jumps.
Courtyard
Despite the shed, a coverless area. Quickly reach any point of your side or the ennemy Courtyard by running through this no man's land. Quick but coveless access to the point.
The shed can be used either by your allies as a defensive position, (Maybe put a sentry or a TP here) or the opposing team as Highground and covers from peoples coming from Forward.
Forward
A safe place to retreat and patch up. Visibility on the battlefield, thanks to the huge glass but also pretty far from the point. Ennemies can't see you coming from here due to the inclination.
Gutter
An way to travese the map sideway by being hidden. Can be used to reach safehouse.
Mostly used to slow down the flanking routes around the point / From under Pier.
Generalities
I think Snipers aren't overpowered on this map because most of the good sightlines don't have great covers or can be easily accessed by a scout or a rocket-jumping soldier.
IMO, Where to find most classes :
Scouts : Flanking the point or Underpier
Soldiers : Spamming the point from WaterTank or jumping to pick threats (Courtyard's shed, Ennemy Pier)
Pyros : Reflecting people of the point or protecting it from spam. Flanking UnderPier/Nest Floor1
Demo : Spaming Snipernest From Ramp, Spamming the point from courtyard & Reatreating to Watertreat
Heavy : Building Uber on Pier for a push or flanking through Nest Floor 1 balcony
Engi : Building in safehouse or Nest Floor 0, Maybe Minis in courtyard.
Sniper : In the sniper nest, In counter sniping positions (Catwalk/BalconyHouse)
Medic : Building At ramp/Safehouse/forward, healing from courtyard on friendly pushes.
Spies : Ambush from BalconyHouse, Flank from gutter to Safehouse, Ambush in Pyramid.
Thanks a lot for reading everything.
Your constructive feedback are more than welcomed !