- Jul 29, 2016
- 128
- 137
Models generated by propper from brush work don't support light mapping via prop statics by default. Here is how to use blender (2.79) to fix that. I won't bother covering creating props using propper as that has already been covered. All I care about is that you have a smd created by propper.
Extra resources to help those who don't know what they are doing:
DrSquishy's Guide to getting propper to work
Generic blender navigation tutorial
Requires:
Blender (The 3d modeling software)
Blender source tools (Importing and Exporting source model files)
VTF Edit or equivalent (To convert vtf into either tga or png and back.)
GCFscape (To get the materials from your source game)
I assume you already know how to extract the texture files from the vpks, so I'll skip that.
Step 1: Import your smd into blender.
Simple enough, I don't think I need to explain this.
Optionally, if you know what you are doing and how to do so, you can optimize the mesh manually in blender, making it one continuous mesh rather than a bunch of brushes. I will not cover this.
Step 2: Set your render type to Cycles.

This is possible in blender render, but this guide will show you how to do this in cycles.
Also, move over the right and set it on the edge here. Drag click this boundary left to see all of the different properties. I'd say this is a good amount for me.

Oh, and if you haven't already, select your mesh. Else you're probably selecting the armature blender created when importing the mesh.
Step 3: Creating a second UV map.
Step 4: Unwrapping the new UV map
Step 5: Preparing the texture for baking
I should explain what is going on here. What we are going is specifying to blender to take our "rendered" texture, what was attached to the node, and baking that information onto the texture that is selected in the materials panel.
Simply put:
Rendered UV map -> Selected UV map
Rendered Material -> Selected Texture
Step 6: Baking the texture in cycles and Exporting the Processed Image and Model
Step 7: Compiling
Everything from here on is standard model creation for source. I recommend using crowbar to compile.
I could potentially go more in depth, but that's already information covered in standard tutorials anyways. Hopefully this was helpful for some people.
Extra resources to help those who don't know what they are doing:
DrSquishy's Guide to getting propper to work
Generic blender navigation tutorial
Requires:
Blender (The 3d modeling software)
Blender source tools (Importing and Exporting source model files)
VTF Edit or equivalent (To convert vtf into either tga or png and back.)
GCFscape (To get the materials from your source game)
I assume you already know how to extract the texture files from the vpks, so I'll skip that.
Step 1: Import your smd into blender.
Simple enough, I don't think I need to explain this.
Optionally, if you know what you are doing and how to do so, you can optimize the mesh manually in blender, making it one continuous mesh rather than a bunch of brushes. I will not cover this.
Step 2: Set your render type to Cycles.
This is possible in blender render, but this guide will show you how to do this in cycles.
Also, move over the right and set it on the edge here. Drag click this boundary left to see all of the different properties. I'd say this is a good amount for me.
Oh, and if you haven't already, select your mesh. Else you're probably selecting the armature blender created when importing the mesh.
Step 3: Creating a second UV map.
When doing this step, make sure you include all materials when unwrapping, you'll be merging them into one texture file so light mapping works.
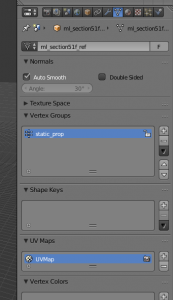
Go to this tab in the properties box

Scroll down till you see UV maps

Create a new one. Don't bother naming it. The default name is fine. Just creating the new UV map should mean it is the one selected by the blue bar.

You'll want it exactly like this.
Go to this tab in the properties box
Scroll down till you see UV maps
Create a new one. Don't bother naming it. The default name is fine. Just creating the new UV map should mean it is the one selected by the blue bar.
You'll want it exactly like this.
Step 4: Unwrapping the new UV map
Hit tab to enter edit mode, and hit U to bring up the UV Unwrapping menu. Select Smart UV Project.

The default setting should be fine.

Hit okay. You've just created the new UV map that the prop will use for light mapping. Now we need to get the texture mapped as well.
The default setting should be fine.
Hit okay. You've just created the new UV map that the prop will use for light mapping. Now we need to get the texture mapped as well.
Step 5: Preparing the texture for baking
Go to the material tab in the properties panel.

Click "Use Nodes".

Open the node editor.

Create two image texture nodes.

Drag click the color circle from one of the image texture nodes to the diffuse BSDF. Click open and select the tga/png of the material.

Alright. Now switch over to the UV Editing layout.

On the lower left, click new.

Uncheck the alpha tick box, set the width and height to be the size of the new material that you're creating. (Some number that is to the power of 2, I.E. 512, 1024, 2048, 4096, etc.) Name the something unique to the model.

Hit OK and go back to the default layout.

Click on the second image texture node you created earlier so that's it the only node selected. Click on the icon next to OPEN and select the texture you just made.

Repeat all of these steps for each material that your brush model has. When you export the model back into hammer, you need for it to only have one material.
Now you've setup the textures for baking.
Click "Use Nodes".
Open the node editor.
Create two image texture nodes.
Drag click the color circle from one of the image texture nodes to the diffuse BSDF. Click open and select the tga/png of the material.
Alright. Now switch over to the UV Editing layout.
On the lower left, click new.
Uncheck the alpha tick box, set the width and height to be the size of the new material that you're creating. (Some number that is to the power of 2, I.E. 512, 1024, 2048, 4096, etc.) Name the something unique to the model.
Hit OK and go back to the default layout.
Click on the second image texture node you created earlier so that's it the only node selected. Click on the icon next to OPEN and select the texture you just made.
Repeat all of these steps for each material that your brush model has. When you export the model back into hammer, you need for it to only have one material.
Now you've setup the textures for baking.
I should explain what is going on here. What we are going is specifying to blender to take our "rendered" texture, what was attached to the node, and baking that information onto the texture that is selected in the materials panel.
Simply put:
Rendered UV map -> Selected UV map
Rendered Material -> Selected Texture
Step 6: Baking the texture in cycles and Exporting the Processed Image and Model
Go back to the render tab in the properties panel. Scroll down until you see bake and open the tab up.

Click bake type and set it to diffuse.

Deselect Direct and Indirect. Those would bake in lighting data. We only care about the color.

Now you can hit bake.

Go back to the UV Editing layout and click Image. Save the image somewhere.

Go back to the default layout and delete the first UV map.

Go to the material tab and remove any existing materials until there is only one. Rename that material to be the same as the texture file you've created. (without the file type extension)

Export your model as a smd.
Click bake type and set it to diffuse.
Deselect Direct and Indirect. Those would bake in lighting data. We only care about the color.
Now you can hit bake.
Go back to the UV Editing layout and click Image. Save the image somewhere.
Go back to the default layout and delete the first UV map.
Go to the material tab and remove any existing materials until there is only one. Rename that material to be the same as the texture file you've created. (without the file type extension)
Export your model as a smd.
Step 7: Compiling
Everything from here on is standard model creation for source. I recommend using crowbar to compile.
I could potentially go more in depth, but that's already information covered in standard tutorials anyways. Hopefully this was helpful for some people.
Attachments
Last edited: