- Sep 10, 2016
- 524
- 395
All gamemodes in TF2 benefit from having some back-and-forth gameplay.
In Attack/Defense, points which just involve one hold spot are severely flawed, because they either let BLU take the point after only one successful push, or RED respawns so fast that they're able to come back to the point and sweep BLU off it after any successful push, making the round drag out forever. Points tend to be much better when RED has their hold spot on the point, but also has another hold spot in front of that - this allows them to initially hold the forward spot, then when they get cleared out of that, they can hold the backward spot - if they win a fight in the backward spot, they get to hold the forward spot again, but if they lose a fight, they lose the point. This creates a "back-and-forth" dynamic where RED can lose and retake the forward spot fluidly and dynamically without worrying about losing the point, and it makes the point more fun and balanced for both teams.
KOTH's single point has a similar function in that teams who take the point will naturally push forward and begin to hold forward. However, KOTH needs to have this forward hold be hard to keep, and little to no possibility of a backward hold, because if it's too easy to hold the point, the first team to take it holds it for the whole round, meaning only one fight matters in the entire round, which is frustrating for both teams because they want to be rewarded for being skillful.
Making it easy for the attacking team to take the point after respawning has more benefits than just making the gamemode not horrible - it means that teams who take the point are rewarded if they can keep their forward hold (with great difficulty), but even if they lose the point, they still have the advantage attacking it again, so it's not such a serious disadvantage, but they can still lose if the enemy team keeps their newly won forward hold for long enough. In other words, it becomes fun and balanced for both teams.
So, how do you do this? Well, I've thought up several criteria to follow:
1) Health and ammo should be placed not in the point area, but in a "staging area" just before it.
This one's relatively straightforward - it's easier to hold the point area if you have health in it you can retreat to - if there isn't any health in the point area at all, the defending team has to retreat all the way to their "staging area" to get health, which means they can't easily hold the point area, so the point becomes easier to capture. Furthermore, the attacking team has their own staging area, which gives them health and ammo very close to their routes into the point area. Considering that players on both teams are going to fight in these routes, the scales will tip most in the favour of the team who has health closest to their routes, which will be the attacking team - so, the attacking team gets a substantial advantage, making it easier for them to take the point. You can see that good maps do this - in Viaduct, the health is placed in areas that only the attackers will be able to reach, and placed pretty close to their entrances into the point area, while the point area itself is completely devoid of health.
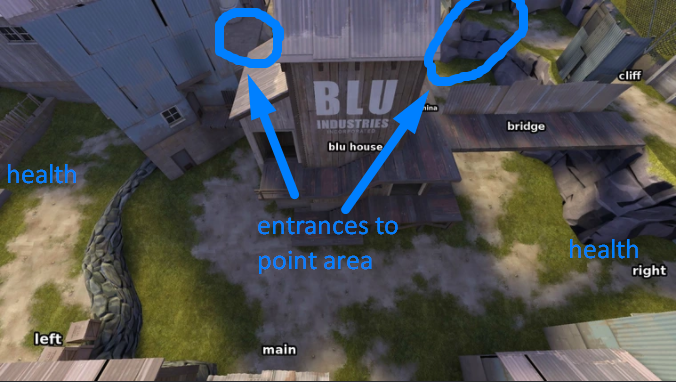
What's that you say? "This image is of Product, not Viaduct"?
Yeah, and?
2) Players should be forced to stand on the point in order to see the enemy team's routes into the greater point area.
Consider a point area which is completely flat and has sightlines all the way across it, like on Nucleus.
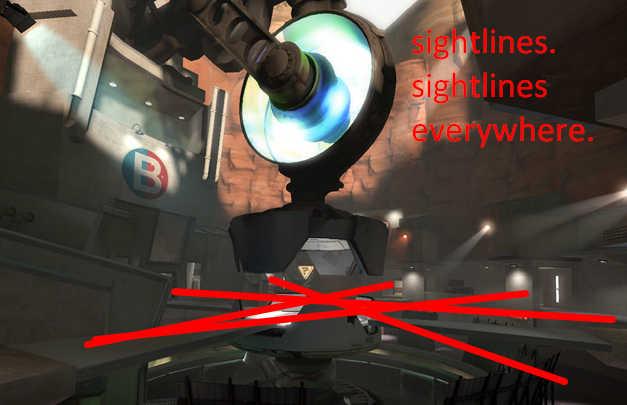
This makes it really hard for attackers to approach the point, since the point area is symmetrical by nature, which means that defenders can shoot the attacking team with access to the same amount of cover and health that the attackers have, which makes team fights a brutal stalemate without any chance for either team to reach the point. This disproportionately favours the team who owns the point, because they're actively winning as long as the timer is ticking down, so what seems to be a stalemate is actively progressing towards the victory of the team who owns the point, with little that the attacking team can do about it.
3) Although attackers should have flanks into the point area, it should be difficult to use these flanks to get behind attackers and to their spawn.
To explain this, we can actually reuse the image of Product's staging area, or "lobby":

Although the attackers have a total of four routes into the point area (marked out with red arrows), all of these routes largely start from the same place - from "main", you can easily see all of them, and use them too. This means not only that the attackers have an easy time getting into the point area, but also that the team who owns the point has a hard time pushing into this lobby, because the attackers can stand in main and watch all of their routes at once.
Too many KOTH maps that I see in imps follow the """""""Viaduct formula"""""""" and create three distinct routes from spawn, which are separated from each other until they reach the point. Of course, it's important to give the attackers options, but I'd argue it's actually far more important to make these routes converge into a single courtyard before the point, because otherwise the team who wins the fight at the point gets to go to the enemy spawn for free, and that sucks.
In fact, even Viaduct is pretty famous for letting people spawncamp via going down whichever route the attackers aren't using, usually the right side.
It's actually very hard to find an example of an official map that does this exceptionally well, or exceptionally poorly. If I had to give a general guideline, it'd be: "Make sure the connectors between spawn and the courtyard are very simple, and the team pushing out of spawn can always rotate between these connectors more easily than the would-be spawncampers."
Simpler is better. It makes it so that the team pushing out of spawn needs to spend less time flushing out solo members of the enemy team who're hiding in some corner in one of the connectors - time is money in KOTH!
Just don't make it so that every connector is a long sightline.
4) The forward hold of the team who owns the point must never occupy the enemy team's spawn area.
This is achieved simply through distance, and respawn times - these two factors dictate how far forward a team can move after they cap the point, before they run into the newly respawned enemy team. With Viaduct, the map's just a bit too small, and the respawn times too long, so the map suffers from spawncamping - this can effectively give the defending team two forward holds, slowing down the attacking team and giving the defenders the same kind of fluid back-and-forth defense A/D has, which can enable them to hold the point for three minutes with ease.
5) It should be impossible for somebody on the team who owns the point to die, respawn and come back before the enemy team captures the point.
Supposing that the attacking team breaks the forward hold of the defenders and starts to capture the point, you want them to be able to reliably finish capping before the defenders respawn and come back - if they can't, the defenders will have the advantage of health, ammo and cover, so they'll usually flush the attacking team off the point and continue holding. The longer the point takes to capture, not only do you increase your risk of the defenders being too easily able to come back, but you also reduce the effectiveness of the attacking team's forward hold that they'll get after capping the point, which will doom them to the fate of having the enemy team nearly always recapture the point before they could hold it for any reasonable amount of time, which is almost as bad as them never having capped at all. So, you want to make the point's cap time as short as possible without letting attackers backcap it with just a scout or other, similarly ridiculous scenarios - you also want the respawn times, and distance between spawn and the points to be as long as possible, but overdoing it tends to make it too easy for the defending team to set up two forward holds, which as we covered in the explanation of the previous criterion, makes it too hard for the attacking team to cap the point after respawning. In other words, you need to very carefully balance the cap time, respawn time and walk times of your map so that these two criteria are achieved.
-----------------------------------------
Beyond this, you can make any geometry that seems fun to play around as long as it encourages class balance, or experiment with very different point areas as long as they still follow these criteria, and you should have a pretty fun map.
Maps that I'd consider successful experiments are Harvest (tentatively) and Bagel - although Bagel has routes which bypass the point in the form of its two buildings, one building is easy for attackers to take and helps them a lot if they have it, while the other is hard for them to take - this combined with the cylinder on the point means that it's hard for attackers to stay alive on the point if the enemy team owns both buildings, but if the attacking team owns at least one building, it's easy for them to stay alive and take the point - so, it can become easier for the defending team to stall, but not for very long (if at all), and this whole dynamic occurs the same way for every push, so it acts as a forward hold that's balanced for both attackers and defenders.
What I'm trying to say is that you don't need to make every KOTH map exactly like Viaduct to make it good - there's plenty of variations you can play with, and undoubtedly some variations that work well which we haven't even discovered yet.
Have fun!
In Attack/Defense, points which just involve one hold spot are severely flawed, because they either let BLU take the point after only one successful push, or RED respawns so fast that they're able to come back to the point and sweep BLU off it after any successful push, making the round drag out forever. Points tend to be much better when RED has their hold spot on the point, but also has another hold spot in front of that - this allows them to initially hold the forward spot, then when they get cleared out of that, they can hold the backward spot - if they win a fight in the backward spot, they get to hold the forward spot again, but if they lose a fight, they lose the point. This creates a "back-and-forth" dynamic where RED can lose and retake the forward spot fluidly and dynamically without worrying about losing the point, and it makes the point more fun and balanced for both teams.
KOTH's single point has a similar function in that teams who take the point will naturally push forward and begin to hold forward. However, KOTH needs to have this forward hold be hard to keep, and little to no possibility of a backward hold, because if it's too easy to hold the point, the first team to take it holds it for the whole round, meaning only one fight matters in the entire round, which is frustrating for both teams because they want to be rewarded for being skillful.
Making it easy for the attacking team to take the point after respawning has more benefits than just making the gamemode not horrible - it means that teams who take the point are rewarded if they can keep their forward hold (with great difficulty), but even if they lose the point, they still have the advantage attacking it again, so it's not such a serious disadvantage, but they can still lose if the enemy team keeps their newly won forward hold for long enough. In other words, it becomes fun and balanced for both teams.
So, how do you do this? Well, I've thought up several criteria to follow:
1) Health and ammo should be placed not in the point area, but in a "staging area" just before it.
2) Players should be forced to stand on the point in order to see the enemy team's routes into the greater point area.
3) Although attackers should have flanks into the point area, it should be difficult to use these flanks to get behind attackers and to their spawn.
4) The forward hold of the team who owns the point should never occupy the enemy team's spawn area.
5) It should be impossible for somebody on the team who owns the point to die, respawn and come back before the enemy team captures the point.
1) Health and ammo should be placed not in the point area, but in a "staging area" just before it.
This one's relatively straightforward - it's easier to hold the point area if you have health in it you can retreat to - if there isn't any health in the point area at all, the defending team has to retreat all the way to their "staging area" to get health, which means they can't easily hold the point area, so the point becomes easier to capture. Furthermore, the attacking team has their own staging area, which gives them health and ammo very close to their routes into the point area. Considering that players on both teams are going to fight in these routes, the scales will tip most in the favour of the team who has health closest to their routes, which will be the attacking team - so, the attacking team gets a substantial advantage, making it easier for them to take the point. You can see that good maps do this - in Viaduct, the health is placed in areas that only the attackers will be able to reach, and placed pretty close to their entrances into the point area, while the point area itself is completely devoid of health.
What's that you say? "This image is of Product, not Viaduct"?
Yeah, and?
2) Players should be forced to stand on the point in order to see the enemy team's routes into the greater point area.
Consider a point area which is completely flat and has sightlines all the way across it, like on Nucleus.
This makes it really hard for attackers to approach the point, since the point area is symmetrical by nature, which means that defenders can shoot the attacking team with access to the same amount of cover and health that the attackers have, which makes team fights a brutal stalemate without any chance for either team to reach the point. This disproportionately favours the team who owns the point, because they're actively winning as long as the timer is ticking down, so what seems to be a stalemate is actively progressing towards the victory of the team who owns the point, with little that the attacking team can do about it.
3) Although attackers should have flanks into the point area, it should be difficult to use these flanks to get behind attackers and to their spawn.
To explain this, we can actually reuse the image of Product's staging area, or "lobby":
Although the attackers have a total of four routes into the point area (marked out with red arrows), all of these routes largely start from the same place - from "main", you can easily see all of them, and use them too. This means not only that the attackers have an easy time getting into the point area, but also that the team who owns the point has a hard time pushing into this lobby, because the attackers can stand in main and watch all of their routes at once.
Too many KOTH maps that I see in imps follow the """""""Viaduct formula"""""""" and create three distinct routes from spawn, which are separated from each other until they reach the point. Of course, it's important to give the attackers options, but I'd argue it's actually far more important to make these routes converge into a single courtyard before the point, because otherwise the team who wins the fight at the point gets to go to the enemy spawn for free, and that sucks.
In fact, even Viaduct is pretty famous for letting people spawncamp via going down whichever route the attackers aren't using, usually the right side.
It's actually very hard to find an example of an official map that does this exceptionally well, or exceptionally poorly. If I had to give a general guideline, it'd be: "Make sure the connectors between spawn and the courtyard are very simple, and the team pushing out of spawn can always rotate between these connectors more easily than the would-be spawncampers."
Simpler is better. It makes it so that the team pushing out of spawn needs to spend less time flushing out solo members of the enemy team who're hiding in some corner in one of the connectors - time is money in KOTH!
Just don't make it so that every connector is a long sightline.
4) The forward hold of the team who owns the point must never occupy the enemy team's spawn area.
This is achieved simply through distance, and respawn times - these two factors dictate how far forward a team can move after they cap the point, before they run into the newly respawned enemy team. With Viaduct, the map's just a bit too small, and the respawn times too long, so the map suffers from spawncamping - this can effectively give the defending team two forward holds, slowing down the attacking team and giving the defenders the same kind of fluid back-and-forth defense A/D has, which can enable them to hold the point for three minutes with ease.
5) It should be impossible for somebody on the team who owns the point to die, respawn and come back before the enemy team captures the point.
Supposing that the attacking team breaks the forward hold of the defenders and starts to capture the point, you want them to be able to reliably finish capping before the defenders respawn and come back - if they can't, the defenders will have the advantage of health, ammo and cover, so they'll usually flush the attacking team off the point and continue holding. The longer the point takes to capture, not only do you increase your risk of the defenders being too easily able to come back, but you also reduce the effectiveness of the attacking team's forward hold that they'll get after capping the point, which will doom them to the fate of having the enemy team nearly always recapture the point before they could hold it for any reasonable amount of time, which is almost as bad as them never having capped at all. So, you want to make the point's cap time as short as possible without letting attackers backcap it with just a scout or other, similarly ridiculous scenarios - you also want the respawn times, and distance between spawn and the points to be as long as possible, but overdoing it tends to make it too easy for the defending team to set up two forward holds, which as we covered in the explanation of the previous criterion, makes it too hard for the attacking team to cap the point after respawning. In other words, you need to very carefully balance the cap time, respawn time and walk times of your map so that these two criteria are achieved.
-----------------------------------------
Beyond this, you can make any geometry that seems fun to play around as long as it encourages class balance, or experiment with very different point areas as long as they still follow these criteria, and you should have a pretty fun map.
Maps that I'd consider successful experiments are Harvest (tentatively) and Bagel - although Bagel has routes which bypass the point in the form of its two buildings, one building is easy for attackers to take and helps them a lot if they have it, while the other is hard for them to take - this combined with the cylinder on the point means that it's hard for attackers to stay alive on the point if the enemy team owns both buildings, but if the attacking team owns at least one building, it's easy for them to stay alive and take the point - so, it can become easier for the defending team to stall, but not for very long (if at all), and this whole dynamic occurs the same way for every push, so it acts as a forward hold that's balanced for both attackers and defenders.
What I'm trying to say is that you don't need to make every KOTH map exactly like Viaduct to make it good - there's plenty of variations you can play with, and undoubtedly some variations that work well which we haven't even discovered yet.
Have fun!
Edit 28/09/2021 - Added a fifth criterion (in between the former second and third criteria) to stipulate that flanks into the point area should not be used to get behind attackers.
Last edited: