


Hello new mapper! Today I am going to teach you how to map, how to use our discord and give you some advices!
Starting
Part 1. Helpful things
Before you start making your first map,here are a few tools that can make your mapping experience more simplistic:
A Boojum Snark's Ultimate Mapping Resource Pack
Easy to install, easy to use, really helpful
What advantages it provides?
- Gamemode Library. Just open this library and copy gamemode you need
- Prefab Library. Includes doors, filters, track curves (for payload and other), soundscapes and other helpful things
- Prop Library. Want some good prop? Open these 3 libraries and search out!
- Improved material browser. Easy to search texture you need
- And much more
Part 2. Setting up
If you only started mapping and dont know where Hammer is located, follow this path in windows file explorer:
.png")
When you found Hammer, I would recommend to create a shortcut for it and put it in some comfortable place
Also, when you finish making your first map, it will need to be compiled and made into bsp so TF2 can run it. Standard Hammer Compiler is kinda bad, so, I recommend you to use this:
CompilePal
- Really helpful Compiler with lots of Compiling options
- Regular updates
- Not lagging or crashing
- You can map while compiling other maps
- etc.
There are instructions on how to use it in the next segment.
Mapping
Part 1. Starting
Where to start? First things first, you need to have some kind of idea for your map. You can use Map Idea Generator. Find some inspiration for your map and figure out what gamemode you will be playing. Here is list of easy-to-make gamemodes:
- KOTH
- A/D 3 CP (Mountain Lab Style)
- Arena (not actual)
- CTF (with timer)
After choosing what gamemode you will be making, try to understand, how it works and what layout it has. For example, you may open good maps of these gamemodes (Koth - Viaduct, CTF - Landfall, AD - Mountain Lab) and looks out how they works. Also, look up guides.
After that, you need to name your map, here is example how we do this:
[Gamemode Type] _ [Map name] _ [Version string]
Gamemode Type - shortcut of the name of gamemode type. For example - cp_, arena_, ctf_ and etc.
Map name - name of the map. Don’t be obligated to call them with "cool" names, you can have simple test names. For example - cp_egypt_thing or cp_idolon_egypt.
Version string - string of your map version. Really helpful to keep up your map updates and is also needed for our test bot (testing your maps). There are 3 stages of map version: Alpha (_a#), Beta (_b#) and Release Candidate (_rc#). Highly recommend you to start with a1.
Part 2. Making a map
Now you can feel free to create your own interesting (or not so) cool map! I can advice you to not detail much your map or bother with textures. Use dev textures while making your map, such as grid, reflectivity and dev_measure textures. Using orange textures not so good idea, some people do not like those
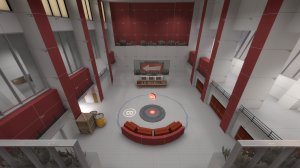
Here is example of my own indev map - cp_venera_a1
.png")
Using dev textures, not so much details, few entities
Or other Examples:
Operandi - A3. Some details, highly using dev textures

Freightline - A8. Some details, some lighting, Highly using dev textures

Snowbase - A19. Detailed, Lighted, Highly using dev textures

So, my rule are:
Alpha - Making layout, few details, Focus on gameplay
Beta - Adding more details, fix layout flaws, fix gameplay issues
Release Candidate - When you think that your map is ready to be added to the game
Part 3. Skybox and Environment Light
Using usual 2Fort skybox is boring, you might change your map skybox. You can find all official TF2 skyboxes here. Also, you need to set your map lighting. You need to place light_environment entity somewhere on the map and then copy-paste all settings from that same page
Part 4. Helpful links
We done with the basics and I am not going to describe all mapping process (except compiling), so, there are some helpful links:
Very Helpful Egan's thread with Mapping links
UEAKCrash TF2 mapping videos
3KliksPhilips mapping tutorials
Hammer "Wiki"
Part 5. Compiling
As I said before, CompilePal is good tool for compiling
Here how it looks like:
.png")
Instructions:
1. Add your map by pressing "Add map" button. Find *your map name*.vmf
2. Choice "Normal" compiling
3. Make sure that VBSP, VVIS, VRAD and COPY are checked
4. Press "Compile"
After compiling you will get *your map name*.bsp file. Now you can play on your map!
By the way, what other compiling option means?
CUBEMAPS - If you have reflect textures on your map (like intel room floor on 2Fort), you need to check this option. Without it, your reflect textures will have some Pink-Black ugly reflect
PACK - if you have some custom assets on your map, it will pack it, so people without these assets will see them. Without it, people will see Pink-Black textures and Error models
REPACK - if you have custom assets, it will down-size your map
Using Site
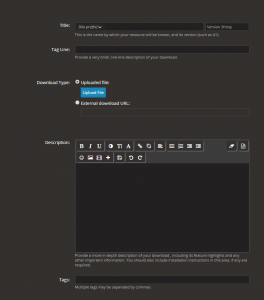
Part 1. Uploading your map
After finishing your map, you may upload it here, on TF2Maps.net. How to do this?
1. On main page, go to "Downloads"
_LI.jpg")
2. Press "Add download"
_LI.jpg")
3. In new window choose category. If your map is A/D CP, then choose "Attack/Defense CP"
4. In title - Your map name. Also write version string
5. Tagline - small description of your map
6. Press "Upload File" button and choose *Your map name*.bsp! You need to upload BSP file, not VMF!
7. Write some kind description of your map
8. Add some tags. People can find your map by tags. For example, if your map theme is farm, add "farm" tag
9. If you have workshop link or other additional links you may fill them there
10. Check box "Upload map icon". After that (when you uploaded your map), you need to upload map icon, so, people could see your map small icon, instead of default black
11. You may add images of your map
12. If you ready to upload - press "Save"
.png")
Part 2. Searching Custom Content and using it
Sometimes, usual TF2 doesnt have some interesting models or texture, so, you can use TF2maps.net to find some! How to do this?
1. On main page, press "Search" and then "More..."
_LI.jpg")
2. Then press "Search Downloads"
.png")
3. And then choose category and search what you want. For example lets pick "textures" and find my custom CP HUD icons
4. Then press search
.png")
How to use custom content?
For example, I want to use this custom catlamp in my game
1. Download the file
2. Open (or create) your custom folder. You may found it by path steamapps/common/Team Fortress 2/tf/
3. Create some folder with any name you want. For example - Catlamp model
4. Open your model zip file
5. Move all files from it in to that folder
.png")
6. If you did it right - you will see your model in hammer
.png")
Using Discord
Part 1. Testing your map
When you had finished your map, you may test it with people. If so, you need to upload your to map list using #bot in our Discord (you can find link to it on main page). It is really easy, use this command:
!add [your map name] [link to your map on tf2maps.net] [some notes]
For example:
_LI.jpg")
Part 2. Getting feedback
Sometimes, we do imps (impromptu testing) on our NY or EU servers. You may join them or not. After your map gets tested, it gets deleted from the list. While people are testing it, they can leave feedback comments and a demo is recorded. There are instructions on where to find all of these:
1. On main page, press "Feedback"
_LI.jpg")
2. On new page, Press "Feedback"
.png")
3. Then, find your map
.png")
4. After that, you will see your map feedback. Don't forget to download the demo and watch it! Sometimes more feedback can be gained from watching the gameplay and how your map works!
Part 3. Improving your map
After that, you will need to improve your map. Use the feedback comments or demo experience. Remember that some comments maybe useful or useless. Don't be afraid to ask others about your map!
Conclusion
Mapping - is not difficult process. Work hard, be creative, develop yourself and maybe one day your map will be added to the game... or better - You will become a good level designer and get a job at a good company!
Starting
Part 1. Helpful things
Before you start making your first map,here are a few tools that can make your mapping experience more simplistic:
A Boojum Snark's Ultimate Mapping Resource Pack
Easy to install, easy to use, really helpful
What advantages it provides?
- Gamemode Library. Just open this library and copy gamemode you need
- Prefab Library. Includes doors, filters, track curves (for payload and other), soundscapes and other helpful things
- Prop Library. Want some good prop? Open these 3 libraries and search out!
- Improved material browser. Easy to search texture you need
- And much more
Part 2. Setting up
If you only started mapping and dont know where Hammer is located, follow this path in windows file explorer:
When you found Hammer, I would recommend to create a shortcut for it and put it in some comfortable place
Also, when you finish making your first map, it will need to be compiled and made into bsp so TF2 can run it. Standard Hammer Compiler is kinda bad, so, I recommend you to use this:
CompilePal
- Really helpful Compiler with lots of Compiling options
- Regular updates
- Not lagging or crashing
- You can map while compiling other maps
- etc.
There are instructions on how to use it in the next segment.
Mapping
Part 1. Starting
Where to start? First things first, you need to have some kind of idea for your map. You can use Map Idea Generator. Find some inspiration for your map and figure out what gamemode you will be playing. Here is list of easy-to-make gamemodes:
- KOTH
- A/D 3 CP (Mountain Lab Style)
- Arena (not actual)
- CTF (with timer)
After choosing what gamemode you will be making, try to understand, how it works and what layout it has. For example, you may open good maps of these gamemodes (Koth - Viaduct, CTF - Landfall, AD - Mountain Lab) and looks out how they works. Also, look up guides.
After that, you need to name your map, here is example how we do this:
[Gamemode Type] _ [Map name] _ [Version string]
Gamemode Type - shortcut of the name of gamemode type. For example - cp_, arena_, ctf_ and etc.
Map name - name of the map. Don’t be obligated to call them with "cool" names, you can have simple test names. For example - cp_egypt_thing or cp_idolon_egypt.
Version string - string of your map version. Really helpful to keep up your map updates and is also needed for our test bot (testing your maps). There are 3 stages of map version: Alpha (_a#), Beta (_b#) and Release Candidate (_rc#). Highly recommend you to start with a1.
Part 2. Making a map
Now you can feel free to create your own interesting (or not so) cool map! I can advice you to not detail much your map or bother with textures. Use dev textures while making your map, such as grid, reflectivity and dev_measure textures. Using orange textures not so good idea, some people do not like those
Here is example of my own indev map - cp_venera_a1
Using dev textures, not so much details, few entities
Or other Examples:
Operandi - A3. Some details, highly using dev textures
Freightline - A8. Some details, some lighting, Highly using dev textures
Snowbase - A19. Detailed, Lighted, Highly using dev textures
So, my rule are:
Alpha - Making layout, few details, Focus on gameplay
Beta - Adding more details, fix layout flaws, fix gameplay issues
Release Candidate - When you think that your map is ready to be added to the game
Part 3. Skybox and Environment Light
Using usual 2Fort skybox is boring, you might change your map skybox. You can find all official TF2 skyboxes here. Also, you need to set your map lighting. You need to place light_environment entity somewhere on the map and then copy-paste all settings from that same page
Part 4. Helpful links
We done with the basics and I am not going to describe all mapping process (except compiling), so, there are some helpful links:
Very Helpful Egan's thread with Mapping links
UEAKCrash TF2 mapping videos
3KliksPhilips mapping tutorials
Hammer "Wiki"
Part 5. Compiling
As I said before, CompilePal is good tool for compiling
Here how it looks like:
Instructions:
1. Add your map by pressing "Add map" button. Find *your map name*.vmf
2. Choice "Normal" compiling
3. Make sure that VBSP, VVIS, VRAD and COPY are checked
4. Press "Compile"
After compiling you will get *your map name*.bsp file. Now you can play on your map!
By the way, what other compiling option means?
CUBEMAPS - If you have reflect textures on your map (like intel room floor on 2Fort), you need to check this option. Without it, your reflect textures will have some Pink-Black ugly reflect
PACK - if you have some custom assets on your map, it will pack it, so people without these assets will see them. Without it, people will see Pink-Black textures and Error models
REPACK - if you have custom assets, it will down-size your map
Using Site
Part 1. Uploading your map
After finishing your map, you may upload it here, on TF2Maps.net. How to do this?
1. On main page, go to "Downloads"
2. Press "Add download"
3. In new window choose category. If your map is A/D CP, then choose "Attack/Defense CP"
4. In title - Your map name. Also write version string
5. Tagline - small description of your map
6. Press "Upload File" button and choose *Your map name*.bsp! You need to upload BSP file, not VMF!
7. Write some kind description of your map
8. Add some tags. People can find your map by tags. For example, if your map theme is farm, add "farm" tag
9. If you have workshop link or other additional links you may fill them there
10. Check box "Upload map icon". After that (when you uploaded your map), you need to upload map icon, so, people could see your map small icon, instead of default black
11. You may add images of your map
12. If you ready to upload - press "Save"
Part 2. Searching Custom Content and using it
Sometimes, usual TF2 doesnt have some interesting models or texture, so, you can use TF2maps.net to find some! How to do this?
1. On main page, press "Search" and then "More..."
2. Then press "Search Downloads"
3. And then choose category and search what you want. For example lets pick "textures" and find my custom CP HUD icons
4. Then press search
How to use custom content?
For example, I want to use this custom catlamp in my game
1. Download the file
2. Open (or create) your custom folder. You may found it by path steamapps/common/Team Fortress 2/tf/
3. Create some folder with any name you want. For example - Catlamp model
4. Open your model zip file
5. Move all files from it in to that folder
6. If you did it right - you will see your model in hammer
Using Discord
Part 1. Testing your map
When you had finished your map, you may test it with people. If so, you need to upload your to map list using #bot in our Discord (you can find link to it on main page). It is really easy, use this command:
!add [your map name] [link to your map on tf2maps.net] [some notes]
For example:
Part 2. Getting feedback
Sometimes, we do imps (impromptu testing) on our NY or EU servers. You may join them or not. After your map gets tested, it gets deleted from the list. While people are testing it, they can leave feedback comments and a demo is recorded. There are instructions on where to find all of these:
1. On main page, press "Feedback"
2. On new page, Press "Feedback"
3. Then, find your map
4. After that, you will see your map feedback. Don't forget to download the demo and watch it! Sometimes more feedback can be gained from watching the gameplay and how your map works!
Part 3. Improving your map
After that, you will need to improve your map. Use the feedback comments or demo experience. Remember that some comments maybe useful or useless. Don't be afraid to ask others about your map!
Conclusion
Mapping - is not difficult process. Work hard, be creative, develop yourself and maybe one day your map will be added to the game... or better - You will become a good level designer and get a job at a good company!
Attachments
Last edited:


.png")