- Jul 20, 2014
- 224
- 137
There's been a bit of talking on how some of the things in MvM aren't documented that well and information about some of its logic is a bit non-existent, so I figured I might as well throw a thread in here to hopefully explain a bit of the logic and other things.
As a last thing: Be sure to check out the IG Class Icon pack (has quite a nice selection of different icons to use on your missions) and Sigsegv's extensive list of .pop file things that are a bit too extensive to list on here
After you put your layout together and throw your bombpath holograms in, you're gonna need something that has the bomb carrier actually go where your bombpath shows the players he's supposed to go.
This is accomplished by placing some func_nav_avoid brush entities for every bombpath you have on the map and placing bomb_carrier within the tags of the entity. So when your bombpath picker picks a bombpath, it should also activate every other func_nav_avoid except for the ones that correspond with the bombpath that's currently shown as active (func_nav_avoids should start disabled, otherwise everything is blocked and bots ignore them)
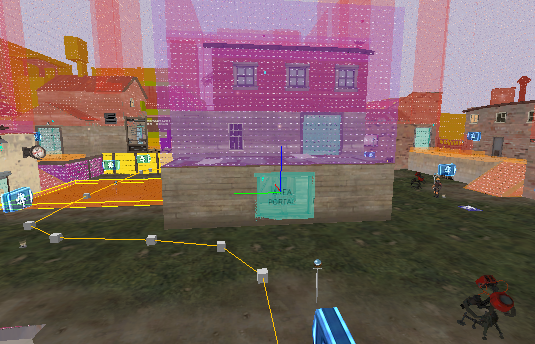
In the above picture, the highlighted func_nav_avoid only activates when the bombpaths on the right are picked as the active bombpath.
You can also use 'common' on your nav_avoid to have bots not use some areas (Rottenburg has this with the forward upgrade station area) and tell your nav_avoid to have bots with your own Tags not use that (bot_giant is one example I can name off the top of my head)
You can also use nav_show_func_nav_avoid to see if your nav_avoid is working as intended.
This is accomplished by placing some func_nav_avoid brush entities for every bombpath you have on the map and placing bomb_carrier within the tags of the entity. So when your bombpath picker picks a bombpath, it should also activate every other func_nav_avoid except for the ones that correspond with the bombpath that's currently shown as active (func_nav_avoids should start disabled, otherwise everything is blocked and bots ignore them)
In the above picture, the highlighted func_nav_avoid only activates when the bombpaths on the right are picked as the active bombpath.
You can also use 'common' on your nav_avoid to have bots not use some areas (Rottenburg has this with the forward upgrade station area) and tell your nav_avoid to have bots with your own Tags not use that (bot_giant is one example I can name off the top of my head)
You can also use nav_show_func_nav_avoid to see if your nav_avoid is working as intended.
Are you planning to use some Mobbers on your map? Do you want your Mobbers to run across one specific path instead of the regular, shortest possible route? Func_nav_prefer is your friend.
Setting up your func_nav_prefer is essentially the same as with func_nav_avoid: Place your func_nav_prefers where you want the bots using that preferred path to go and give your preferred path its own, unique tag (something like nav_prefer_flank_right, for example)
You can use nav_show_func_nav_prefer to see if your preferred paths are working as intended.
Gatebots are one big step up on the setup part. Thankfully Alias has a thread explaining this so I don't have to repeat what he says in there
Sniper bots are a funny little thing: They use func_tfbot_hint to work, rather than the Sniper spot entity that is in-game.
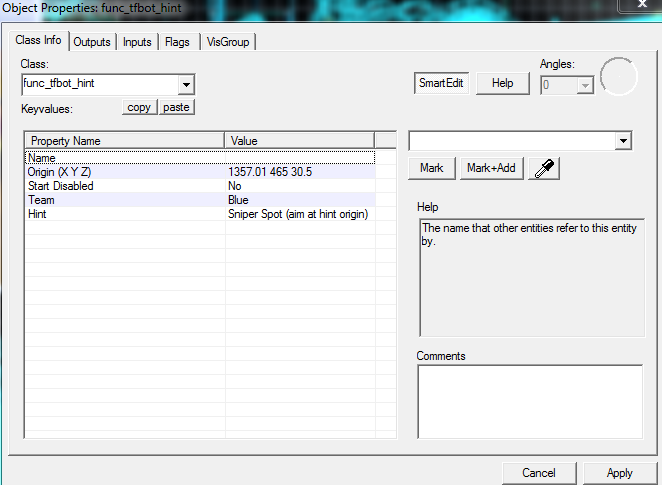
Here's what your sniper spot should look like.
The origin is where the Sniper is going to look at when he uses this specific location, so you should have it pointing at whatever direction you want the Sniper to watch over. You can also name it if you want to disable or enable it (Mannhattan does this to have Snipers move up as the gates are taken)
The main thing that makes Engineerbots tick is bot_hint_engineer_nest. It serves as the spot that Engineerbots are going to first run to (Or teleport into, if they are the teleporting variant)
But having just this is not enough.
You also need a bot_hint_sentrygun and bot_hint_teleporter_exit (If you don't want teleporter building engineers, just don't have this entity) and give all entities the same name.
This groups them under the one bot_hint_engineer_nest you have, so when the bomb moves up or your Battle Engineers spawn, this cluster of buildings is going to be up in a jiffy if the Defenders do nothing while the Engiebot does his job.
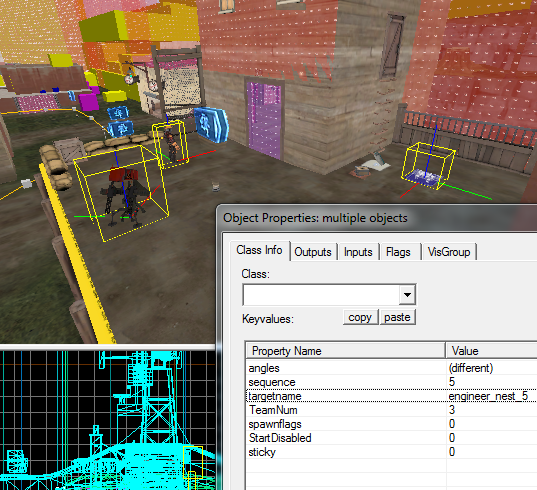
When placing Sentry Gun positions, set the model to refpose to have a better idea where is the Sentry going to point when the Engineerbot builds it.
The Engineer-bot's Teleporter uses TeleportWhere to determine what spawns will be instead spawning on his teleporter. If your map has different names for the robot spawn points, you should specify additional TeleportWhere in the Engineer's TFBot brackets.
But having just this is not enough.
You also need a bot_hint_sentrygun and bot_hint_teleporter_exit (If you don't want teleporter building engineers, just don't have this entity) and give all entities the same name.
This groups them under the one bot_hint_engineer_nest you have, so when the bomb moves up or your Battle Engineers spawn, this cluster of buildings is going to be up in a jiffy if the Defenders do nothing while the Engiebot does his job.
One name to bind them all into a neat little lump.
Protips:When placing Sentry Gun positions, set the model to refpose to have a better idea where is the Sentry going to point when the Engineerbot builds it.
The Engineer-bot's Teleporter uses TeleportWhere to determine what spawns will be instead spawning on his teleporter. If your map has different names for the robot spawn points, you should specify additional TeleportWhere in the Engineer's TFBot brackets.
In here is just a collection of things that MvM has(at least ones that I can remember):
BehaviorModifiers
Give your bot and/or its weapon some attributes from the Attributes List of TF2. Just remember to specify ItemName in your ItemAttributes, otherwise your attributes won't be applied.
Skill
from Easy, Normal, Hard and Expert. Mainly affects how well does the bot react to its surroundings and its capability of aiming. Hard and Expert bots will have orange eyes while Easy and Normal bots have blue eyes.
Scale
In case you want big or small Robots roaming around the map, specify Scale and a number within the TFBot brackets. Scale 1.5 is 50% bigger than regular Robots (this scaling affects Giants, as well!)
Support
There are two kinds of support: Support 1 will keep spawning until wave ends while Support limited spawns until their TotalCount is exhausted or the wave ends, whichever comes first.
Squad/RandomChoice
Sometimes you'd either want a formation of Robots or just a Wavespawn that brings in some variety within a single wavespawn. For this, you can use Squad or RandomChoice.
It's a simple thing, you just set up the wavespawn like so:
When this wavespawn becomes active, it will spawn a Giant Charged Soldier with two Uber Medics. When using Squads, be sure to see that the amount of Robots in your Squad is exactly the same as your spawncount.
FormationSize is a little something added in the Two Cities update, which allows you to specify how big of a radius is your Squad going to take (best used if you wanna have Medics out of Sniper's Explosive Headshot radius)
RandomChoice works like Squad does parsing-wise, as we can take a look below:
This time our Wavespawn is going to either pick a Giant Charged Soldier, an Uber Medic or a Soldier to spawn and will do so for each Robot spawned under this Wavespawn. Since RandomChoice spawns each bot as an individual Robot, FormationSize will not work here.
FirstSpawnOutput, LastSpawnOutput and FirstSpawnWarningSound
If your map has something a bit more complex in mind and you wanna have something occur at specific parts of the wave, you can use First- and LastSpawnOutput to fire relays that you have set up to do something (enable additional bombs, open alternate spawns, you name it)
Here's a quick demonstration on what it should look like in your .pop file:
When the first Wavespawn spawns, that relay is fired. LastSpawnOutput will fire that relay when the last bots of that wavespawn spawn.
FirstSpawnWarningSound is something mvm_example used to list before it vanished from there at some point (thankfully a couple of people were fast enough to use it in their missions before this happened)
Like the name suggests, all this does is play some sounds when the Wavespawn spawns for the first time. I used this for the bosses of Derelict, like so:
So when Major Firepower spawns, you get to hear a little tune which serves as a secondary warning that the boss is about to walk in and wreck some shit.
BehaviorModifiers
- Mobber - Runs from spawn to hatch, then to the bomb and back to the hatch. Uses the bomb as a marker for it's Point A of back-and-forth running.
- Push - Runs from spawn to hatch and stays there until death.
- IgnoreFlag - This bot will ignore the flag alltogether. Best used for Support 1/Support limited Spies, really.
- AlwaysCrit - This bot has permanent crits.
- DisableDodge - This bot will not even attempt to dodge anything.
- MiniBoss - This bot is a Giant.
- UseBossHealthBar - This bot will display a healthbar once it becomes active.
- HoldFireUntilFullReload - This bot will only fire when it has a full clip.
- SpawnWithFullCharge - This bot spawns with a full charge (Medics and Banner Soldiers have this)
- Parachute - This bot will deploy a parachute once in the air (All-class attribute, is not Soldier/Demo exclusive)
- ProjectileShield - This bot can build energy and use the Projectile Shield once it takes damage while having full energy (Only works on Medic-bots) If you want a big Projectile Shield on your Medic-bot, use "generate rage on heal" 2 as an ItemAttribute to its secondary of choice ("generate rage on heal" 1 is the smaller shield)
- PrimaryOnly - This bot will only use their primary weapon.
- SecondaryOnly - This bot will only use their secondary weapon.
- MeleeOnly - This bot will only use their melee weapon.
Give your bot and/or its weapon some attributes from the Attributes List of TF2. Just remember to specify ItemName in your ItemAttributes, otherwise your attributes won't be applied.
Skill
from Easy, Normal, Hard and Expert. Mainly affects how well does the bot react to its surroundings and its capability of aiming. Hard and Expert bots will have orange eyes while Easy and Normal bots have blue eyes.
Scale
In case you want big or small Robots roaming around the map, specify Scale and a number within the TFBot brackets. Scale 1.5 is 50% bigger than regular Robots (this scaling affects Giants, as well!)
Support
There are two kinds of support: Support 1 will keep spawning until wave ends while Support limited spawns until their TotalCount is exhausted or the wave ends, whichever comes first.
Squad/RandomChoice
Sometimes you'd either want a formation of Robots or just a Wavespawn that brings in some variety within a single wavespawn. For this, you can use Squad or RandomChoice.
It's a simple thing, you just set up the wavespawn like so:
Code:
WaveSpawn
        {
            Where spawnbot
            TotalCount 3
            MaxActive 3
            SpawnCount 3
            WaitBeforeStarting 0
            WaitBetweenSpawns 0
            TotalCurrency 0

            Squad
            {
                 FormationSize 500

                TFBot
                {
                    Template T_TFBot_Giant_Soldier_Crit
                }
                TFBot
                {
                    Template T_TFBot_Medic
                }
                TFBot
                {
                    Template T_TFBot_Medic
                }
            }
}FormationSize is a little something added in the Two Cities update, which allows you to specify how big of a radius is your Squad going to take (best used if you wanna have Medics out of Sniper's Explosive Headshot radius)
RandomChoice works like Squad does parsing-wise, as we can take a look below:
Code:
WaveSpawn
        {
            Where spawnbot
            TotalCount 3
            MaxActive 3
            SpawnCount 3
            WaitBeforeStarting 0
            WaitBetweenSpawns 0
            TotalCurrency 0

            Support 1 //Or Support limited, if you like

             RandomChoice
            {
                TFBot
                {
                    Template T_TFBot_Giant_Soldier_Crit
                }
                TFBot
                {
                    Template T_TFBot_Medic
                }
                TFBot
                {
                    Class Soldier
                    Skill Normal
                    WeaponRestrictions PrimaryOnly
                }
            }
}FirstSpawnOutput, LastSpawnOutput and FirstSpawnWarningSound
If your map has something a bit more complex in mind and you wanna have something occur at specific parts of the wave, you can use First- and LastSpawnOutput to fire relays that you have set up to do something (enable additional bombs, open alternate spawns, you name it)
Here's a quick demonstration on what it should look like in your .pop file:
Code:
FirstSpawnOutput
            {
                Target bomb_relay_1
                Action Trigger
}FirstSpawnWarningSound is something mvm_example used to list before it vanished from there at some point (thankfully a couple of people were fast enough to use it in their missions before this happened)
Like the name suggests, all this does is play some sounds when the Wavespawn spawns for the first time. I used this for the bosses of Derelict, like so:
Code:
WaveSpawn //The hairy bastard
        {
            Where spawnbot
            TotalCount 1
            MaxActive 1
            SpawnCount 1
            WaitBeforeStarting 10
            WaitBetweenSpawns 0
            WaitForAllSpawned "wave08banner"
            TotalCurrency 0

            FirstSpawnWarningSound "MVM.GiantHeavyEntrance"

            TFBot
            {
                Template T_TFBot_Major_Firepower
            }
}Sometimes you have some amazing ideas. Ideas that the average robot_standard, robot_giant or robot_gatebot don't contain. Just make your own robot_templates file!
Let's use robot_giant as a visual guide, here:
This Templates bracket will contain each and every one of the custom Robots you write under it. So when you save your robot_whatever file, remember to add #base robot_whatever.pop to the mission you are going to use your creations on. Just remember to have your Template names not clash with ones in the other #base .pop files your mission uses, or you might have some trouble.
Let's use robot_giant as a visual guide, here:
Code:
WaveSchedule
{
    Templates
    {
        // Standard Classes ////////////////////////////////////////////////////////////////////////////////////////
        ////////////////////////////////////////////////////////////////////////////////////////////////////////////

        T_TFBot_Giant_Scout_Toomuch
        {
            Class Scout
            Name "Ultra Giant Scout"
            ClassIcon scout_giant
            Skill Expert
            Health 16000
            Scale 4.5
            WeaponRestrictions PrimaryOnly
            Attributes MiniBoss
            CharacterAttributes
            {
                "damage force reduction" 0.7
                "airblast vulnerability multiplier" 0.7
                "override footstep sound set" 5
            }
        }
}Have you made a Payload map and set up the dozen path_tracks for it? Congratulations, now you also know how to set up Tanks!
Tanks will only obey world geometry on their movements, so they might look a bit funny when they move across stairs or the like. Tanks will also deploy the bomb at the last path_track of its travel, so be sure to position it properly so that your Tank does not deploy the bomb through the hatch or just drive down into the hatch pit and deploy there.
Here's a bit of code to demonstrate how to set up your Tanks in .pop files:
FirstSpawnOutput is self-explanatory enough and fires when the Tank (or in this wavespawn's case, the first Tank) spawns. You should set up your boss_deploy_relay as a logic_relay that fires a RoundWin for BLU and fires the hatch's destruction relay (be sure to remember to have DestroyIfAtCapturePoint fired on tankboss or whatever name you give your Tank so that it blows up with the hatch)
Tanks will only obey world geometry on their movements, so they might look a bit funny when they move across stairs or the like. Tanks will also deploy the bomb at the last path_track of its travel, so be sure to position it properly so that your Tank does not deploy the bomb through the hatch or just drive down into the hatch pit and deploy there.
Here's a bit of code to demonstrate how to set up your Tanks in .pop files:
Code:
WaveSpawn //Tank
        {
            Name "wave02tank"
            TotalCount 2
            WaitBeforeStarting 35
            WaitBetweenSpawns 45
            TotalCurrency 200

            FirstSpawnOutput
            {
                Target boss_spawn_relay
                Action Trigger
            }

            Tank
            {
                Health 22000
                Speed 60
                Name "tankboss"
                StartingPathTrackNode "tank_path_1"

                OnKilledOutput
                {
                    Target boss_dead_relay
                    Action Trigger
                }

                OnBombDroppedOutput
                {
                    Target boss_deploy_relay
                    Action Trigger
                }
            }
}Some of you have noticed that sometimes the wave bar looks like about 197 Robots and 8 Tanks are about to show up, but they don't all come out in a giant clusterfuck of death and despair. That's because these waves are structured to have a bit of gaps between the others, leading to what people like to call "wave flow".
Having your wave flow nicely between its Wavespawns is the key difference between compact, fun waves and an unholy endurance that is both not really challenging and way longer than it needs to be.
Let's take a Wavespawn to work with as an example:
Here we have some Skullcutter Demos, waiting 15 seconds after a Tank spawns and only then do they start spawning and ruining everyone's day. You can do some other business with Wavespawns, too!
You can set them to WaitForAllDead "<wavespawnname>" which has them spawn after the WaitBeforeStarting expires (which in turn starts to tick down only when all of that wavespawn is dead)
There is also WaitBetweenSpawnsAfterDeath, introduced in Two Cities. Unlike the other two, this will only allow 1 bot to spawn instead of a group. When that bot is killed, it will wait the time specified until spawning again. Best used with Giants, semi-Giants or just some really nasty Robots that you don't want to group up against players.
Having your wave flow nicely between its Wavespawns is the key difference between compact, fun waves and an unholy endurance that is both not really challenging and way longer than it needs to be.
Let's take a Wavespawn to work with as an example:
Code:
WaveSpawn //SkullCutter Demos
        {
            Where spawnbot_invasion
            TotalCount 36
            MaxActive 8
            SpawnCount 4
            WaitBeforeStarting 15
            WaitBetweenSpawns 15
            WaitForAllSpawned "wave07tank"
            TotalCurrency 250

            Support 1

            TFBot
            {
                Template T_TFBot_Demoman_Battleaxe
            }
}You can set them to WaitForAllDead "<wavespawnname>" which has them spawn after the WaitBeforeStarting expires (which in turn starts to tick down only when all of that wavespawn is dead)
There is also WaitBetweenSpawnsAfterDeath, introduced in Two Cities. Unlike the other two, this will only allow 1 bot to spawn instead of a group. When that bot is killed, it will wait the time specified until spawning again. Best used with Giants, semi-Giants or just some really nasty Robots that you don't want to group up against players.
As a last thing: Be sure to check out the IG Class Icon pack (has quite a nice selection of different icons to use on your missions) and Sigsegv's extensive list of .pop file things that are a bit too extensive to list on here
Last edited: