B1 is the official transition to Beta. Or, as official as I can make it.

MAJOR CHANGES:

STARTING ARTPASS

With the layout of the map 90% solid, I feel comfortable enough to start detailing. As is nature of it, they are all small but noticable things. However, some major things I am proud of:

sapwoodb1_sky2.jpg

sapwoodb1_sky1.jpg


The big "BETA" tag was used as an excuse to teach myself about 3d skyboxes. It is very plain and unfinished, but I wanted to get the basic topography down. And also for fun.

sapwoodb1_a3.jpg


I started working on the large flank to A, reshaping the floor into a "lift" for logging equipment to the yard below.

TWEAKS TO POINT A

As defenders have become more affluent with the map through tests, the impenetrable nature of the point has become apparent. A has an incredibly strong area to hold from and no reason to hold forward. The following changes have been made in an attempt to ease frustration:

sapwoodb1_a2.jpg


The transition from the staging area has been transformed into a hill that cuts off sightlines from those behind the point, giving BLU more cover before launching a serious attack; this is to curtail RED being able to pepper attackers before they could even step foot on the point, from a far distance. A small healthpack has also been added to the right lobby, and the medium on defender's side has been downgraded. The doorways into the woodshop have also been widened and deepened, to give RED less overall cover. They need to either hold further back, giving up ground but earning comfort, or hold in the alleyway and risk exposure to the sightline.

sapwoodb1_a1.jpg


The route to the left has been given extra cover and another bend, stopping a sightline extending all the way into the flank. My intention is to give more strength to area for soldiers and snipers to assist in a push from a further position.

sapwoodb1_bspawn.jpg


BLU's first spawn has also been given a renovation. While it was not disfunctional, many players expressed discomfort with so many hallways and tight turns, so i sacrificed some sightline cover for a more cohesive walking direction to the front lines.

Overall, every "minor" change are now summed up by detailing. Anything that would be noted is covered above. I plan to make updates as I finish detailing each area, the order of which is what I feel like doing. So, I'll just leave a "thank you" for all testers. This is my first map to go beta, and I'm incredibly proud of how I haven't smashed my keyboard yet in the process. Now, the fun part begins.

sapwoodb1_ov.jpg

Attachments

  • sapwoodb1_a2.jpg
    sapwoodb1_a2.jpg
    697.2 KB · Views: 44
This version includes an experimental change, testing dynamics focused on A. If they pass the test, I'll include them in the next full version.
A7 holds preparations for moving into beta, and some presents for defenders.

MAJOR CHANGES:

DEFENDER'S C BALCONY

sapwooda7_c1.jpg


A complaint with point C, and observed in testing was that there was no good spot for Defenders to hold. I realized that, while I had areas designed for holding, I didn't have an "anchor" spot these tactics could circle around. So the balcony Defenders have over C has been given a makeover, increasing its depth, cover, and overall "coziness." My hope is that it will be a prime spot for Engineer and Heavy to set up, and incentivize the usage of the flank below and across from it.

The hut at B has also been slightly stretched, to give more room there aswell. If that is still not satisfactory, I have some other changes in mind.

PREPARATIONS FOR BETA


sapwooda7_det2.jpg

sapwooda7_det1.jpg


I've started detailing areas, now that the map is edging into Beta. I'll "officially" make the change when I am happy with B and C. A is pretty much solid. I'm doing small areas now to get a grasp of what I want to do, and it should spread like chickenpox as I feel like working on it.

MINOR CHANGES:

-Adjusted assistance for the directionally challenged.
-Doors now lock off the entire areas of B and C until A is captured, to reduce confusion when defenders walk out of their first spawn.
-Fixed holes in clipping near A and C.
-Adjusted some displacements that were mismatched.
-Moved the medium healthkit in C Lobby closer to the door, to increase its visibility.
This update is minor, and a direct followup to the behemoth that is A6. It features only minor changes.

-Slightly shortened length of B cliff flank
-Increased period of fast respawns for RED after a capture
-Moved a tree at A that can unfairly hide a sentry
-Increased the depth and width of the water below A, to increase ease of dampening fall damage.
-Widened the main door to C, hoping to encourage its recognition of a main entrance.
-General clipping
-Fixed an HDR issue for those using LDR - Map may look flat now, and will likely be fully fixed after. This is effectively a bandaid.
-Backend brush optimization.
A6 brings the most impactful changes to the map yet.

MAJOR CHANGES:

POINT B LEAD-UP
sapwooda6_b1.jpg


The area attackers have before point B has been entirely remade, with a focus on making the direction of attack, and organization of pushes more legible. The goal is to give BLU strong positions to attack from, with the cost of easily being drowned out by firepower from any side. Overall, they have two less entrances into point B, but I hope they have the same total strength.

sapwooda6_b2.jpg


The building that splits the courtyard and point functions as a staging point for BLU, and a focus for the action around the point. Internally, I consider the layout an A1 - the goal has entirely changed, and thus this layout will likely need some tweaks. The building itself has a main entrance, and a flank that runs underneath.

sapwooda6_b3.jpg


The layout of the area in front of the staging building is extremely hostile to defenders, ensuring BLU will have an easy way to push back an overextension.

Overall, while the DNA of Point B is still visible, the intended style of gameplay around the point has been flipped on its head, now focused on legible pushes and directions, but requiring firepower to break the first line. RED has been given a severely reduced spawntime for a few moments after A is captured, to give them time to meet in the area for a proper, fair showdown.

FLANKS: QUALITY OVER QUANTITY

You may notice that there's a large window of time between A5 and A6, and that's because I did not touch Sapwood for a few days, realizing many of the problems in the map came from my own design philosophy. I had to sleep on it a few nights. In my fear of having brutal, Dustbowl or Cactus Canyon S2 style chokes, I ended up including too many flanks for attackers to use. And, while many areas were relatively balanced, overtime in playtests they proved frustrating from the amount of places a defender could be attacked from. Players could entirely circumvent a forward hold, and sometimes even the backward hold too. I don't expect such issues to be solved in one version, but I hope this is a start.

sapwooda6_aflank.jpg


SO, as a result, every single point on the map has one, or even two less possible routes to the point for attackers.
The following is the total list of flanks struck down, directions from POV of attackers:
-A has lost the rocket-jump flank to the left, so the room has been focused as a staging area for the only area that can contest a sentry guarding the point, and a large ammopack.
-A has also had the doorway between the first flank to the right, and the point building sealed. The goal of this is to give defenders a definitive area to hold from, and also resolving the purpose of the right flank for poking at a forward hold, and snipers using a balcony.
-B has lost two routes in total, see further above.
-C's waterside flank to the right has had its entrance moved to the floor below, requiring attackers to actually make eye contact with a forward hold before slipping into it. The lograil door has been closed, making the catwalk dedicated to break a forward hold, and later a sentry spot for attackers.

Overall, these changes are highly experimental, and I may playtest twice. But I'm confident this new approach is the foundation of an easier-to-read gamestate.

MINOR CHANGES:
-More clipping.
-Started texturing, to get a feel for areas.
-Sewed some displacements I glazed over.
-Fixed RED's last spawn doors not using the proper filter.

The next version will likely be a smaller update, focusing on refining what has been done here.
A5 is an update focused more on the future of the map, and tiny little changes.

MAJOR CHANGES:

A5 features no changes on the scale of previous iterations - rather, it contains a little bit of everything everywhere. Clipping, cleaning up displacements, simplifications, and lighting. There are a few things I think should be featured:

sapwooda5_aflank.jpg


The flank near A with a medium healthpack has been given a small, but impactful change: Attackers now have access to the platform in the middle, instead of having to walk to the back of the room, and then go up a ramp. This area was sparsely used, and thus few knew about the large ammopack relatively close point A. My hope is that this brings some of the action back to this area.

Not pictured, but inbetween B and C, the cliffside/sunroom flank has been closed off to the attackers, and instead feeds from the walkway to the window overlooking B. This area was sparsely useful to BLU, and held nothing of value to RED. My hope is that this will create a viable option for RED flankers to get high ground over the frontline, while reducing choice paralysis for BLU.

sapwooda5_vistab.jpg


sapwooda5_vistaa.jpg


I've also started laying out, and slightly detailing the larger vistas I plan to have in the map. While this might be a bit much for the Alpha versions, I want to put them in now so I can see their impact on preformance over time. I was also, y'know... a little bored. They aren't final and will fit with a skybox when I get to it in Beta.

MINOR CHANGES:
-Fixed some HDR color values. Still probably gonna tweak them overtime.
-Started applying textures to some areas, to give myself an idea of where I'm going to take the detail.
-Minor clipping, here and there.
-A new Medium ammopack, and two small ammopacks are dotted around A.
-Improved some Areaportals around C, slicing it into two sections and reducing unwanted rendering from the other side of the map.
A4's goal is to improve the area outside BLU's first spawn, tweak spawn times in general, and tweak the atmosphere of the map.

MAJOR CHANGES:

POINT A OVERHAUL

While Point A felt (mostly) balanced, it was also incredibly boring. A sightline from the first point to BLU's spawn made for a boring experience, reducing the early match to more singular fights avoiding it. It all rotated around avoiding the main path, and most of the fighting was in one doorway.

sapwooda4_a1.jpg


This new take splits them into two distinctive areas: The point itself, and the field BLU comes out into. RED has strong positions on either side, with major weaknesses built into them.

sapwooda4_a2.jpg


The split itself is comprised of wooden "barricades" for lack of a better word, creating a break in LOS and action, as well as assisting with some backend optimization. My hope is that this will make the progression of BLU's advance more legible, with RED first holding the barricades, and then falling back to the point.

sapwooda4_a3.jpg


BLU's spawn has also received an overhaul, making it a shorter walk to the doors, while also splitting sightlines so you only have to worry about one at once while inside.

ENVIRONMENTAL CHANGES

sapwooda4_sky.jpg


The lighting, fog, custom trees, and brand-new HDR (Don't worry, I burned my corneas the first time trying it, so you won't have to) give the map a more coherent identity and theme. I'm shooting for a humid, Northern Frontier feel. I might tweak it more in the future based on feedback. The HDR isn't active in the images above, but you'll feel the difference in-game.

Credits:
Pine Trees by Diva Dan
Green Alpine Skybox by Void

SPAWN ADJUSTMENTS

BLU's spawn had been adjusted. They spawn in roughly the same place, but have a new door that dumps them out in the upper flank for B, shaving a few seconds off of a painful walk. They still have access to their old doors through a passage that only opens after they unlock the spawn, to prevent spawncamping.

MINOR CHANGES
-More interior lighting adjustments.
-Fixed some wayward displacements.
-The "mosh pit" below C have been given some steps, so that getting out is just a simple jump, instead of a painfully inconsistent clamber.
-RED's spawn waves have been increased by ~2 seconds for point C.
-ACTUALLY FIXED the spawn failsafe - RED now gets teleported to their new spawn is A is captured while in their old one.
-Removed Herobrine.
A3's goal is to address a few nasty sightlines, pickups, and most grandiose, point C.

MAJOR CHANGES:

OVERHAULED POINT C


Point C was, although visually interesting, frustrating to navigate and fight in. The hanging logs were unnoticable and did not provide any interesting gameplay, the height variation was too high, and one route was so incredibly powerful that BLU would be morons to not use it every time. new take is an attempt to address every issue given in feedback, and cull one of the worst sniper sightlines in the map.

sapwooda3_c2.jpg


Now, an open point is guarded by a sheltered area defenders can control. A pool below harboring a medium healthkit serves as an emergency fallback for defenders at the first lobby, or attackers during a push at the cost of giving up some elevation. From the above images' perspective, a tight hallway to the left branching from the sunroom serves as a sneaky option for both attackers and defenders, and holds the only large ammopack in the area. Engineers can jump down from the defender's balcony above it, but risk the walk back above the point.


sapwooda3_c1.jpg


The attacker's lobby has gained a wall separating it from the main area, with the logging rail kept intact via industrial doors that are angled to split sightlines between the catwalk and the defender's balcony. A set of extremely convenient crates somewhat splits the sightline beyond the door, and there is extra shelter beneath the catwalk. The waterlogged basement and low wall splitting B from A has been removed, forcing attackers into two options for a main attack: High ground but tight, or low ground and open.

sapwooda3_c3.jpg


Speaking of highground, the route for attackers has been simplified to be clearer in its purpose of a good spot for poking at sentry nests or making it behind a defensive line. However, it comes with a new cost of being a one-way drop. Defenders no longer has direct access to the balcony via a staircase, making their choices out of spawn easier to make, but the route becoming a constant worry. My hope is that attackers will utilize this route to apply pressure to a defensive hold, but not solely rely on it for a push.

RED's spawn has also been streamlined. I will very likely give the same treatment to BLU's first spawn next version.
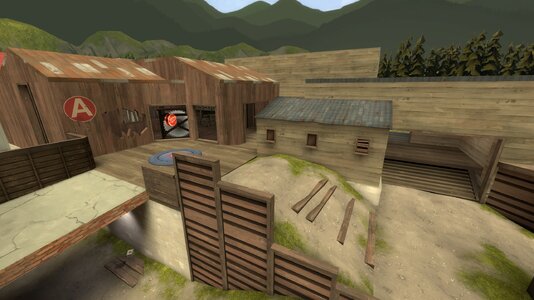
POINT A TWEAKS

Point A is still in flux, and I'm unsure about what changes need to be needed to the area. One major issue however was the dirty sightline from the hallway RED enters the area, all the way to the courtyard BLU approaches from. This has been cut off with an adjustment of the opening to the point itself, with some bonus detailing because I got bored.

sapwooda3_a.jpg


Overall, there is more ammo throughout the area, including a large one to the right from the perspective if you are defending - the goal is to provide a risky move for engineers, at the cost of exposing himself to a wall for splash damage, a sniper, or any flankers coming from the healthpack ledge. It is also entirely possible for BLU to inch their way up towards it through the main route.

MINOR CHANGES:
-Fixed misaligned displacements
-Backend brush cleanup
-More ammopacks, everywhere, because I guess y'all don't know what a diet is.
-Ammopack in the sunroom next to C has been upgraded to a large.
-Added patches underneath some pickups that I glossed over.
-Extended the shack outside B to force more commitment from BLU, and patch a sightline.
-Clipping fixes.

I feel strong about B right now, but am willing to make adjustments.
This is a minor update fixing a major clipping oversight, and some extra QOL clipping while I was at it.
A2 is an attempt to address the major issue I was made aware of during A1's test. Also featuring small improvements/QOL.

MAJOR CHANGE:
The area between Point A and B has been given a complete overhaul, and I sheared a few hundred Hu's off the walk in total. The old design was too large, empty, boring, and directionless. This new design is an attempt to shorten the distance between the two points, while encouraging more interesting opportunities for close range and flanking classes.
sapwooda2_atob1.jpg
sapwooda2_atob2.jpg

MINOR CHANGES:
-General lighting improvements/tweaks. Brightened some areas.
-Added patches beneath pickups.
-More signs indicating areas. Unsure of temp or not.
-Made geometry outside BLU spawn easier to traverse.
-Simplified windowsil at Point B.
-More ammo available overall around Point A - B. Notable examples are a new ammopack under A's bridge to encourage usage by spies, and another underneath the new A -> B route.